GF Signet 8900 Multi-Parameter Controller User Manual
Page 21
21
Signet 8900 Multi-Parameter
Menu Directory:
System Setup
Returning to
ViewMode...
Channel 1 Type:
None >
Channel 1 Type:
None
Channel 1 Type:
Level
Channel 1 Type:
Conductivity
Channel 1 Type:
Flow
Flow
F1 34.01 GPM
Returning to
Menu Directory..
Activated Relays
_ _ _ _ _ _ _ _
Enter Password:
0000
Channel Data
Will be RESET!
Check Relay And
Output Sources
Are You Sure?
No Yes
Are You Sure?
Saving
ENTER
ENTER
ENTER
ENTER
ENTER
Channel 1 Type:
Flow >
Channel 2 Type:
None >
ENTER
2s
OR
Menu Directory:
System Setup
Enter Password
- - - -
1.
6.
5.
4.
3.
2.
7.
8.
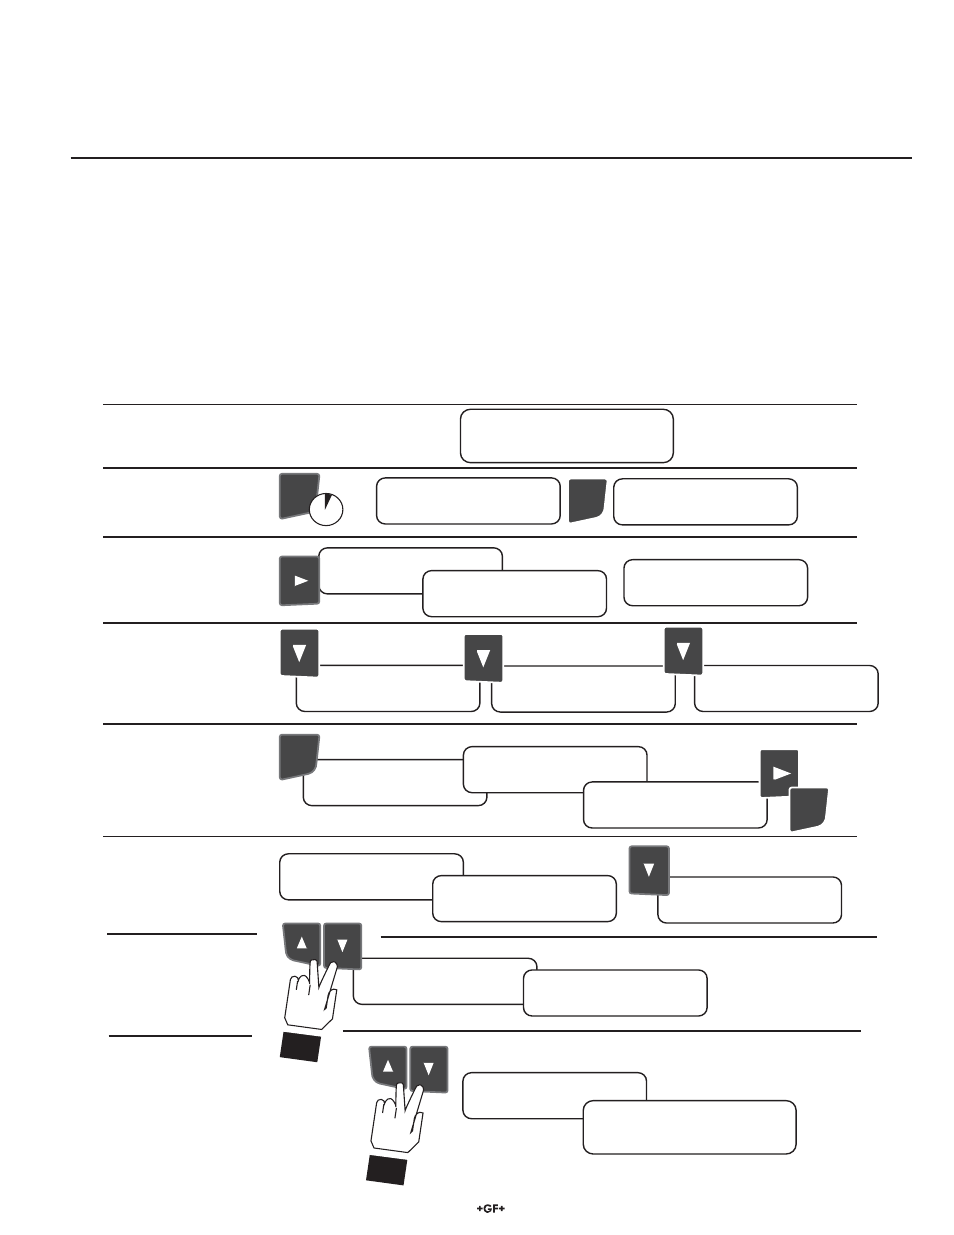
8. System Setup Menu
All of the basic system setup functions are automated in the 8900, with the exception of Channel Type assignments. These must be
done by the user. After Channel types are assigned, the 8900 will automatically complete all of the remaining tasks in the System
Setup menu. This includes assigning each sensor connected to the 8900 to a matching channel, and confi guring one display for each
channel. After installation and wiring is completed, follow the steps below.
NOTE: Automatic Sensor Recognition occurs each time the 8900 is powered on. See the following page for additional information.
8.1 System Setup: Channel Type
Example: Set Channel 1 to operate as a Flow Channel:
1. Start from View Mode (normal operation). In a new unit, the View display depends on the type of I/O module.
2. Hold the ENTER key for 2 seconds. When the display shows "Menu Directory-System Setup", release, then press ENTER again.
3. Press the RIGHT key, then enter the password. (Factory standard setting is UP-UP-UP-DOWN, Enhanced is 0-0-0-0)
4. The channel type will be fl ashing "None". Press the DOWN key three times to scroll to "Flow".
5. Press the ENTER key to select Flow. The display will show two warning messages, then ask "Are You Sure?"
Press the RIGHT key to change the fl ashing response to "Yes", then press the ENTER key to fi nalize the change.
6. The display will show "Saving" for a few seconds, then return to the root menu.
Press the DOWN key to scroll to the next channel type setting, then repeat steps 4 and 5.
7. If all settings in this menu are complete, press the UP and DOWN keys together again to return to the Menu Directory.
8. Press the UP and DOWN keys together once more to return to the View mode and normal operation.
The display will now show the information from the sensor assigned to Channel 1.