Red Lion TSC User Manual
Page 85
CALIBRATION
When calibration is required (generally every two years),
this procedure should only be performed by qualified
technicians using appropriate equipment. Equipment source
accuracies of 0.01% or better are required.
The procedure consists of four parts: applying accurate
mV signals, setting the thermocouple cold junction
temperature, applying precision resistances and measuring
accurate mA currents. Allow a 30 minute warm-up period
before starting this procedure. Do not use thermocouple
wire at any stage of calibration.
This procedure may be aborted by disconnecting power
to the controller before exiting the configuration mode. The
existing calibration settings remain in affect.
Note: After completing any of the calibration sequences, the
controller will default the input sensor type to
thermocouple type “j” (tc-j). Be sure to set input sensor
for proper type.
-83-
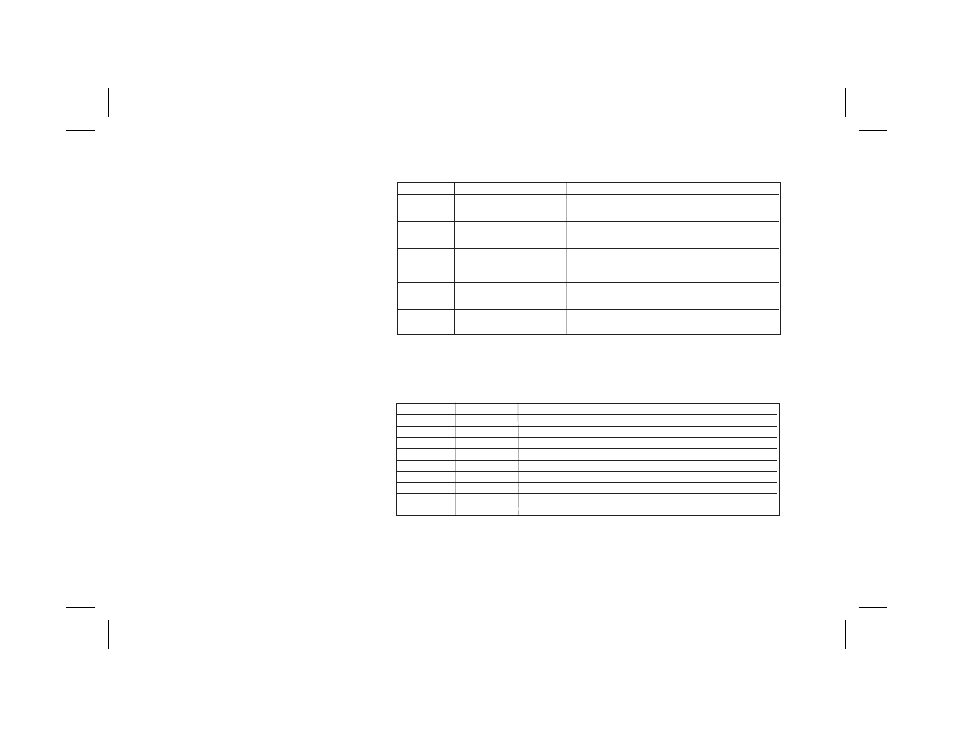
Millivolt Calibration (CAL)
Connect precision millivolt source with an accuracy of 0.01% to terminals (+) #9 and (-) #10.
Display
Parameter
Description/Comments
Code
Enter factory
service
48
Calibrate instrument
function code
CAL
Millivolt
yes/no
Calibration required for both RTD and TC input. If this
calibration
procedure is performed the cold junction temp. and RTD
ohms calibration procedures in turn must be completed.
CJC
Thermocouple
yes/no
Not required if only using RTD input. This procedure can
cold junction
only be performed AFTER an accurate mV calibration.
temperature
calibration
rtd
RTD
yes/no
Not required if only using TC input. This procedure can
resistance
only be performed AFTER an accurate mV calibration.
calibration
ANCL
analog output
yes/no
This parameter does not appear if analog output option is
not installed.
Display
Parameter
Description/Comments
StP1
0.0 mV step
Apply 0.0 mV, wait 10 seconds, press PAR
StP2
9.0 mV step
Apply 9.0 mV, wait 10 seconds, press PAR
StP3
18.0 mV step
Apply 18.0 mV, wait 10 seconds, press PAR
StP4
27.0 mV step
Apply 27.0 mV, wait 10 seconds, press PAR
StP5
36.0 mV step
Apply 36.0 mV, wait 10 seconds, press PAR
StP6
45.0 mV step
Apply 45.0 mV, wait 10 seconds, press PAR
StP7
54.0 mV step
Apply 54.0 mV, wait 10 seconds, press PAR
Stp-
Pause
The controller imposes a 5 second delay. (Keep the 54mV signal applied)
The unit advances to CJC - NO.
Configure Step 9 - Factory Service Operations (9-FS)