Grass Valley Profile XP Service Manual User Manual
Page 107
Replacing parts in a system with the redundancy option
23 July 2004
Profile XP Service Manual
107
10.Press any key, then exit the program.
11. Power-down the Profile XP system and remove the front panel, fan unit, top cover,
and air chamber from the Profile XP chassis to allow access to the cable connectors
on the motherboard and the back of the drives installed in the bays.
12. Unplug the IDE ribbon cable and power cable from the rear of the failed drive.
13. Remove the bay cover and slide out the failed drive.
NOTE: The replacement drive must be of equal or greater storage capacity than the
remaining working drive. Also, verify the replacement drive jumper settings are set
for Master mode.
14. Slide in the replacement drive and connect the IDE ribbon and power cables.
Replace the bay cover.
15. Replace all parts removed in step 10.
16. Power-up the Profile XP system. The Profile XP system boots from the bootable
DupliDisk Utilities diskette. All DupliDisk controller LEDs flash orange for a few
moments.
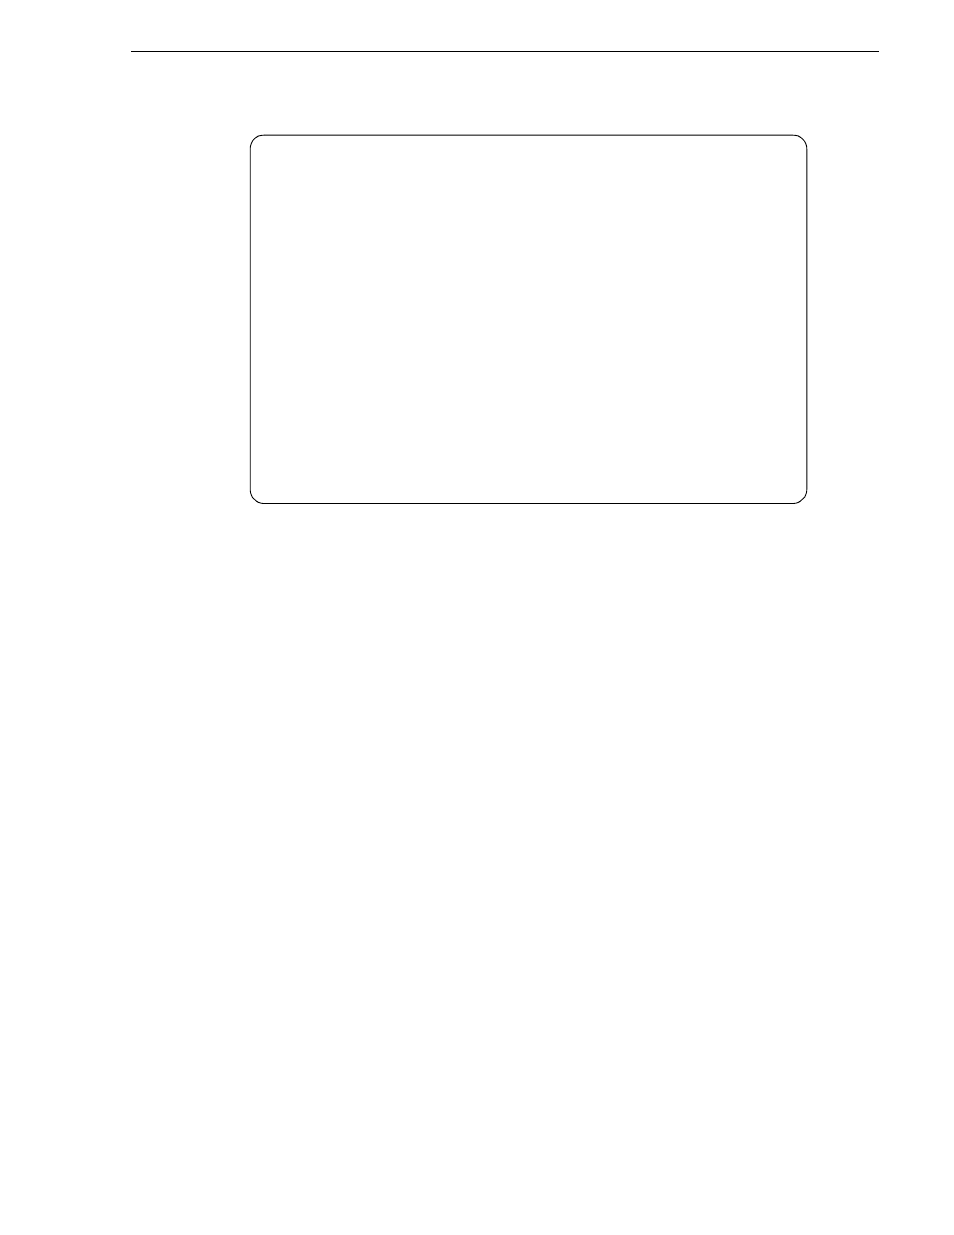
17. From the on-screen menu, choose menu item 2, Dupli.exe for DupliDisk2 and
DupliDisk3. The Initialization Status Screen appears displaying the replacement
drive status as “MARKED AS BAD” and the other drive as “Initialized”. Master
drives are NOT in mirror mode. The LED for the replacement drive flashes red, and
the Master LED is red.
18. Press any key to continue.
DupliDisk II Adapter Setup Utility (Bay)
Initialization Status
Primary Channel
Master: not present
Slave: not present
Mirror Channel
Master: Fujitsu MPE3102AT hd(16) cyl(19856) spt(0) cap(63Mb)
Slave: not present
Initialization Information
Mirror Master: Fujitsu MPE3102AT......Initialized
Checksum-9337 Bios Rev-1.25.1.05 Serial Number 000000000000
Press any key. . .
Master Drives are NOT in MIRROR mode.
Primary Master: ..................... MARKED AS BAD