Editing controlnet node information, Chapter 3 – Rockwell Automation 1785-L20C_L40C, D17856.5.14 ControlNet PLC-5 Programmable Controllers User Manual User Manual
Page 48
Chapter 3
Configuring Your ControlNet System
3-4
Follow the steps on the left to go to the ControlNet Node Information
(Edit) screen.
Important: Only one user on a network can enter a processor’s
ControlNet Node Information (Edit) screen at one time.
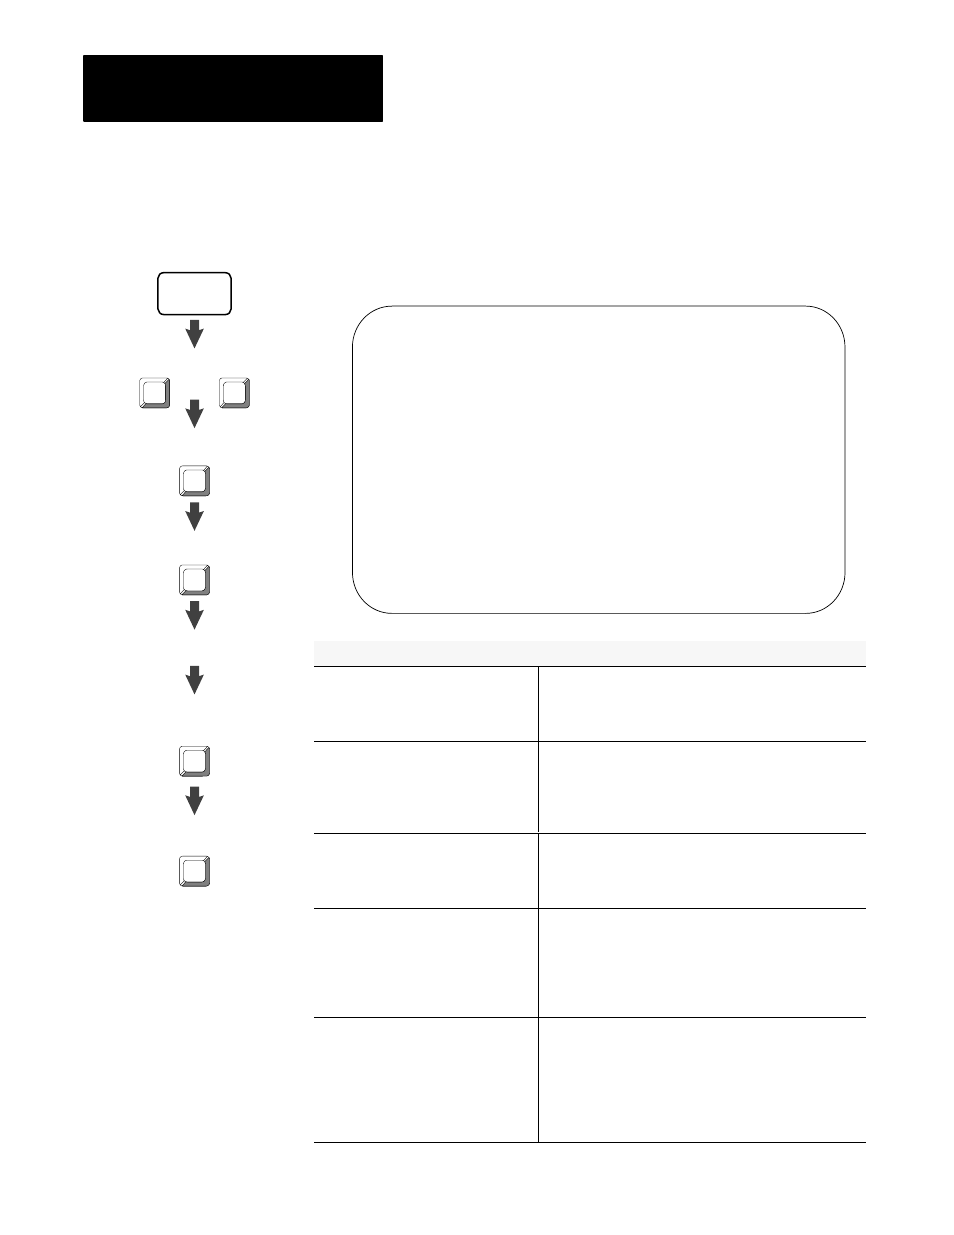
ControlNet - Node Information EDIT
Channel 2 Configuration NODE 1
Diagnostics File: N12 Network Update Time(ms): 5
Coax Repeaters in Series: 1 Scheduled Bandwidth Usage: 64%
Fiber Repeater Pairs: 0 Media Redundancy Usage: A Only
Maximum Scheduled Node: 10
Node Node Type Series/Revision Status
1 PLC-5/40C C/H ACTIVE
2 1771-ACN A/A ACTIVE
3 PLC-5/20C C/H ACTIVE
4 1794-ACN A/A ACTIVE
Press a function key, page up or page down, or enter a value.
>
Rem Prog Forces:None 5/40C File CN
Accept Map Move Copy Auto Delete Insert Delete Select
Edits Edit Entry Entry Network List to List Item Option
F1 F2 F3 F4 F5 F6 F7 F8 F10
If you want to:
Do this:
specify and create a diagnostics file
1. Move the cursor to the
Diagnostics
File
field
2. Type an integer file number between N3 and N999
3. Press
[Enter]
specify the number of coax repeaters in
series that you are using in your
ControlNet network
1. Move the cursor to the
Coax
Repeaters
in
Series
field
2. Type a number from 0 through 5
3. Press
[Enter]
specify the number of pairs of fiberĆ
optic repeaters that you are using in
your ControlNet network
1. Move the cursor to the
Fiber
Repeater
Pairs
field
2. Type 0, 1, or 2
3. Press
[Enter]
enter the length of fiber cable between
repeaters for any fiberĆoptic repeater
pairs that you specify
Important: The field(s) for fiberĆcable
length only appear if the number of
fiberĆoptic repeater pairs is not zero.
1. Move the cursor to the appropriate
Pair
#x
length
(meters)
field
2. Type a number between 100 and 25500 (the software
rounds up to the nearest 100)
3. Press
[Enter]
specify the NUTĊthe repetitive time
interval during which data can be sent
over the ControlNet network
Important: All nodes do not need to
transmit each NUI; however, the NUT
defines the minimum time during which a
node can transfer scheduled data.
1. Move the cursor to the
Network
Update
Time
(ms)
field
2. Type a number between 2 and 100
3. Press
[Enter]
Editing ControlNet
Node Information
Channel
Overview
Channel
Configuration
6200
Main Menu
General
Utility
F3
Online
Program
Offline
Program
F1
F7
or
F4
F5
(Monitor)
Node
Edit
F4
Move cursor to
Channel 2: CONTROLNET