18 quick coupler, 3 quick coupler removal (4014ps & 4017ps), 4 quick coupler installation (4014ps & 4017ps) – JLG 4017PS Service Manual User Manual
Page 77: Quick coupler, Quick coupler removal (4014ps & 4017ps), Quick coupler installation (4014ps & 4017ps)
3-39
3706PS, 3707PS, 4014PS, 4017PS, 33.7, 37.6, 37.7
Boom
3.18
QUICK COUPLER
Note: The following procedures covers all styles of
quick couplers.
3.18.1
Quick Coupler Removal
(3706PS, 3707PS, 33.7, 37.6 & 37.7)
1. Lower attachment to ground, tilt forward to access
coupler pin, set park brake and turn off engine.
2. If equipped with a hydraulic quick coupler device,
refer to Operation & Safety Manual.
3. Remove the lock bolt (1) holding the coupler pin to
the tilt cylinder lever assembly. Remove the coupler
pin.
4. Support the quick coupler assembly. Remove the
pivot pin (2) from the quick coupler assembly.
5. Inspect the above pin for nicks or surface corrosion.
Use fine emery cloth to fix minor nicks or corrosion.
If damaged or if it cannot be repaired the pin must be
replaced.
6. Inspect the coupler and lever assembly pins for
nicks or surface corrosion. Use fine emery cloth to
fix minor nicks or corrosion. If damaged or if it cannot
be repaired the pin must be replaced.
3.18.2
Quick Coupler Installation
(3706PS, 3707PS, 33.7, 37.6 & 37.7)
1. Assemble the quick coupler to the boom head. Line
up the quick coupler between the mounts on the
boom head. The quick coupler should be centered in
the boom head.
2. Coat the quick coupler pivot pin with Anti-Seize
Lube. Insert the quick coupler pivot pin (2) through
the boom head and the lever assembly.
3. Align the quick coupler with the lever assembly and
insert the coupler pin (1) and replace the lock bolt
assembly. Apply Loctite
®
242
TM
and torque to
90 Nm (66 lb-ft).
4. If equipped, reconnect the hydraulic quick coupler
device hoses to the quick disconnect fittings on the
left side of the boom head.
3.18.3
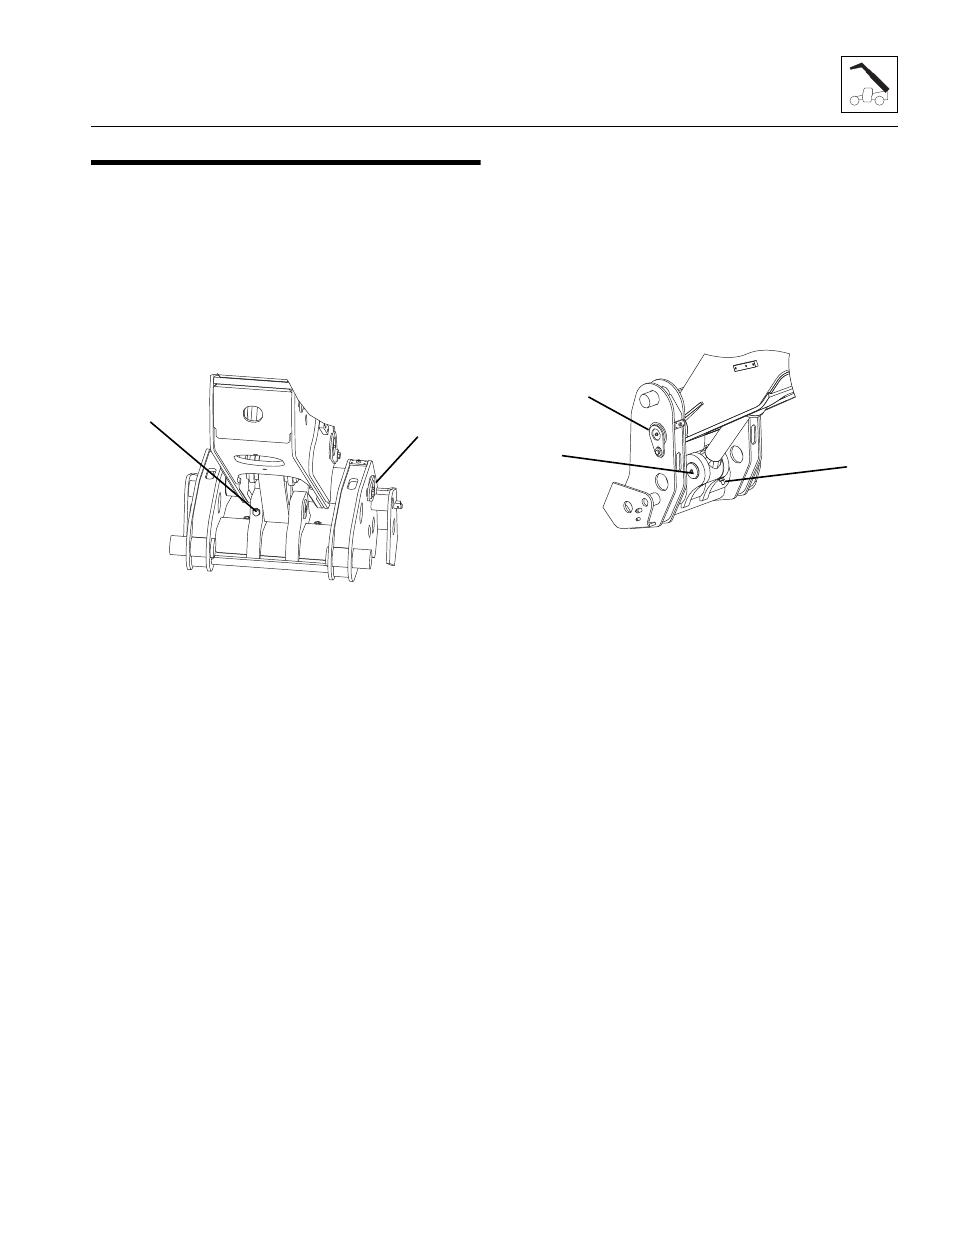
Quick Coupler Removal
(4014PS & 4017PS)
1. Lower attachment to ground, tilt forward to access
coupler pin, set park brake and turn off engine.
2. If equipped with a hydraulic quick coupler device,
refer to Operation & Safety Manual.
3. Remove the lock bolt (3) holding the rod end tilt
cylinder pin to the quick coupler assembly. Remove
the rod end pin (4).
4. Support the quick coupler assembly. Remove the pin
from the quick coupler assembly (5).
5. Inspect the above pins for nicks or surface corrosion.
Use fine emery cloth to fix minor nicks or corrosion.
If damaged or if it cannot be repaired the pin must be
replaced.
3.18.4
Quick Coupler Installation
(4014PS & 4017PS)
1. Assemble the quick coupler to the boom head. Line
up the quick coupler between the mounts on the
boom head. The quick coupler should be centered in
the boom head.
2. Coat the quick coupler pivot pin with Anti-Seize
Lube. Insert the quick coupler pivot pin (5) through
the quick coupler and boom head.
3. Align the quick coupler with the rod end tilt cylinder
and insert the coupler pin (4) and replace the lock
bolt assembly (3). Apply Loctite
®
242
TM
and torque to
90 Nm (66 lb-ft).
4. If equipped, reconnect the hydraulic attachment
hoses to the quick disconnect fittings on the left side
of the boom head.
MAM0750
1
2
VIIEW LOOKING DOWN
MAM1340
4
3
5