2 accumulators, 3 pre-charging accumulator, Accumulators – JLG 4017PS Service Manual User Manual
Page 157: Pre-charging accumulator, Warning, Notice
8-25
3706PS, 3707PS, 4014PS, 4017PS, 33.7, 37.6, 37.7
Hydraulic System
8.12.2
Accumulators
This section covers the charging of the accumulator
system.
The accumulator is located and mounted under the lift/
lower cylinder. The internal parts of the accumulator are
not serviceable. If the internal piston is leaking, or the
seals on the top or bottom cap are leaking, the
accumulator requires replacement.
The accumulator pre-charge pressure will vary
depending on the ambient temperature that the
accumulator was pre-charged at and the actual operating
temperature of the accumulator.
8.12.3
Pre-Charging Accumulator
Note: Replacement accumulators are not pre-charged
when shipped.
Pre-charged the accumulator with nitrogen gas only.
Nitrogen gas is free of water vapor and oxygen which
makes it harmless to internal parts and will not react if
mixed with oil under pressure.
Never charge an accumulator to a pressure more than
specified. The proper pressure for the accumulator is
35 bar (507 psi).
Note: Make sure the nitrogen bottle, as well as the
charging and gauge assembly used is compatible with
the schrader valve assembly on the accumulator. The
nitrogen bottle and all components must be rated for a
pressure at least as high as the nitrogen source. It is
strongly recommended that the nitrogen bottle has a
high pressure regulator.
You will require an accumulator fill kit to properly charge
the accumulators. Refer to the parts manual
or contact
the local JLG dealer.
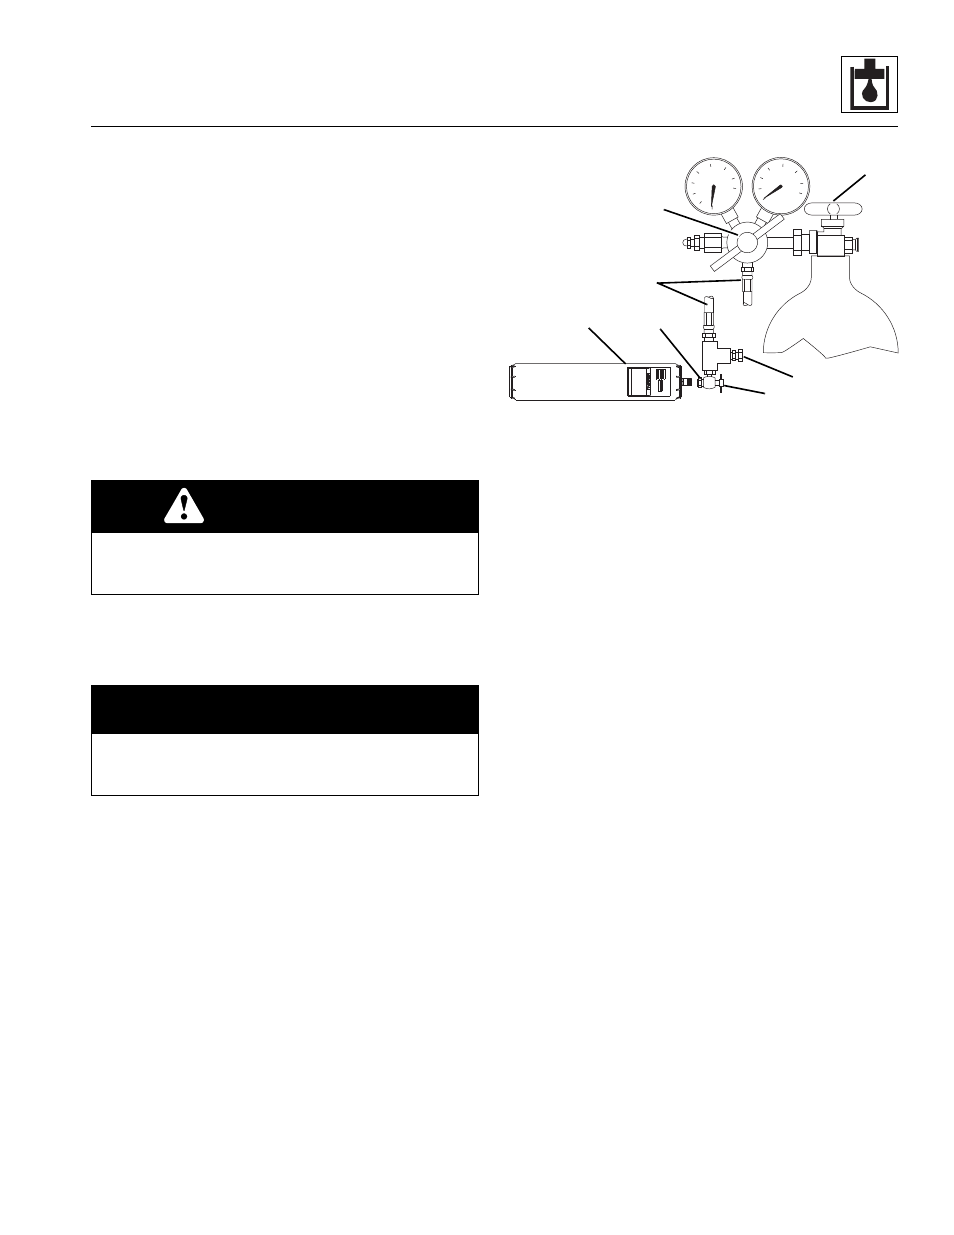
Use the following steps to properly pre-charge each
accumulator:
1. Thoroughly clean the top of each accumulator (4).
2. Make sure the nitrogen supply is shut off.
3. Attach the accumulator fill kit (5) to the nitrogen
bottle.
4. Remove the protective cap from the gas valve on the
accumulator.
5. Back the “T” handle (6) on the accumulator fill kit all
the way out (counter-clockwise). Attach the schrader
adaptor (7) to the gas valve on the accumulator.
Tighten securely.
6. Turn the gas valve/bleed valve (8) on the
accumulator fill kit all the way in.
7. Turn the “T” handle (6) all the way in to open the
valve core on the accumulator.
8. Open the valve (9) on the nitrogen bottle.
9. Slowly adjust the regulator (10) on the nitrogen
bottle to read 35 bar (507 psi).
10. Close the main valve (9) on the nitrogen bottle.
11. Back the “T” handle (6) on the accumulator fill kit all
the way out (counter-clockwise).
12. Let the pre-charge on the accumulator set for 10-15
minutes. This will allow the gas temperature to
stabilize. If the desired pre-charged range is
exceeded, turn the “T” handle (6) all the way in. With
the main valve (9) closed on the nitrogen bottle, turn
the gas valve/bleeder valve (8) out to bleed pressure
off the accumulator. Turn the valve all the way in and
check the pressure reading on the regulator gauge.
13. When the correct pressure is reached, back the “T”
handle (6) on the accumulator fill kit all the way out
(counter-clockwise). Bleed the pressure from the
hose by turning the gas valve/bleed valve out to
relieve the pressure.
WARNING
NEVER fill an accumulator with oxygen! An explosion
could result if oil and oxygen are mixed under pressure.
Only fill accumulator with dry nitrogen.
NOTICE
Never fill an accumulator with air. Air contains moisture
which can cause corrosion. This corrosion may damage
seals and ruin the accumulator.
MAM1450
6
7
10
8
5
4
9