HP XP Array Manager Software User Manual
Page 44
•
LDKC list:
indicates LDKC numbers. To select an LDKC as a monitoring target, click the LDKC number. All
the CUs that belong to that LDKC are displayed.
•
CU table:
The CU table consists of cells representing CUs. Each row consists of 16 cells (CUs). A set of
16 rows represents CUs for one LDKC. The table header row displays the last digit of each CU
number in the form of +n (n is an integer between 0 and 9, or a letter from A to F).
To select a CU, click a cell to invert its color. To restore the cell to its original color, click the
inverted cell. To select all the (16) CUs of the same number in the second last digits, click the
CU number (00 to F0). By dragging the cursor over multiple cells, you can select all the cells
from the source to the destination.
For your information, one cell corresponds to one CU. The relation of the display of a cell to the
CU status is shown below:
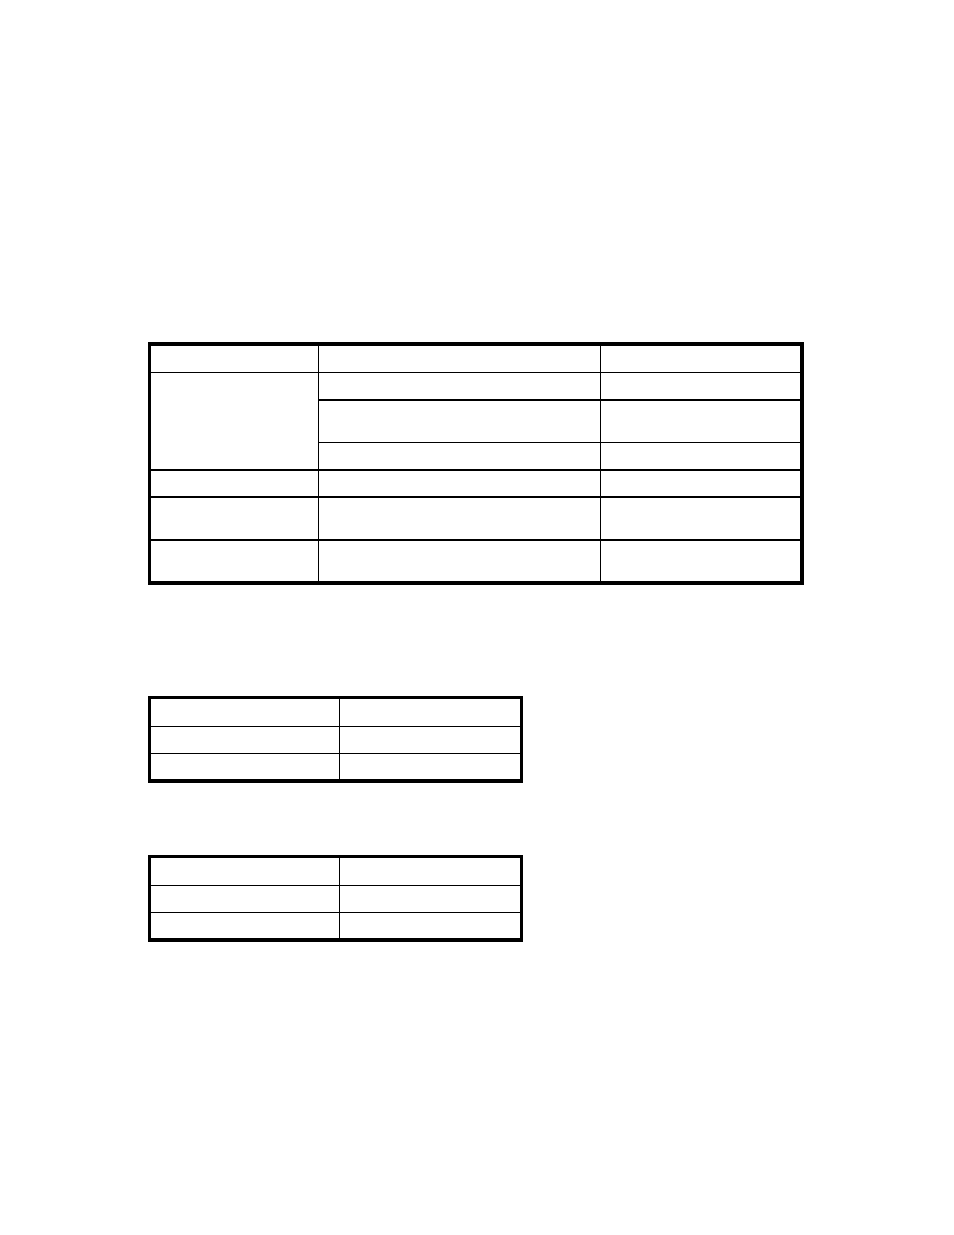
Table 7 The Relationship between the Display of a Cell and the CU Status in the
CU Table
CU to be used or not
CU to be monitoring target or not
Letter displayed in the cell
CU which is already monitoring target
S: in black
CU to be used
CU which is going to release from
monitoring target
R: in blue italics
CU to be removed from the monitoring target None
CU not to be used
CU that is already monitoring target
N: in black
CU which is going to release from
monitoring target
-: Hyphen in black bold
CU to be removed from the monitoring
targets
-: Hyphen in black
•
Monitoring Target CUs:
indicates the number of existing and newly added CUs to be monitored.
•
The Select button adds the CU selected in the CU table to the CUs to be monitored.
Table 8 The Characters Indicated in a Cell When the Select Button is Clicked
Before Click
After Click
-: Hyphen in black
N: in black italics
R: in blue italics
S: in black
•
The Release button remove the CU from monitoring targets.
Table 9 The Characters Indicated in a Cell When Release Button is Clicked
Before Click
After Click
N: in black
-: Hyphen in black bold
S: in black
R: slanted in blue italics
•
The Apply button applies settings in the Monitoring Options window to the storage system.
•
The Reset button resets the settings in the Monitoring Options window.
Performance Monitor has two kinds of periods (ranges) for collecting and storing statistics: short range
and long range.
The storing period of statistics in short range is determined by the settings of Gathering Interval option.
Performance Monitor saves the statistics obtained up to 1440 times in SVP. Therefore, you can estimate
the storing period of statistics with gathering interval multiplied by 1440. For example, if you specify
44
Using the Performance Monitor GUI