Printing format – Omega RD200 User Manual
Page 99
-95-
14. PRINTING FORMAT
14.2
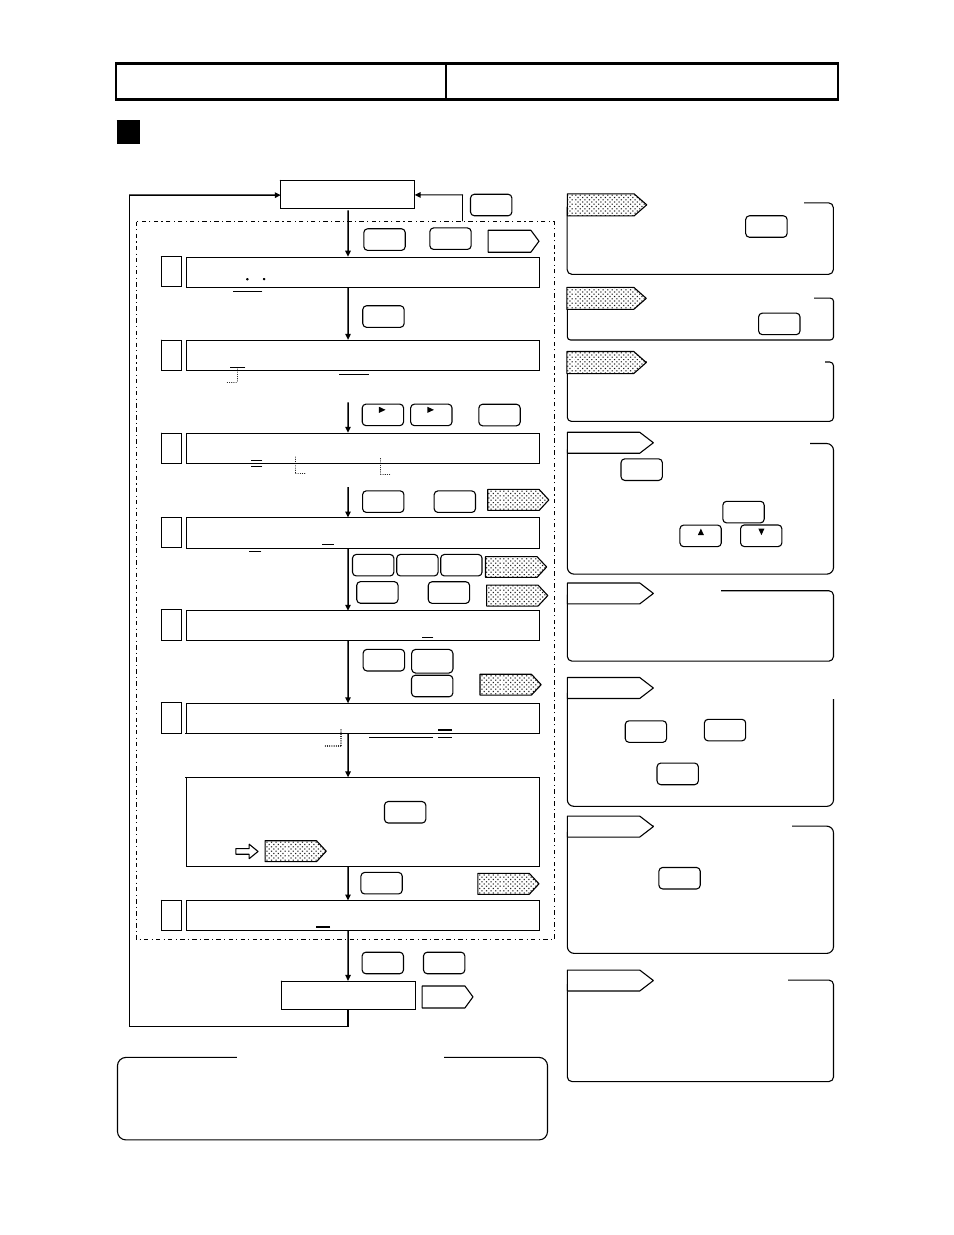
Programming Compressed/Expanded Printing
3
Programming Flow Chart
Operation screen
[Checking printing format]
+
[To be ready for programming]
[Selecting
compressed/expanded]
→
[Programming channel]
→
[Programming printing position
for each break point]
[
Programming scale of printing
position0%]
Printing position (%) changes. Program the
corresponding scale and press for every
programming. Continue this programming up to 100%
scale.
[Returning to the step (5)]
+
Stored
This programming is necessary for each channel. For
programming other channels, repeat the procedure from the
“Operation screen”.
Press any key other than
and program again. When it is normal,
the next screen appears.
Leave it as spaces and press .
For storing parameters into memory,
return the screen to Step (5).
Press to display parameters.
The parameters are displayed
sequentially each time is
pressed. Press or to
change channels.
Store the parameters into memory.
(Programming change mark is
printed.)
For canceling the stored parameters,
press and
simultaneously at Steps (4) to (7), and
then press to store the
cancellation.
Point the cursor to () at Step (2)
and press . To return to the
compressed/expanded function,
execute the procedure of Steps (1) to
(3) and store it.
Scales at each printing position are
printed like as –100, 600, 800 or1200.
• “+” mark is printed at the printing
position for break points.
* Fill unused digits with spaces.
Cursor
Channel
Ref1
Remarks 1
(1)
(2)
(3)
(4)
(5)
(6)
(7)
(8)
No.1 break
point
Scale
*
Printing position
DISP
SHIFT
DISP
SET
END
ENTRY
2
TAG
ENTRY
Channel
2
TAG
0
CLEAR
8
ALARM
0
CLEAR
ENTRY
→
0
CLEAR
SPACE
COPY(=)
×4
→
ENTRY
ENTRY
ENTRY
SHIFT
SET
END
Remedial measure to
error display
Remarks 1
No programming of No. 2
break point necessary
Remarks 2
Return to the screen of
Step (5)
Remarks 3
ENTRY
ENTRY
%
/
Checking parameters
Reference 1
Storing
Reference 2
Cancellation of programming
Reference 3
ENTRY
SHIFT
0
CLEAR
Returning to
standard printing
Reference 4
Scale printing at
fixed time printing
Reference 5
Other channel programming
Compressed
/Expanded
Standard
No.2 break point
ENTRY
Remarks 2
Remarks 1
Remarks 1
Remarks 1
Remarks 3
Ref. 2
ENTRY
SHIFT