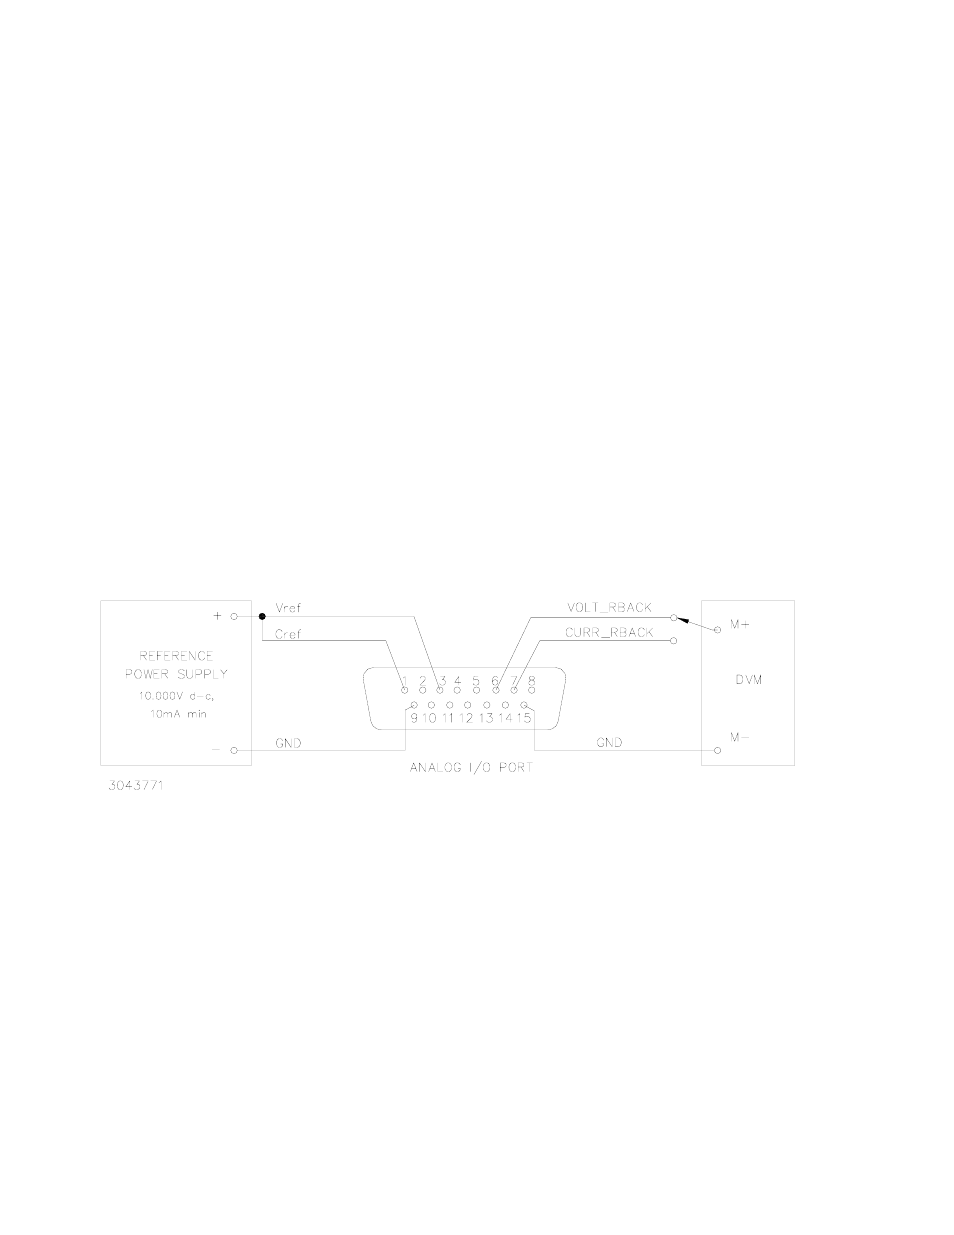
Figure 4-1. analog port wiring for calibration, Analog port wiring for calibration -2, R. 4.3) – KEPCO KLP Series User Manual, Rev 4 User Manual
Page 82: Ar. 4.3), 3). not, Ar. 4.3

4-2
KLP 091313
4.3
CALIBRATION USING FRONT PANEL CONTROLS IN LOCAL MODE
For voltage calibration all loads must be disconnected and the sense terminals connected to the
corresponding output terminals. The digital voltmeter will be connected to the output of the
power supply. For current calibration after disconnecting all loads an appropriate shunt resistor
will be connected across the output terminals and the digital voltmeter will be connected to the
sense terminals of the shunt resistor.
1. Turn off power supply and disconnect load from output terminals at the rear of the unit.
2. Verify that power supply is configured for local error sensing (PAR. 2.7.5.1).
3. For voltage calibration connect DVM to (M+, S+) and (M-, S-) of terminal block at the rear of
power supply.
4. For current calibration connect an appropriate shunt resistor (see PAR 4.2) across the output
terminals and connect DVM to shunt resistor terminals.
5. Configure the mating I/O connector (provided with unit) to access the input programming sig-
nals (Vref and Cref) and output readback signals (VOLT_RBACK and CURR_RBACK) as
shown in Figure 4-1. Note that the wires to Vref and Cref should be tightly twisted with the
corresponding GND wire and kept as short as possible. Then connect the I/O mating con-
nector to the Analog I/O port of the power supply.
FIGURE 4-1. ANALOG PORT WIRING FOR CALIBRATION
6. Turn on power supply, exit SET mode by tapping either VOLTAGE or CURRENT control and
using a thin tool (e.g., a paper clip), press the FUNCTION switch once until the status display
reads VIRT, then rotate either the VOLTAGE or CURRENT control in either direction until
status display reads UTIL.
7. Tap the DC OUTPUT switch once, then rotate either the VOLTAGE or CURRENT control in
either direction until status display reads CAL. The last calibration date is displayed (see
PAR. 4.3.4 for details) and the DC AMPERES display reads 0000 with the left-most digit
blinking.
8. Tap DC OUTPUT switch to enter calibration mode. The status display shows PASS. Enter the
password (see PAR. 3.2.8) and tap DC OUTPUT switch to accept the number.
