Main control window, Toolbar buttons – Measurement Computing Personal Daq rev.6.0 User Manual
Page 45
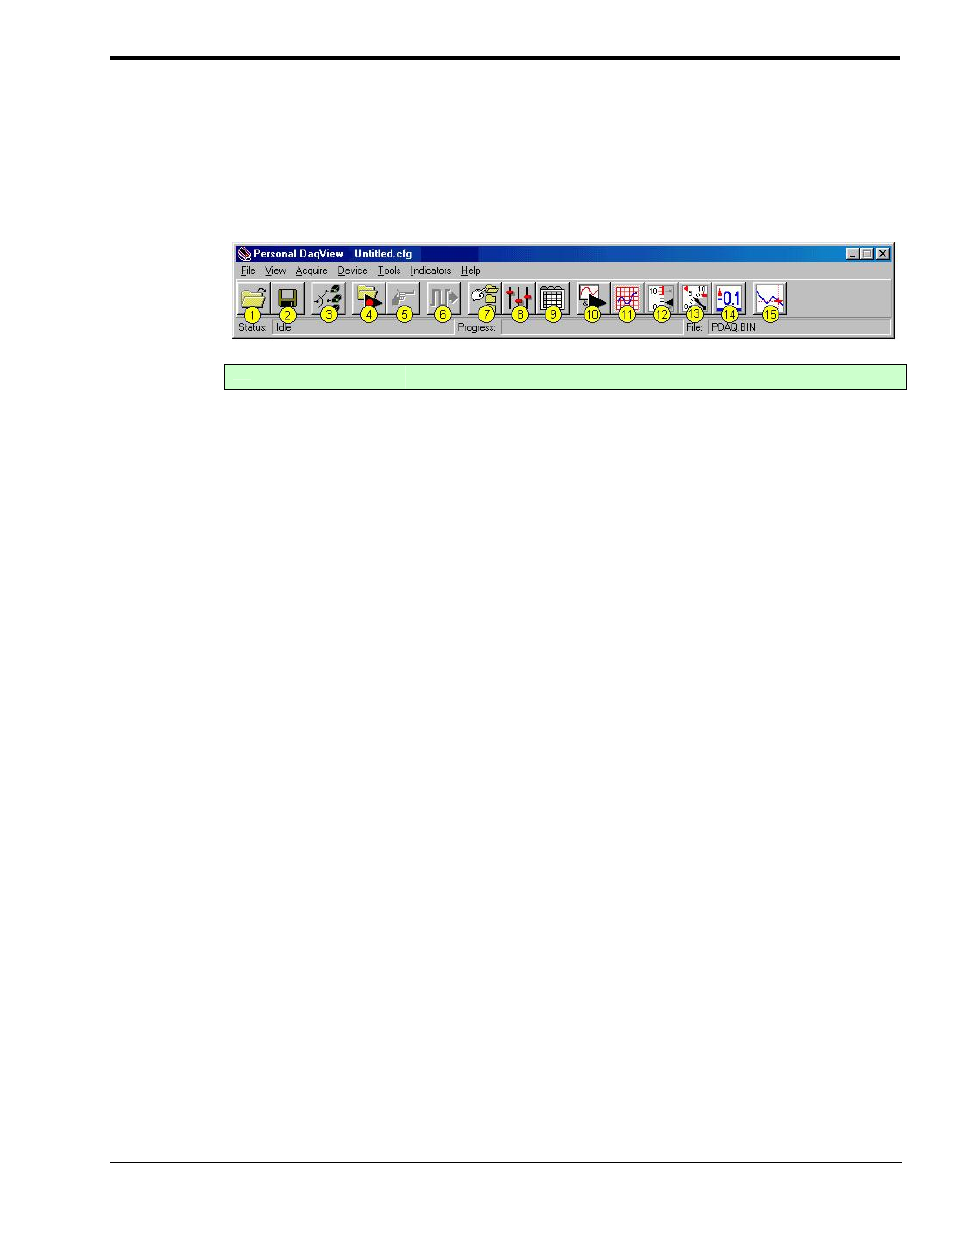
Main Control Window
When you first open Personal DaqView the Main Control and Channel Configuration Windows appear.
Note that this section pertains to the Main Control Window only; discussion of the Channel Configuration
Window begins on page 4-6.
The Main Control Window contains several pull-down menus, a toolbar composed of icon buttons, and
information boxes for status, progress [number of scans], and file identification. Functions that can be
obtained through the toolbar can also be obtained through the pull-down menus.
Toolbar Buttons
Main Control Window
Button
Function
1
Open Configuration File
Opens a selected configuration file.
2
Save Configuration File
Saves the current configuration file to disk.
3
Select Active Device
Provides a list of available devices, their serial number, and device type. A
checkmark appears next to the selected device. Use the mouse to select (or
deselect) a device. “Device” in this context can include an expansion module, for
example: a Personal Daq/55 with an attached PDQ1 would be one device.
4
Arm Trigger for Disk
Recording
Arms the trigger and stores acquisition data to a designated disk file. If Auto Rearm is
selected, clicking this button puts Auto rearm in effect. This button, is also used to
disarm the data acquisition.
5
Manual Trigger
Used to trigger the device when the mode of trigger is set to “Manual.” Note that the
Manual Trigger button can not be depressed until after the trigger is armed, for
example, by first pressing button 4.
6
Update Digital Outputs
Updates digital outputs for all digital channels that are selected to “Output State.” See
Digital Input/Output Spreadsheet, page 4-14.
Digital I/O does not apply to Personal Daq/54.
7 Configure
Data
Destination
Accesses the Configure Data Destination window (page 4-16). Note that this window
provides a means of selecting sequential destinations through an auto rearm feature.
8
Configure Acquisition
Accesses the Configure Acquisition window (page 4-15).
9 Configure
Channel
Settings
Brings up the Channel Configuration window. From this window you can configure
channels for Analog Input (page 4-8), Frequency/Pulse Input (page 4-12), and Digital
Input/Output channels (page 4-14), depending on which tab is selected.
10
Update All Indicators
Starts all on-screen indicators with a display of up-to-date data. Has no affect on the
recording of data to disk. Auto Rearm, even if selected, will not occur when using this
control. This button is also used to pause all indicators.
11
Display Scrolling Charts
Displays data graphically in a scrolling chart. Discussion of Chart Display begins on
page 4-27.
12
Display Bar Meters
Displays data in a bar graph format. Discussed on page 4-24.
13
Display Analog Meters
Displays data displayed in a dial-gage format. Discussed on page 4-25.
14
Display Digital Meters
Displays data in a digital meter format. Discussed on page 4-26.
15
View Data
Launches an independent post-data acquisition program such as eZ-PostView.
Refer to the Post Acquisition Analysis PDF (included on your CD) for detailed
information.
Personal Daq User’s Manual
989394
Personal DaqView 4-3