Configure system – Measurement Computing Personal Daq rev.6.0 User Manual
Page 16
1-8 Unit Startup
878395
Personal Daq User’s Manual
Configure System
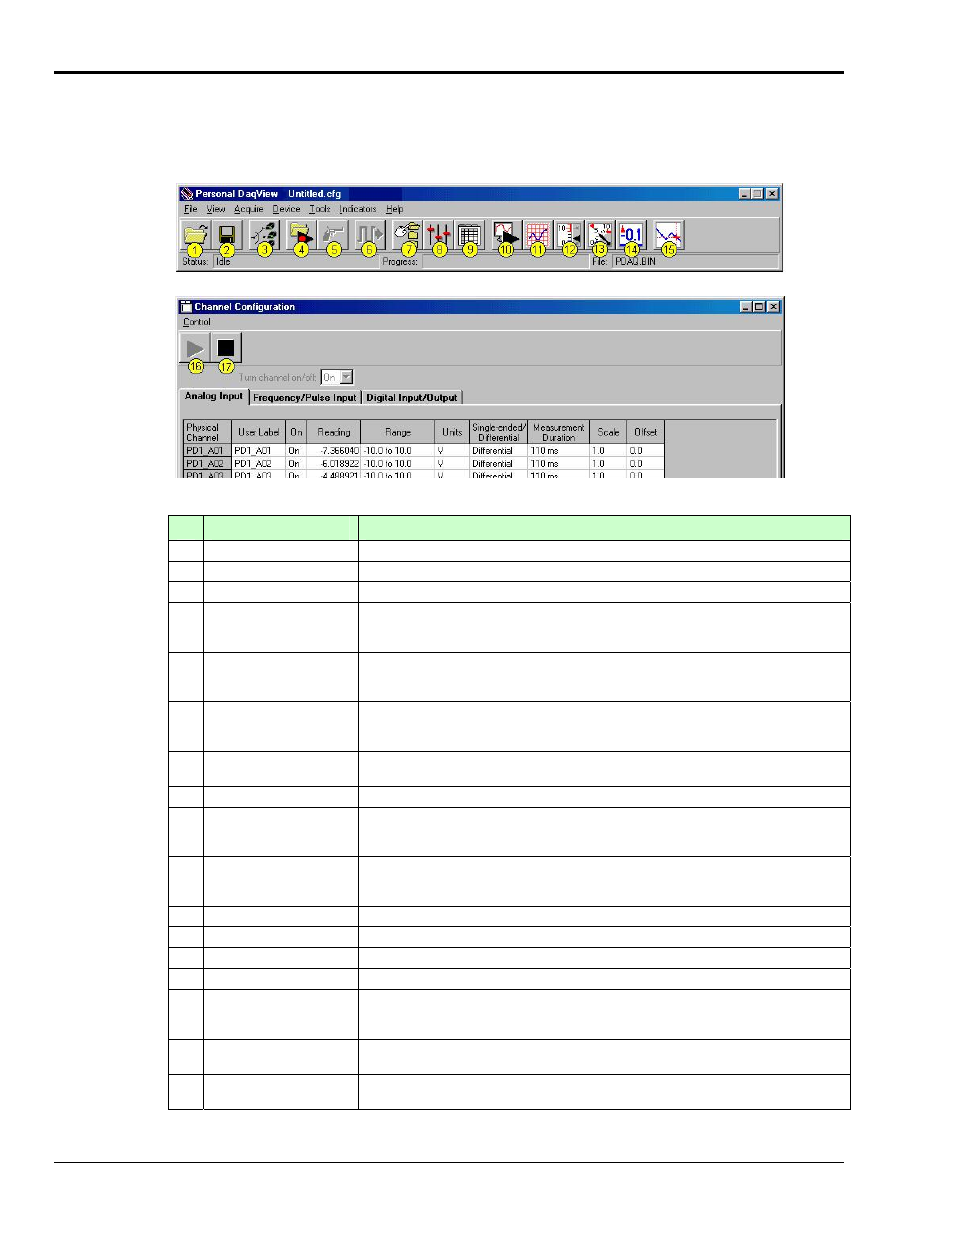
This step pertains to configuration of channels and acquisition parameters through Personal DaqView
software. To configure a set of parameters, use the appropriate toolbar button (or the View pull-down
menu) to open the applicable window. Clicking on the Configure Channel Settings button (9) brings up
the Channel Configuration Window.
Main Control Window
Channel Configuration Window, with Analog Input Spreadsheet Selected
Button
Function
1
Open Configuration File
Opens a selected configuration file.
2
Save Configuration File
Saves the current configuration file to disk.
3
Select Active Device
Provides a means of selecting active devices from the Personal Daq system.
4
Arm Trigger for Disk
Recording
Arms the trigger and stores acquisition data to a designated disk file. If Auto Rearm is
selected, clicking this button puts Auto rearm in effect. This button, is also used to
disarm the data acquisition.
5
Manual Trigger
Used to trigger the device when the mode of trigger is set to “Manual.” Note that the
Manual Trigger button can not be clicked until after the trigger is armed, for example,
by first clickng button 4.
6
Update Digital Outputs
Updates digital outputs for all digital channels that are selected to “output state.” also
see Digital Input/Output Spreadsheet, in Chapter 4).
Does not apply to Personal Daq/54.
7 Configure
Data
Destination
Accesses the Configure Data Destination window. Note that this window provides a
means of selecting sequential destinations through an auto rearm feature.
8 Configure
Acquisition
Accesses
the Configure Acquisition window.
9 Configure
Channel
Settings
Brings up the Channel Configuration window. From this window you can configure
channels for Analog Input, Frequency/Pulse Input, and Digital Input/Output channels,
depending on which tab is selected.
10
Update All Indicators
Starts all on-screen indicators with a display of up-to-date data. Has no affect on the
recording of data to disk. Auto Rearm, even if selected, will not occur when using this
control. This button is also used to pause all indicators.
11
Display Scrolling Charts
Displays data graphically in a scrolling chart.
12
Display Bar Meters
Displays data in a bar graph format.
13
Display Analog Meters
Displays data displayed in a dial-gage format.
14
Display Digital Meters
Displays data in a digital meter format.
15
View Data
Launches an independent post-data acquisition program such as eZ-PostView.
Refer to the Post Acquisition Analysis PDF (included on your CD) for detailed
information.
16 Enable
Readings
Column
Activates the Channel Configuration Window’s reading column. Does not affect the
recording of data to disk.
17 Disable
Readings
Column
Stops the Channel Configuration Window’s reading column. Does not affect the
recording of data to disk.