4 ids, 1 setting an id, Setting an id – Rice Lake Static Weighing User Manual
Page 47
Note
Operation
43
5. When the desired value is displayed, press
Enter
.
The decimal point flashes.
6. To change the position of the decimal point, use the and keys until it is in the desired position.
7. Press
Enter
again to accept the value and return to weigh mode.
8. Press the
UNDER
key. The Under light begins flashing and a flashing digit is shown.
9. Using the and keys to increment/decrement the values and the and keys to move between digits,
enter the desired value, in percent (entering 5 equals 5%). If using the CW-90, you can also use the
numeric keypad to enter the desired under value.
To discard any changes and return to weigh mode, press the Menu button.
10. When the desired value is displayed, press
Enter
.
The decimal point flashes.
11. To change the position of the decimal point, use the and keys until it is in the desired position.
12. Press
Enter
again to accept the value and return to weigh mode.
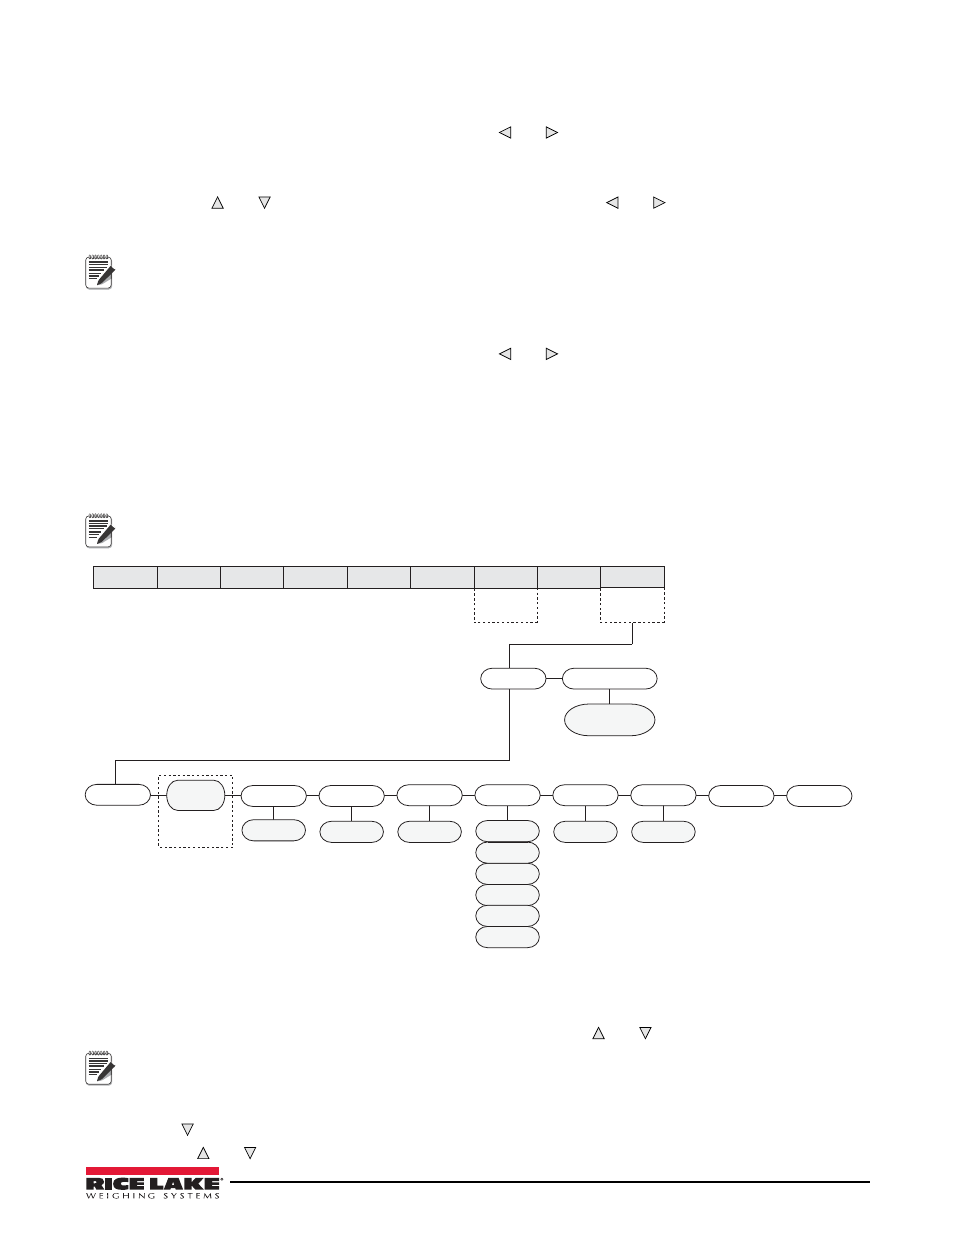
5.4
IDs
IDs are used to save and recall previously set over/under/tare settings, descriptions, and units preferences. The
CW-90/CW-90X has the capacity to store up to 50 individual IDs. Make sure you have IDs enabled under the
CHKWGH
menu shown in Figure 5-1 on page 39 or the menu will not appear. To store more than 50 IDs,
WeighVault and an Ethernet option card are required (see Section 5.4.3 on page 45).
REG1
REG2 - REG50
TARGET
VALUE
Only if in
target mode
SAME AS REG1
DESC1
DESCRIPTION
OVER
VALUE
TARE
VALUE
UNITS
OFF
LB
G
KG
OZ
LB/OZ
DESC2
DESCRIPTION
COPYWV
CLEAR
PROD ID
EXIT
T&D
TEST
SETUP
AUDIT
XXXXXXX
CALIBR
BRIGHT
ACCUM
Only displayed if
turned on
from Setup menu
ID
Only displayed if
turned on
from Setup menu
UNDER
VALUE
Note
To clear over/under/tare settings, set the ID number to 0.
Figure 5-5. ID Menu
5.4.1
Setting an ID
1. From the
ID
menu, press
Enter
and you will be at REG1.
2. Navigate to the REG number you want to use (1-50) by using the and keys.
Note
All menus have wrap-around functionality. If you are at REG1 and want to access REG50, you can quickly do
so by moving backwards through the menu.
3. When you have reached the REG number you want to set, press
Enter
to select that REG.
4. Press or
Enter
to select
PROD ID.
5. Use the and keys to set the PROD ID and press
Enter
.