0 configuration, 1 menu navigation, Configuration – Rice Lake Static Weighing User Manual
Page 19
Configuration
15
3.0
Configuration
To set up and configure the CW-90/CW-90X checkweigher, you will either use the
Menu
key on the front panel or
press the setup switch on the bottom of the indicator. The indicator is defaulted at the factory with the audit trail
jumper (JMP1) in the ON position, allowing configuration access by pressing the
Menu
key. Pressing the
Menu
key
will take you to the Audit menu selection. Use the
ID
( ) and
TARGET
( ) navigation keys to move to other menu
selections. Use the
UNDER
( ) and
OVER
( ) navigation keys to enter and exit menu selections, respectively.
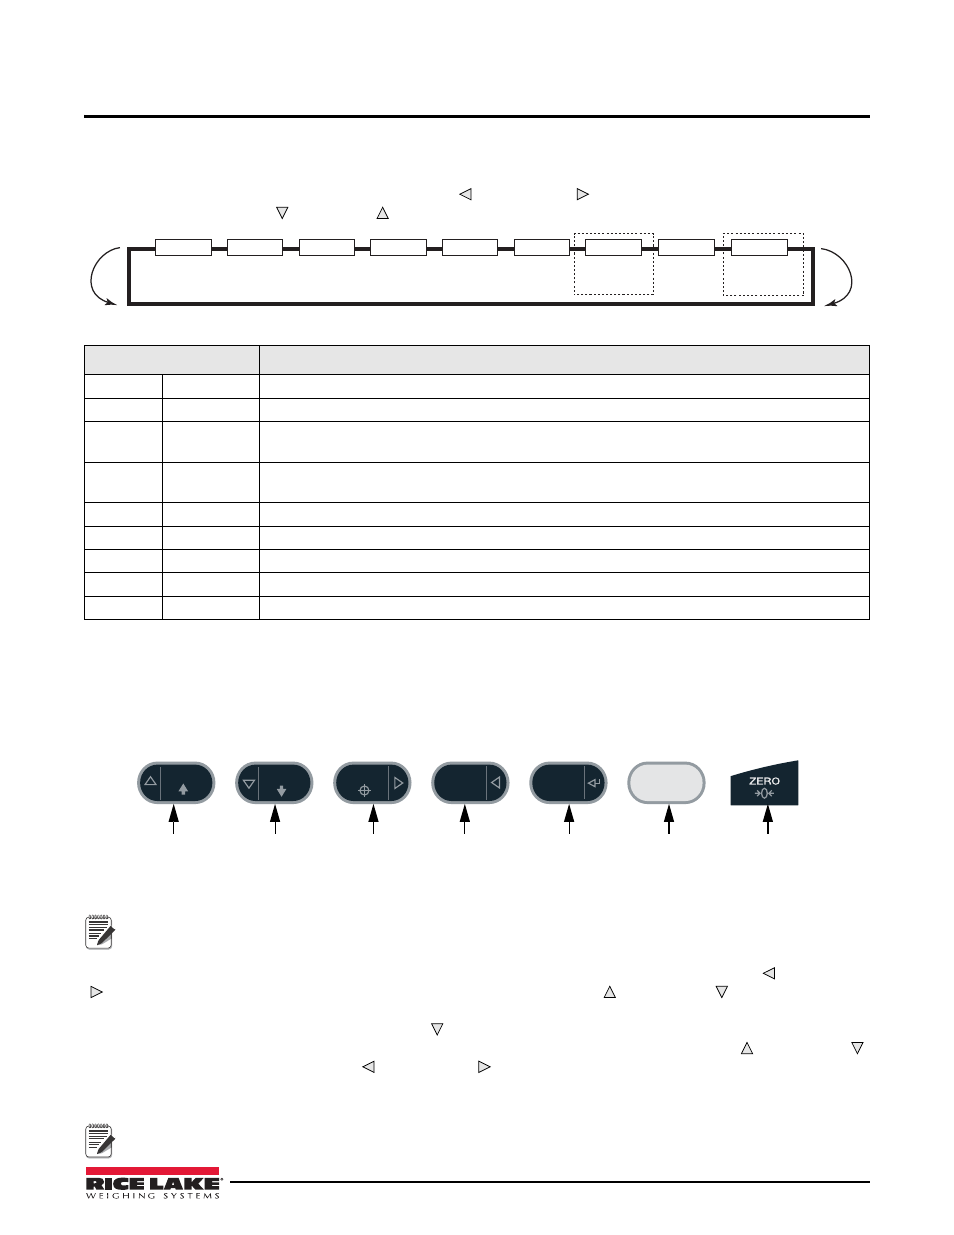
AUDIT
Only displayed if
turned on
from Setup menu
Only displayed if
turned on
from Setup menu
CALIBR
SETUP
TEST
EXIT
ID
ACCUM
BRIGHT
T&D
Figure 3-1.
Table 3-1. Menu Menu Summary
Menu
Function
AUDIT
Audit Trail
Displays the legally relevant (LR) firmware version, configuration count, and calibration count.
CALIBR
Calibrate
Calibrates the scale.
SETUP
Setup
Accesses setup options for the scale, features, serial output, print format, digital inputs and outputs,
and displays the version number.
TEST
Test
Performs a basic test on the A/D, digital inputs and outputs, communication ports, RAM, and
keypad.
EXIT
Exit
Exits Configuration mode and returns to the weigh screen.
T&D
Time & Date
Allows you to view and change time and date.
ACCUM
Accumulator
Displays the current accumulator value.
BRIGHT
Brightness
Adjusts display intensity on a scale from 0 (dimmest) to 7 (brightest).
ID
ID
Allows you to setup or edit IDs.
Menu Mode Navigation Structure
3.1
Menu Navigation
Once you have entered the menus, you can use the front panel buttons to navigate. Note the looped menu structure
shown in Figure 3-1. This provides a shortcut for accessing the rightmost menu items by navigating to the left, and
vice-versa for the opposite side of the menu. This shortcut also holds true for sub-menu navigation.
OVER
UNDER
MENU
ID
ENTER
TARGET
Move UP/
Increment
Value
Move DOWN/
Decrement
Value
Backspace
Enter/Exit
Configuration
Menu
Enter VALUE/
Move DOWN
Move LEFT/
Previous
Move RIGHT/
Next
Figure 3-2. Front Panel Key Functions in Menu Mode
Note
During calibration, the ENTER key acts as a data entry confirmation key. It also acts as an EXECUTE key and
accepts the value upon successful calibration. On the CW-90, the ZERO or CLR key can be used for a
backspace.
Various keys are used as directional keys to navigate through the menus (see Figure 3-2). The
ID
( ) and
TARGET
( ) keys scroll left and right (horizontally) on the same menu level;
OVER
( ) and
UNDER
( ) move up and down
(vertically) to different menu levels. These keys have a directional symbol indicating its menu navigation function.
The
ENTER
key has the same function as
UNDER
( ) when navigating the menu; either will move down to access
sub-categories of a main menu item. When adding or editing data using the CW-90X, the
OVER
( ) and
UNDER
( )
keys will edit the blinking digit. The
ID
( ) and
TARGET
( ) keys navigate to another digit. This also applies to the
CW-90, whose numeric keys can be used to insert a digit to the right of the blinking digit. Press
ENTER
to accept
the data and return to the next menu item.
Note
To exit Configuration and return to weighing, press the MENU key or navigate to the EXIT menu and press
ENTER.