2 panel functions – Epson 440 User Manual
Page 33
EPSON Stylus Color 440/640/740
Revision A
Chapter 1
Product Description
33
1.4.2 Panel Functions
Refer to Table 1-19 to Table 1-21.
Table 1-19. Panel Functions
Table 1-20. Panel Function with Power On
NOTE 1:You can check the 1) firmware version, 2) protection counter
and 3) nozzle check pattern by performing this function.
NOTE 2:The code pages for Stylus Color 440, 640 are not opened.
NOTE 3:Since Stylus Color 740 have 2 specifications both the standard
and NLSP version, user can select some parameter and a
character table by communicating with the printed list.
NOTE 4:After you enter this EEPROM reset mode, go to Table 1-21.
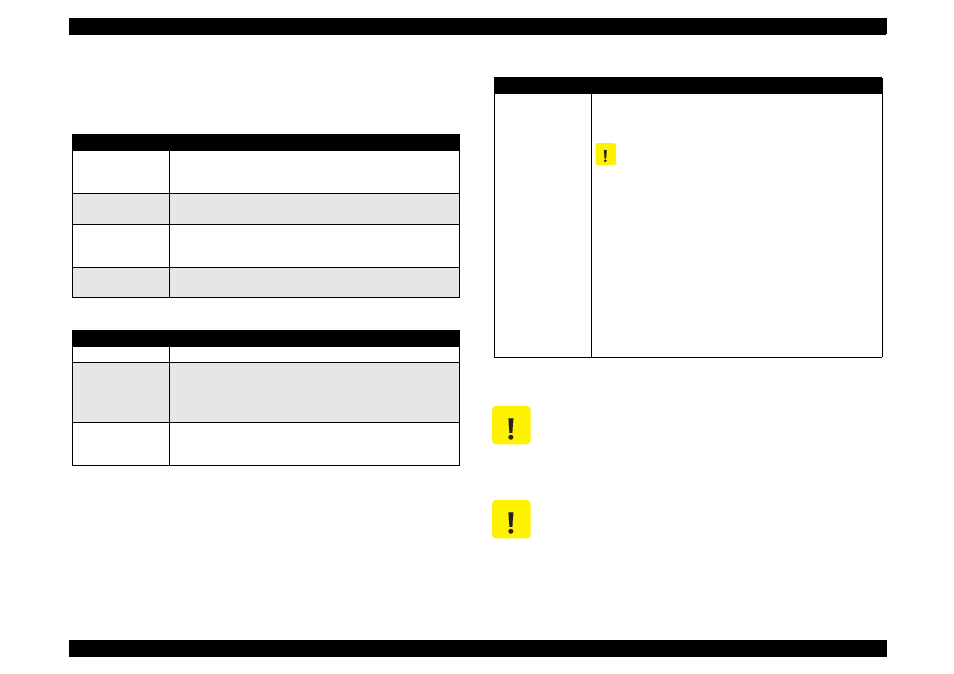
Table 1-21. EEPROM Reset
NOTE 5:Before you press the Load / Eject switch, be sure to enter the
EEPROM reset mode, referring to Table 1-20.
Switch
Function
Load/Eject
(within 2 sec.)
1. Loads or ejects a paper.
2. When the carriage is on the I/C replacement position, return
the carriage to the capping position.
Load/Eject
(for 2 sec.)
1. Starts the I/C replacement sequence.
Cleaning
(for 2 sec.)
1. Starts the printhead cleaning sequence.
2. In case it’s in the ink low or ink out condition, starts the I/C
replacement sequence.
Cleaning
(within 2 sec.)
1. When carriage is on the I/C replacement position, return the
carriage to the capping position.
Switch
Function
Load/Eject
1) Starts the status print.
(*1)
Cleaning
Changes the code page.
(*2)
Enters the Default setting mode.
(*3)
Load/Eject
+
Cleaning
Enters the EEPROM Reset mode. (The Load/Eject LED blinks
for a few seconds.)
(Used only for resetting the maintenance error.)
(*4)
Switch
Function
Cleaning
Resets the EEPROM.
(*5)
1. While the Load/Eject LED is blinking (for about 2 seconds),
press down the Cleaning switch for 10 seconds.
The following steps vary depending on the printer.
2.
[Stylus Color 440/640]
After 10 seconds, both Bk and CMY ink LEDs come
ON
simultaneously.
[Stylus Color 740]
After 10 seconds, Load/Eject, Bk and CMY ink LEDs all
blink
simultaneously.
3.
[Stylus Color 440/640]
Confirming the both LEDs are
ON
, release the Cleaning
switch. The printer automatically starts initialization
operation to reset the specified addresses in the EEPROM.
[Stylus Color 740]
Confirming all 3 LEDs are
blinking
, release the Cleaning
switch. The printer automatically starts initialization
operation to reset the specified addresses in the EEPROM.
C A U T I O N
You can reset the below addresses in a EEPROM by
performing the EEPROM Reset operation.
1. 1) Timer Counter (Power Off time) IC value
2. I/F selection returns to Auto
3. Protection Counter value
C A U T I O N
Even though you repeat the EEPROM reset operation,
it does not perform initialization but only resets the
EEPROM addresses. Wheater or not to permorm
initialization depends on the power off time monitored
by the timer IC.
C A U T I O N