1 overview, 1 required adjustments – Epson 440 User Manual
Page 130
EPSON Stylus Color 440/640/740
Revision A
Chapter 5
Adjustment
130
5.1 Overview
This chapter describes adjustments required when the printer is
disassembled and assembled after repair.
5.1.1 Required Adjustments
Stylus Color 440/640/740 require the following adjustments. (Refer to
Table 5-1) Perform any necessary adjustment referring to the figures
and procedures described throughout this chapter.
Table below shows the actions taken and required adjustments in the
order to be performed.
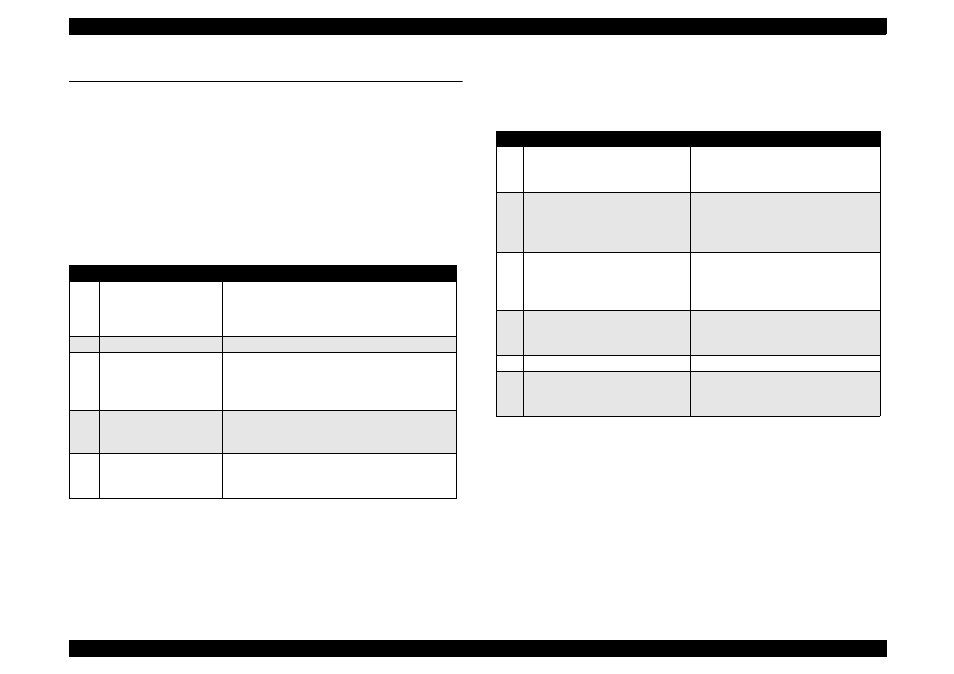
Table 5-1 Adjustment Required
No.
Adjustment Item
Conditions
1
Parallelism Adjustment
• When you replace or remove the Carriage
guide shaft.
• When you move the parallelism adjustment
bushing.
2
Initial Ink Charge
• When you replace or remove the printhead.
3
Head Voltage ID Input
• When you replace the printhead.
• When you replace the main board.
Note) The values stored in this address are not
erased by EEPROM reset operation.
4
Printing Head Angle
Adjustment
• When you replace or remove the printhead.
• When you move the printhead angle adjusting
lever.
5
Bi-D Adjustment
• When you replace or remove the printhead.
• When you replace the main board.
• When you replace the CR Motor.
Table 5-2 Actions Taken and Adjustment Required
No.
Content of Operation
Adjustment Procedure
1
Removal of the printhead
1. Perform initial ink charge.
2. Perform printhead angle adjustment.
3. Perform Bi-d Adjustment.
2
Replacement of the printhead
1. Perform Vh voltage writing operation.
2. Perform initial ink charge.
3. Perform printhead angle adjustment.
4. Perform Bi-d Adjustment.
3
Replacement of the main board
1. Perform Vh voltage writing operation.
2. Perform Bi-d adjustment.
3. Perform CG TAble setting (only for
Stylus Color 740)
4
Replacement or Removal of the
Carriage Unit
1. Perform parallel adjustment.
2. Perform printhead angle adjustment.
3. Perform Bi-d adjustment.
5
Replace of the CR Motor
1. Perform Bi-d adjustment.
6
Replacement of the Printer
Mechanism
1. Perform Head Voltage ID Input.
2. Perform initial ink charge.
3. Perform Bi-d adjustment.