Connecting the smm100 to the network, Connecting the smm100 to the network -2, Installation of the smm100 requires three steps – ClearOne DigiLinX User Manual
Page 105: Install and connect hardware
DigiLinX Installation and Design Guide
14-2
All specifications subject to change without notification. All rights reserved. Copyright © 2008 NetStreams
Main +1 512.977-9393 / fax +1 512.977.9398 / Toll Free Technical Support +1 866-353-3496
3600 W. Parmer Lane, Suite 100; Austin, TX 7872
Connecting the SMM100 to the Network
Installation of the SMM100 requires three steps:
1.
Install and connect hardware.
2.
Set up the folder you have stored music in as a shared folder.
3.
Use the DigiLinX Dealer Setup program to configure the DigiLinX system to
recognize the SMM100 (this is covered in Chapter 15 of the DigiLinX Dealer
Setup Manual found on the NetStr web site
w.netstreams.com
on the Dealer
Documents page).
You can have a DigiLinX only network or you can combine your home computer
network with DigiLinX so that the SMM100 can access the music source (computer,
USB storage device, or NAS drive).
The IP addressing and subnet masking schema of the DigiLinX network and the home
network must match for the SMM100 to find network shared music on the home
network.
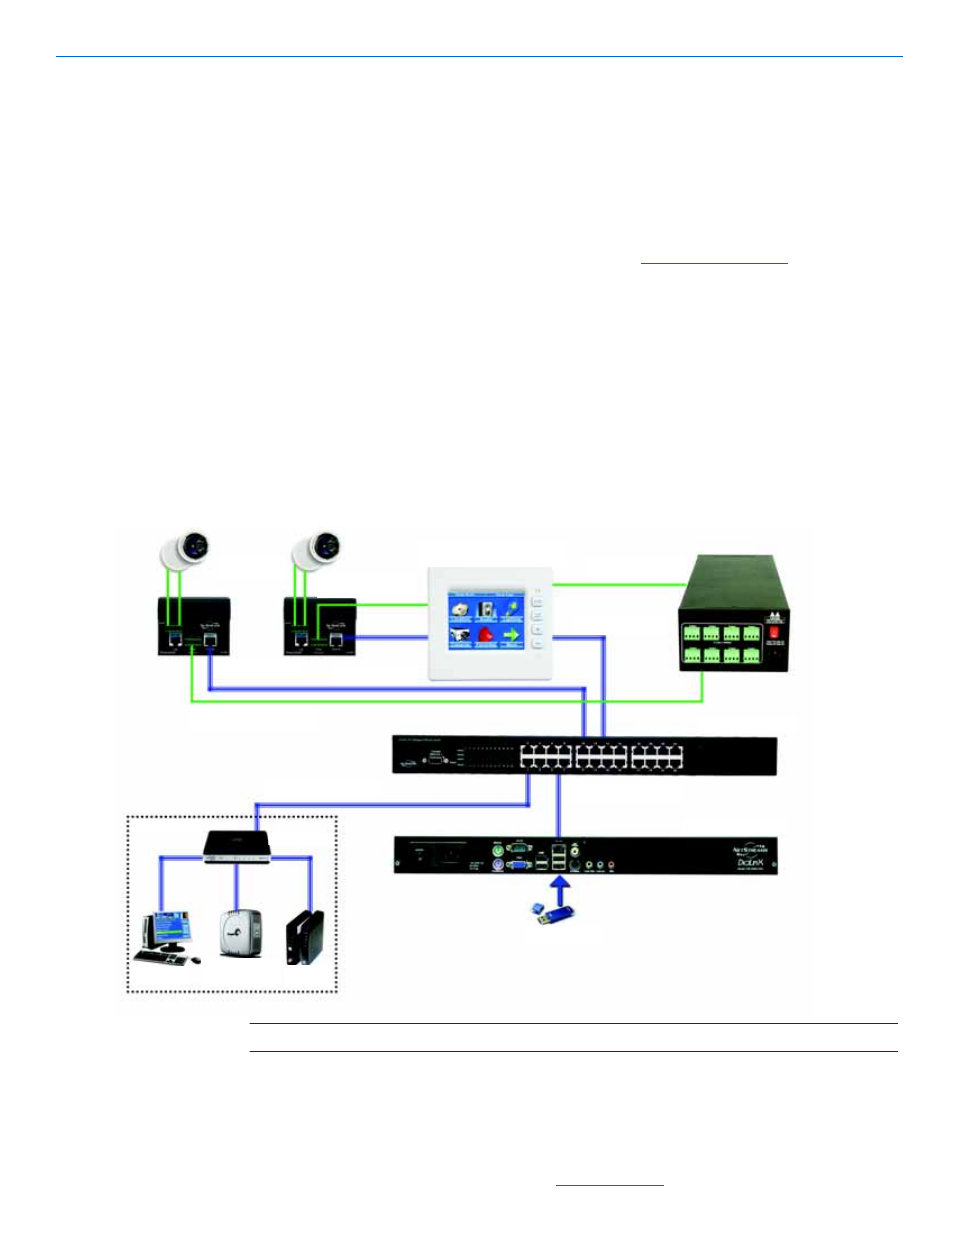
If you want to connect DigiLinX to your existing home network, see Figure 14-2.
Figure 14-2
DigiLinX and a home network
NOTE:
This is the recommended method of integrating the SMM100 with a home network.
TouchLinX
TouchLinX
SpeakerLinX
PowerLinX
16/4 or 14/4
16/4 or 14/4
16/4 or 14/4
SwitchLinX
SMM100
Switch/Router
Computer
Computer
Network Attached
Storage Drive
Cable
Modem
Ethernet CAT5
Ethernet CAT5
Ethernet CAT5
Ethernet CAT5
Ethernet CAT5
Ethernet CAT5
Ethernet
CAT5
Ethernet
CAT5
USB Drive
Home Network
Speakers
Ethernet CAT5
16/4 or 14/4
SpeakerLinX