3 setting parameters using dtm, 5 basic setup, Setting parameters using dtm -2 – Yokogawa digitalYEWFLO (DY) User Manual
Page 62: Interconnection between digitalyewflo and, Hart confi guration tool -2, 5 basic, Setup, Warning, Important, Tag and device information
<8. OPERATION VIA HART CONFIGURATION TOOL (HART 5)>
8-2
IM 01F06A00-01EN
8.3 Setting Parameters using
DTM
When confi gure the parameters using FieldMate,
use the DTM (Device Type Manager) refering to the
following table.
DTM Name
Device Type
Device
Revision
DYF V3.1
0 x 37
3
DYF V4.1
0 x 37
4
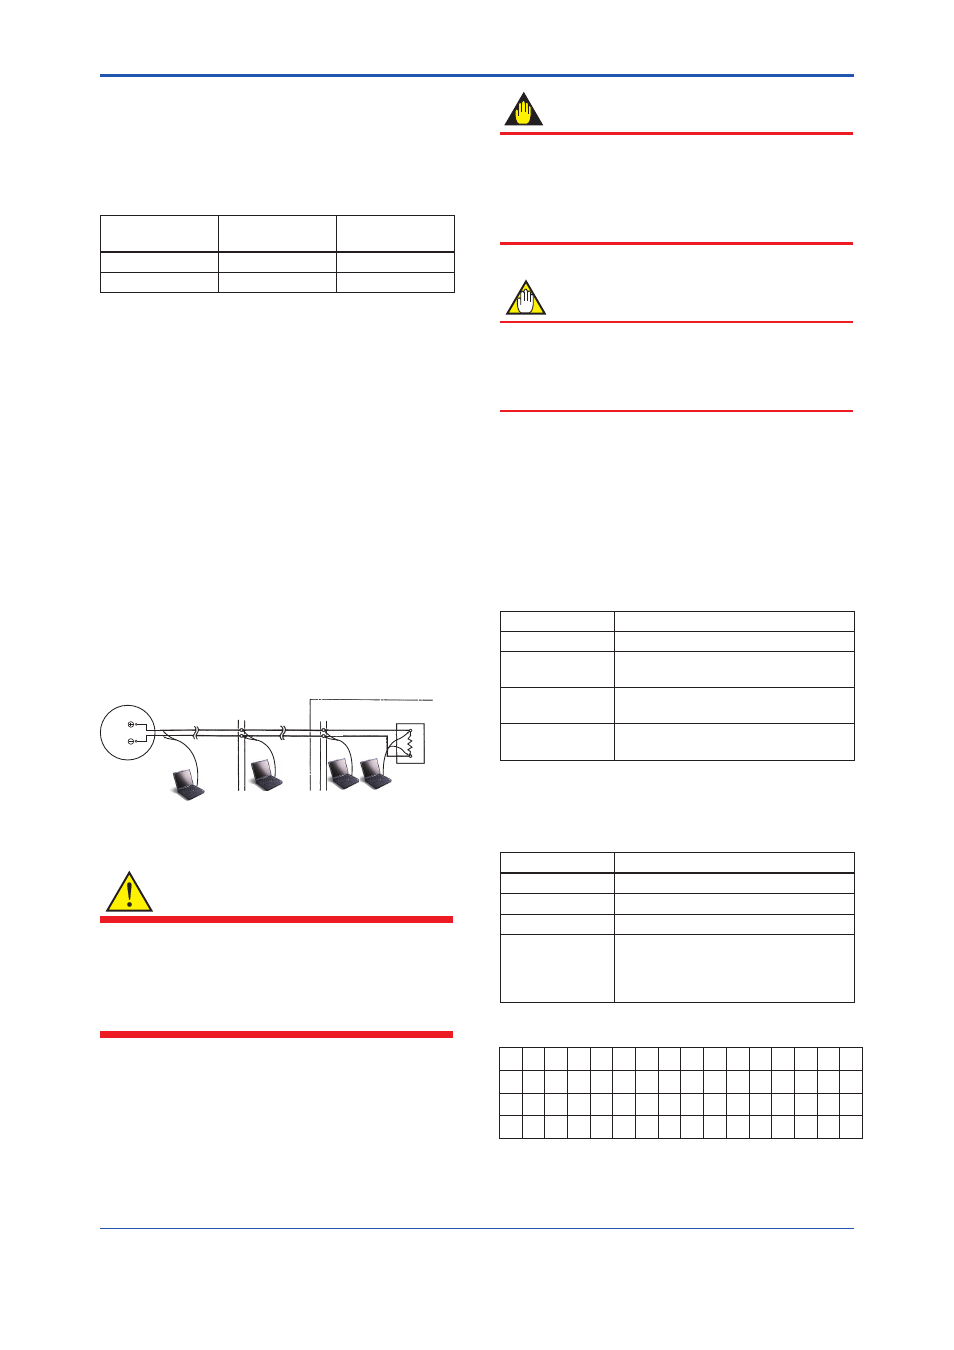
8.4 Interconnection
between
digitalYEWFLO and HART
Confi guration Tool
The HART Confi guration Tool can interface with
the digitalYEWFLO from the control room, the
digitalYEWFLO site, or any other wiring termination
point in the loop, provided there is a minimum load
resistance of 250
Ω between the connection and
the receiving instrument. To communicate, it must
be connected in parallel with the digitalYEWFLO,
and the connections must be non-polarized. Figure
8.2 illustrates the wiring connections for a direct
interface at the digitalYEWFLO site. The HART
Confi guration Tool can be used for remote access
from any terminal strip as well.
+
–
4 to 20 mA DC signal line
Control room
Terminal board
Receiving instrument
load resistance:
250
to 600
Relaying
terminals
HART
Configuration Tool
HART
Configuration Tool
HART
Configuration Tool
F0803.ai
digitalYEWFLO
SUPPLY
SUPPLY
+
–
Figure 8.2
Connecting the HART Communicator
WARNING
Be sure to set parameters as “Protect” on the
write protect function after fi nish of parameter
setting work. Refer to Section 8.9 “Software
Write Protect” how to use the write protect
function in detail.
IMPORTANT
If the power of fl owmeter is turned off within 30
seconds after parameters have been set, these
settings will be canceled. Accordingly, please
keep the power on for at least 30 seconds after
setting parameters.
NOTE
Before updating any setting, remember to
always check the data content you want to
change as described in Section 6.4 “Parameters
Description”.
8.5 Basic
Setup
Tag and Device Information
The tag number and device information can be
checked as follows:
• The location for the tag number and device
information
Item
Precedure
Tag
[Root Menu]
→ Basic setup → Tag
Descriptor
[Root Menu]
→ Detailed setup →
Device information
→ Descriptor
Message
[Root Menu]
→ Detailed setup →
Device information
→ Message
Date
[Root Menu]
→ Detailed setup →
Device information
→ Date
When changing the tag number or device
information, enter the information directly within the
following limitations.
Item
Number and characters
Tag
8
*1
Descripter
16
*1
Message
32
*1
Date
2/2/2 (mm/dd/yy)
• mm : month
• dd : day
• yy : year
SPACE
! " # $ %
& ' ( ) * + , - . /
0 1 2 3 4 5 6 7 8 9 : ; < = > ?
@
A
B C D E F G H I J K L M N O
P Q R
S T U V W
X Y Z [ \ ] ^ _
F0804.ai
*1: All characters in the following table can be used.