Front panel g-70 music workstation – Roland G-70 User Manual
Page 15
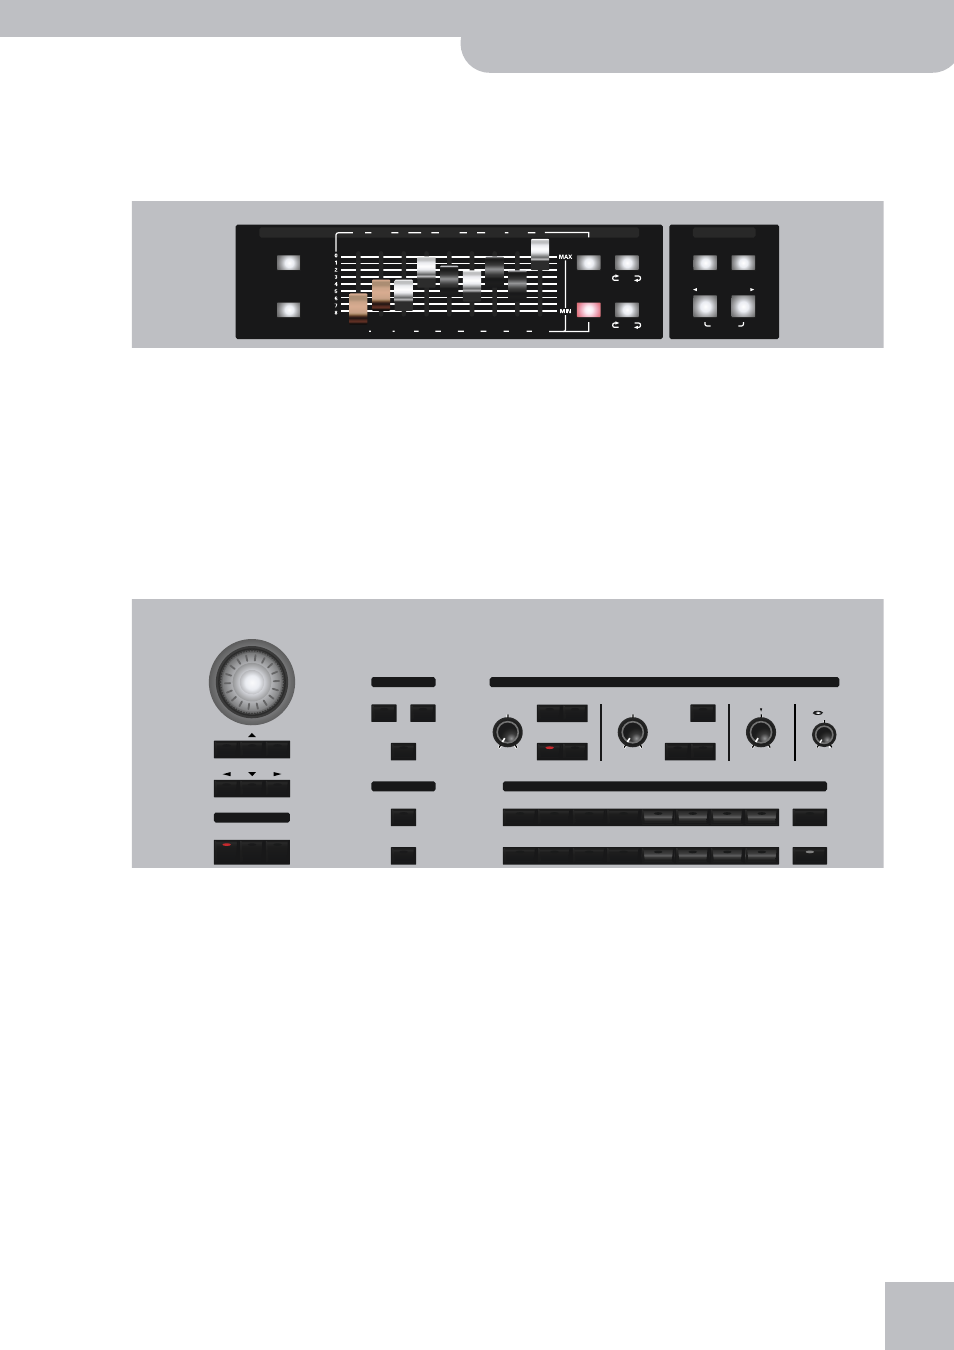
Front panel
G-70 Music Workstation
r
15
R MENU button
Press this button to call up a menu that provides
access to more in-depth G-70 functions you may
only wish to set from time to time.
S EXIT button
Press this button to return to the previously selected
display page, or the G-70’s main page.
T Assignable sliders
These sliders can be used as virtual drawbars (when
the [HARMONIC¥BAR] button lights). In that case,
refer to the footage indications above the sliders for
their specific function (page 33).
Note: The HARMONIC BAR function is only available for the
following parts: UP1, LW1, and MBS.
Then, there are three buttons that allow you to spec-
ify the part group whose settings you want to
change: [PART] (Keyboard parts), [STYLE] (arranger
parts) and [SONG] (recorder parts).
The TYPE buttons, finally, are used to select the
parameter that can be changed using the sliders
(reverb or chorus send level, stereo position, or vol-
ume).
U TEMPO section
[METRONOME] button: Press this button to switch
the internal metronome on or off.
The remaining buttons allow you to set the tempo of
the metronome, the Arranger or the recorder/
sequencer.
V DATA ENTRY section
The dial can be used to set the value of the parameter
field that is currently highlighted. Turn it to scroll
through the available settings. You can also press it
to call up a numeric key pad that allows you to enter
the desired value by pressing the corresponding fields
in the display.
To change the selected value in small steps, press
[DEC] (lower value) or [INC] (higher value). The
[ß][†][®][√] buttons are used to select a parameter for
editing (something you can also do by pressing the
corresponding display field).
While the main page is displayed, the [DATA÷ENTRY]
dial and [DEC]/[INC] buttons also allow you to set the
tempo.
W EASY SETTING section
This key pad allows you to reconfigure the G-70 by
pressing just one button: [ARR] (use the Arranger in
split mode), [ORGAN] (the name says it all), and
[PIANO] (assign a piano sound to the entire key-
board). See also page 56.
X FINDER section
Press one of these buttons to quickly locate songs
([SONG]), Music Styles ([STYLE]) or User Programs
([USER¥PRG]) in the internal memory (SSD), on floppy
disk or an external memory card. See pages 38, 86
and 113.
Y KBD MODE section
Press the [SPLIT] button if you want to play different
sounds with your left and right hands (page 56). (It is
even possible to add a second split point, see
page 90.)
T
U
SONG
STYLE
PAGE
PAGE
16'
5-1/3'
8'
4'
2-2/3'
2'
1-3/5'
1-1/3'
1'
HARMONIC
BAR
PART
REVERB
PANPOT
CHORUS
VOLUME
MODE
TYPE
DBEAM
EFFECT
M.INT
MBS
LW 2
LW 1
UP 3
UP 2
UP 1
DEFAULT
TAP
METRO
NOME
FAST
SLOW
TEMPO
V
X
Y
Z
a
W
ARR
ORGAN PIANO
WHOLE
SPLIT
USER PRG
STYLE
SONG
INC
DEC
DATA ENTRY
NUMERIC PAD (PUSH)
KBD MODE
FINDER
EASY SETTING
OVER
MIN
MAX
OFF
MAX
INPUT GAIN
EFFECTS
OFF
MAX
OFF
MAX
ENSEMBLE
SMALL
HARMONY
VOCODER
PITCH
AUTO
SINGER
VOICE
TALK
VOICE
FX
VOCAL HARMONIST
BRASS
VOCAL
SYNTH
WIND
HARMONIC
BAR
PIANO
E.PIANO
KEYBOARD CHR PERC
ORGAN
ACCORDION A.GUITAR
E.GUITAR
BASS
STRINGS
PAD
ETHNIC
SAX
TRUMPET
SRX
EXPANSION
DRUMS
PERCUSS
SFX
TONE
Note: You can press and hold most buttons to jump to an associated display page.