Installation instructions, 1. installation, Backup switch – Kenwood TM-741A User Manual
Page 8
Attention! The text in this document has been recognized automatically. To view the original document, you can use the "Original mode".
3. INSTALLATION INSTRUCTIONS
3-1. INSTALLATION
3-1-1. Installing the Microphone and Setting
the Clock Backup Switch
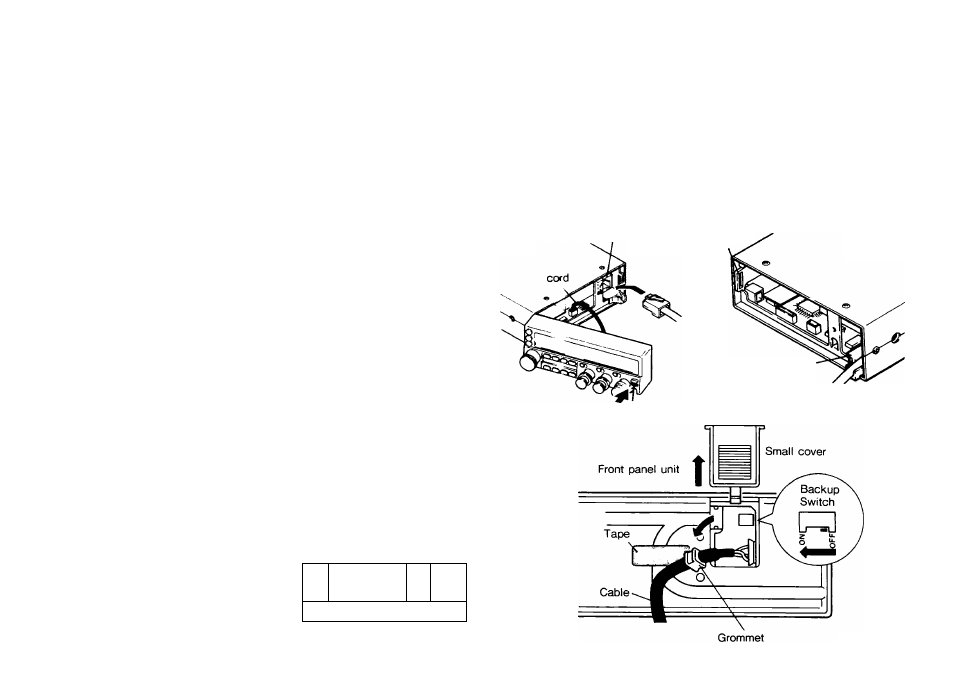
Before installing be sure to turn off the power switch.
1. Slide the release button on the front panel to the
right. Carefully pull the front panel toward you from
the right, then remove the whole panel unit. Be
careful with the cord connecting the front panel unit
to the chassis. (Fig. 1)
2. Insert the microphone connector into the microphone
socket on the right of the main unit until it clicks.
Make sure the tab on the connector is on top.
3. Place the microphone cord in the holder groove. (Fig. 2)
■BACKUP SWITCH
Inside the small cover of the front panel unit there is
a Backup Switch to retain clock memory. If you set
the switch ON »turning off the POWER switch,
disconnecting the power cable or an intermittent
power failure will not erase the clock memories.
4. Slide the small cover off of the front panel unit as
shown in the accompaning illustration. (Fig.3)
5. Gently lift up on the cable near the grommet.
6. Set the Backup switch ON. Pay attention to the labelings.
7. Push the grommet down into its slot.
8. Replace the small cover until it clicks.
9. Route the cable as desired
in the slots on the rear of
the front panel.
1
^
[
1
%--------- )
10. Align the hook on the back of the front panel with
the slot on the left of the chassis before replacing the
front panel.
11. Push the front panel toward the chassis until it locks
completely. Take care not to trap the connecting
cord.
The connecting cord is easier to manage when it is
put in the groove on the back of the front panel.
12. Set the date and time ( See page 55 ).
(Fig. 1)
microphone
connector
slot
(Fig. 2)
holder
release button
8
(Fig. 3)