Status screen, 30 ocp functions – HP EML E-series Tape Libraries User Manual
Page 48
Home Screen
Status Screen
Support Screen
Identity Screen
HP Support Info
Unlock Load Ports
Unlock Door
Reboot Library
Media Operations
Run Admin Tests
Service Menu >
Health Summary >
Component Status >
Event Log Type
Selection
View Library
Inventory
Library Robotics >
- Library Status
- Robotics Status
- Power Supply Status
- Power Supply 1-6
Load Ports
- Load Ports 1-4
Drives
- Drive 1-16
Interface Controllers
- Interface Controller 1-4
Interface Manager
Change Password
Configure Load Ports
Change Network Settings
Configure Barcode
Reporting Formats >
- Format for front panel
reporting
- Format for host
reporting
Configure Reserve Slots
Configure Inventory Mode
Reset Library Robotics
Defaults
Cancel Inventory Prompt
Move Tape
Operator Control Panel
- Align Touch Screen
- Panel Colors
- Panel Pixel Test
- Panel Firmware Version
- Turn Backlight Off
- Inventory Library
Run Demo
Run Self Test
Slot Test
Drive Load/Unload Test
Force Rewind Unload Test
Recalibrate Library
Restore Library Defaults
Library and Robotics Status >
- Library Status
- Robotics Status
- Drive Odometers
Individual Drive Status
All Drive Summary
Interface Controller Status >
- Interface Controller 1-4
Interface Manager Status
Configuration
Screen
Operations Screen
Library
Configuration >
Contact
Information
Display Library
Time
Adjust Screen
Contrast
11599
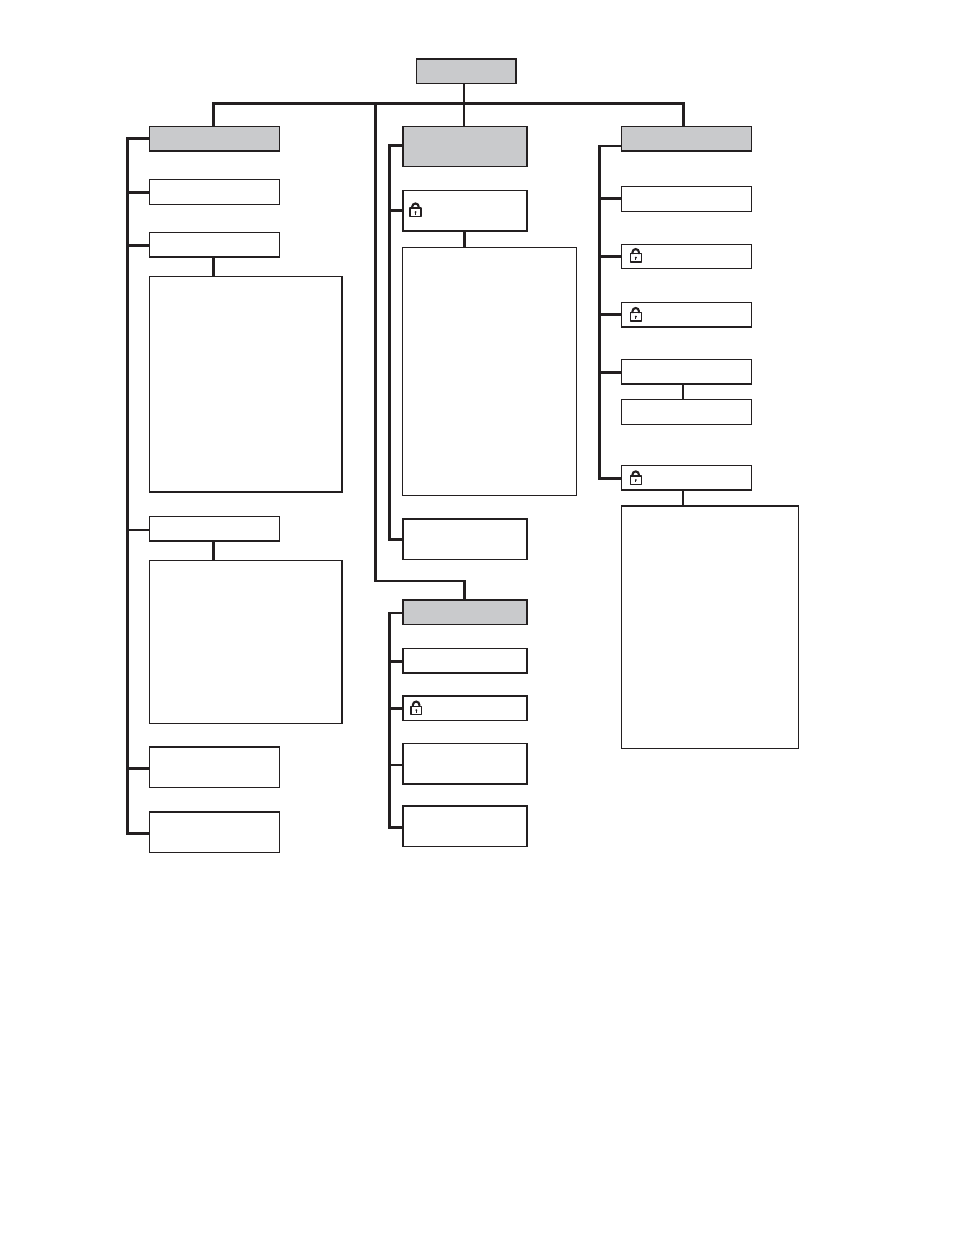
Figure 30 OCP functions
Status screen
The Status screen provides access to the current state of every library component.
Power supplies, load ports, tape drives, and interface controllers are all numbered from top to bottom in
the rack. However, power supplies are numbered by slot, so if a slot is not filled with a power supply, the
slot still receives a number. For example, the top power supply slot in the rack is power supply 1. The
power supply slot under that is power supply number 2. If a power supply is on the same level horizontally
(like those in the card cage expansion module), the one to the right (facing the back of the rack) has the
next highest number. If a component is removed, the numbering does not change until you reboot the
library. After a reboot, the library rediscovers all components and reassigns numbers from top to bottom.
48
Using the library