Dynasonics TFX Ultra Transit Time Flow Meters User Manual
Page 21
Step 3 – Entering Pipe and Liquid Data
This metering system calculates proper transducer spacing by utilizing piping and liquid information entered by the user. This
information can be entered via the keypad on the flow meter or via the optional software utility.
The best accuracy is achieved when transducer spacing is exactly what the flow meter calculates, so the calculated spacing
should be used if signal strength is satisfactory. If the pipe is not round, the wall thickness not correct or the actual liquid
being measured has a different sound speed than the liquid programmed into the transmitter, the spacing can vary from
the calculated value. If that is the case, the transducers should be placed at the highest signal level observed by moving the
transducers slowly around the mount area.
OTE:
N
Transducer spacing is calculated on “ideal” pipe. Ideal pipe is almost never found so the transducer spacing distances
may need to be altered. An effective way to maximize signal strength is to configure the display to show signal
strength, fix one transducer on the pipe and then starting at the calculated spacing, move the remaining transducer
small distances forward and back to find the maximum signal strength point.
MPORTANT
I
Enter all of the data on this list, save the data and reset the flow meter before mounting transducers.
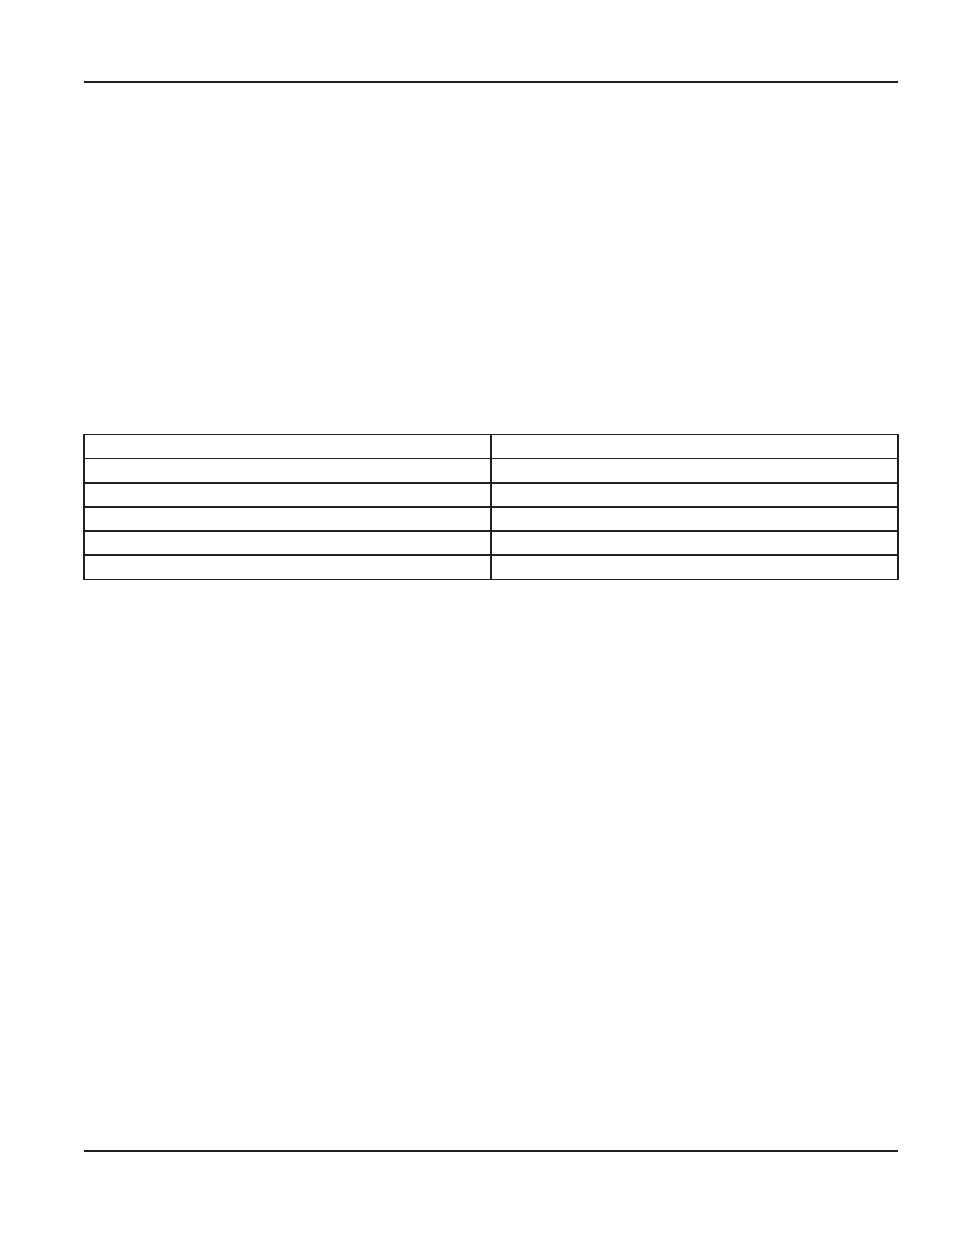
The following information is required before programming the instrument:
Transducer mounting configuration
Pipe O.D. (outside diameter)
Pipe wall thickness
Pipe material
Pipe sound speed
1
Pipe relative roughness
1
Pipe liner thickness (if present)
Pipe liner material (if present)
Fluid type
Fluid sound speed
1
Fluid viscosity
1
Fluid specific gravity
1
OTE:
N
Much of the data relating to material sound speed, viscosity and specific gravity is pre-programmed into the flow
meter. This data only needs to be modified if it is known that a particular application’s data varies from the reference
values. Refer to
STARTUP and CONFIGURATION
of this manual for instructions on entering configuration data into the
flow meter via the transmitter’s keypad. Refer to
INPUTS/OUTPUTS
for data entry via the software.
1
Nominal values for these parameters are included within the meters operating system. The nominal values may be used as
they appear or may be modified if exact system values are known.
After entering the data listed above, the flow meter will calculate proper transducer spacing for the particular data set. This
distance will be in inches if the flow meter is configured in English units, or millimeters if configured in metric units.
Step 4 – Transducer Mounting
Pipe Preparation
After selecting an optimal mounting location (Step 1) and successfully determining the proper transducer spacing
(Step 2 & 3), the transducers may now be mounted onto the pipe (Step 4).
Before the transducers are mounted onto the pipe surface, an area slightly larger than the flat surface of each transducer must
be cleaned of all rust, scale and moisture. For pipes with rough surfaces, such as ductile iron pipe, it is recommended that the
pipe surface be wire brushed to a shiny finish. Paint and other coatings, if not flaked or bubbled, need not be removed. Plastic
pipes typically do not require surface preparation other than soap and water cleaning.
The DTTN, DTTL, and DTTH transducers must be properly oriented and spaced on the pipe to provide optimum reliability and
performance. On horizontal pipes, when Z-Mount is required, the transducers should be mounted 180 radial degrees from
one another and at least 45 degrees from the top-dead-center and bottom-dead-center of the pipe. See
Figure 10
. Also see
Z-Mount Transducer Installation. On vertical pipes the orientation is not critical.
The spacing between the transducers is measured between the two spacing marks on the sides of the transducers. These
marks are approximately 0.75 inches (19 mm) back from the nose of the DTTN and DTTH transducers, and 1.2 inches (30 mm)
back from the nose of the DTTL transducers. See
Figure 11
.
DTTS and DTTC transducers should be mounted with the cable exiting within ±45 degrees of the side of a horizontal pipe. See
Figure 10
. On vertical pipes the orientation does not apply.
TRANSDUCER INSTALLATION
Page 21
March 2014