Using smart tally, Connecting via a wireless lan router, Starting smart tally – Roland VR-120HD Direct Streaming AV Mixer User Manual
Page 97: Other functions

97
Other Functions
Using Smart Tally
Roland’s own Smart Tally system turns your smart device or computer that’s connected to the VR-120HD into a tally box. This lets you access your smart
device or computer via a wireless LAN access point to display a tally on that device.
Connecting via a Wireless LAN Router
Connect your Wi-Fi enabled smart device or computer to the wireless LAN
router via Wi-Fi.
* If you connect multiple smart devices or computers, operation
might be slower.
1 .
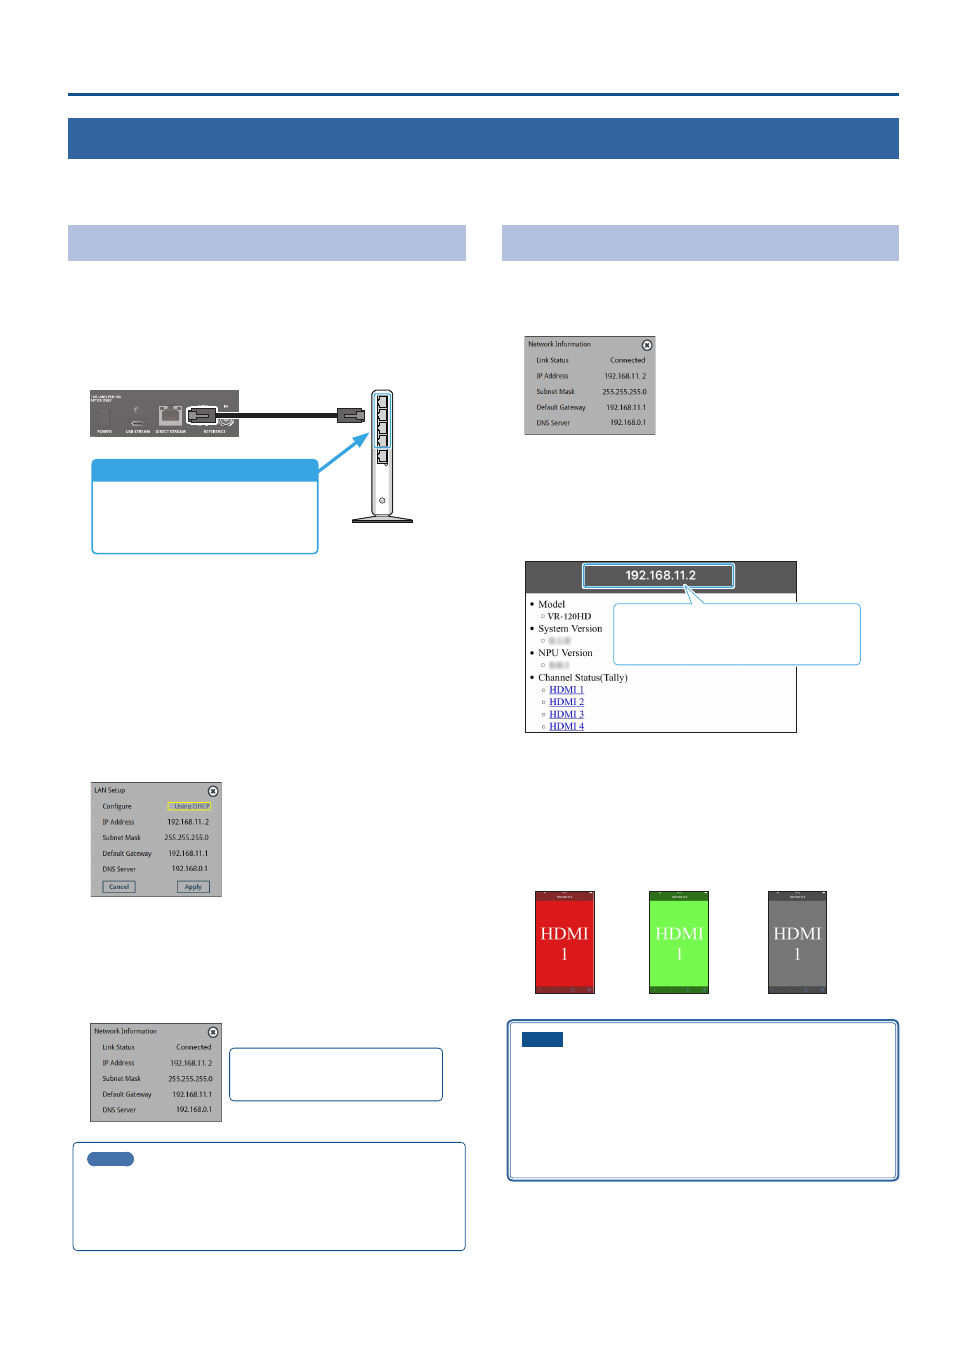
Use a LAN cable to connect the LAN port on your wireless LAN
master device to the DIRECT STREAM port on the VR-120HD.
Connect to a LAN port
Do not connect to the internet port or
WAN port.
* The arrangement of ports will differ
depending on the device you’re using.
VR-120HDRear Panel
LAN cable
Wireless LAN router
2 .
Turn on the wireless LAN master device, and connect your
smart device or computer via wireless LAN (Wi-Fi).
Enable the DHCP function of the wireless LAN router.
* For details on how to connect the wireless LAN (Wi-Fi), refer to the
manual of the device that you’re using.
3 .
Power-on the VR-120HD.
4 .
[MENU] button
Ó
“Network”
Ó
“LAN Setup”
Ó
set
“Configure” to “Using DHCP”, and press the [VALUE] knob.
The IP address, subnet mask, and default gateway are obtained
automatically.
5 .
Use the [VALUE] knob to select “Apply”, and press the
[VALUE] knob.
6 .
Use the [VALUE] knob to select “Network Information”, and
press the [VALUE] knob.
* Network Information screen appears.
MEMO
If you fix the IP address, you’ll always be able to start Smart Tally with
the same IP address.
For details on how to specify a fixed IP address, refer to the manual of
the wireless LAN router that you’re using.
Starting Smart Tally
1 .
From the VR-120HD’s [MENU] button
Ó
“Network”
Ó
select
“Network Information”, and press the [VALUE] knob.
The Network Information screen appears.
2 .
Start a browser on your smart device or computer.
3 .
In the URL input field of your browser, enter the IP address
that’s shown in the Network Information screen to access
the website.
The Smart Tally settings screen appears.
The IP address will differ depending on the
device you’re using.
* You can also access the website by scanning a QR code. The QR code
is shown when you press “2D Code for Smart Tally” on the screen in
step 1.
4 .
In “Channel Status (Tally)”, select the video source that you
want to assign to the smart device or computer.
The device’s display switches to the tally information screen.
This shows the tally information corresponding to the video source
output from the VR-120HD.
Red: PGM
Green: PST
Gray: Not selected
NOTE
¹
Depending on the network conditions, the wireless LAN (Wi-Fi)
communication speed or connection might be unstable, so that
the tally indication is not displayed correctly. In this case, reload
the page.
¹
Depending on the version of the browser that you’re using, the
tally indication might not be displayed correctly. Use the latest
version of the browser whenever possible.
When “Link Status” indicates “Connected”,
the connection settings are complete.
