East Coast Supercharging Lysholm 2010+ Camaro Supercharger Kit User Manual
Page 91
P/N: 4LGE020-010 v1.1, 2011-04-29
© 2011 Lysholm
All Rights Reserved, Intl. Copr. Secured
81
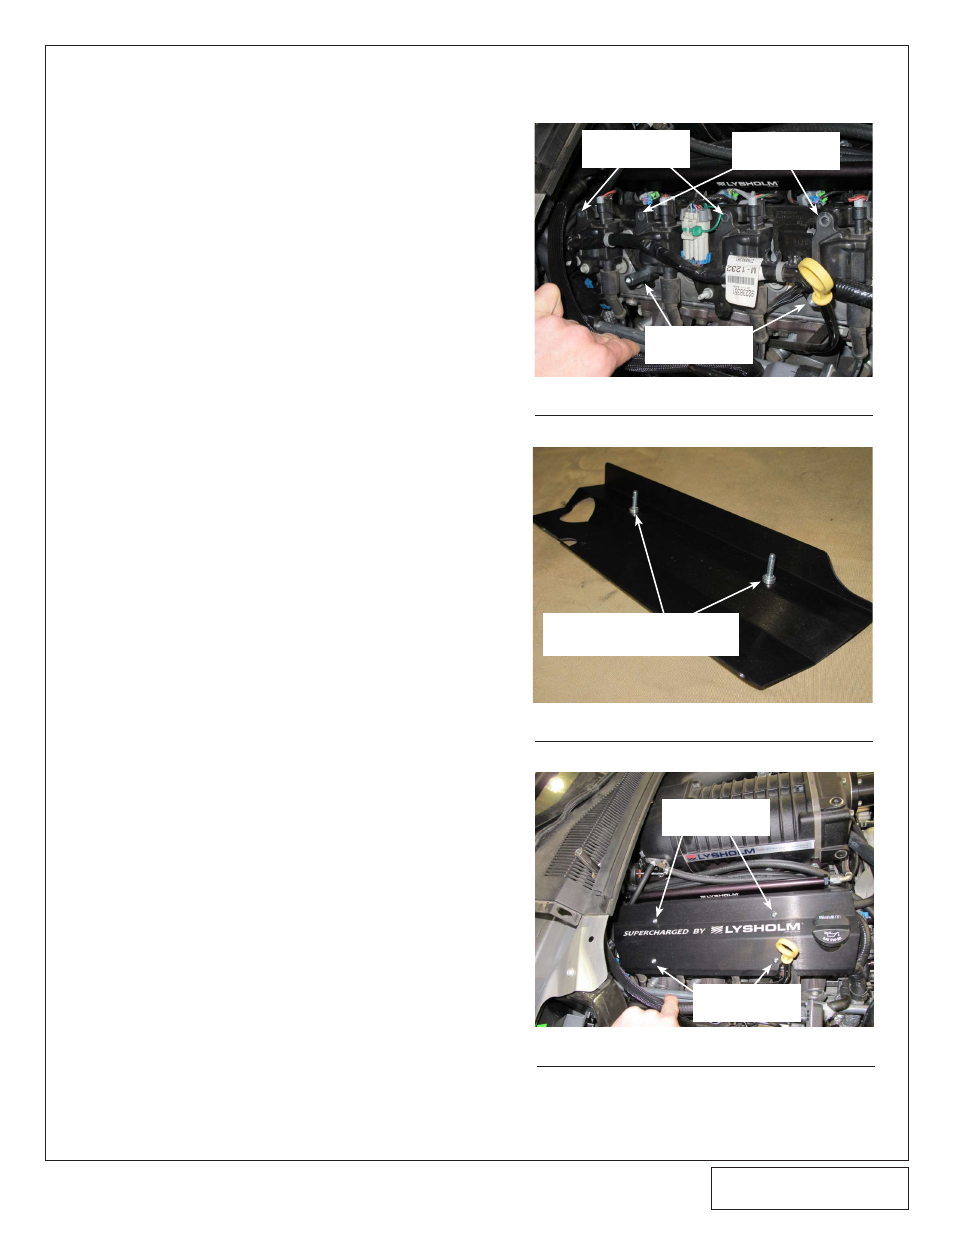
E. Install supplied passenger coil cover as fol-
lows.
1. Remove the two (2) lower mounting
screws securing the #2 and #6 cylinder
coil packs to the coil mounting bracket on
the passenger side valve cover.
2. Install the two (2) supplied male/female
M6 standoffs in the lower mounting holes
of the #2 and #6 cylinder coil packs. See
fig 10F.
3. Remove the four (4) upper mounting
screws securing the #2, #4, #6, and #8
cylinder coil packs to the coil mounting
bracket on the passenger side valve
cover. See fig 10F.
4. Install the two (2) supplied M6x1.0x25mm
button head screws into the upper coil
pack mounting holes for cylinders #4 and
#8. See fig 10F.
5. Locate two (2) M6x1.0x30mm, two (2)
small diameter M6 washers, two (2) .175
spacers, two (2) spacer retaining wash-
ers, and aluminum coil cover.
6. Install the M6x1.0x30mm screws with
small diameter M6 washers through the
two upper holes of the supplied coil cover
from the front, then from the back side,
install the .175 spacers followed by the
spacer retaining washers. See fig 10G.
7. Remove the oil fill cap, and install assem-
bled coil cover as shown.
8. Thread the two (2) M6x1.0x30mm screws
into the upper holes in the OEM coil pack
mounting bracket and the two (2)
M6x1.0x16mm screws with small diame-
ter M6 washers into the lower holes
threading into the previously installed
standoffs. See fig 10H.
9. Reinstall oil cap, and check that all hoses
and wires are free from any sharp edges.
Fig 10F
Fig 10G
Fig 10H
M6 STANDOFFS
M6X1.0X25MM
M6X1.0X30MM
M6X1.0X30MM, .175" SPACER AND
INTERNAL TOOTH LOCK WASHER
M6X1.0X30MM
M6X1.0X16MM