1 quick reference, Quick reference -2, Quick reference – KEYENCE FS-N10 Series User Manual
Page 24: Ba sic oper ati on, Digital fiber sensor fs-n10 series user's manual
3
Ba
sic
Oper
ati
on
3-2
- Digital Fiber Sensor FS-N10 Series User's Manual -
3-1
Quick Reference
The main setting operations are explained according to purpose. Refer to Chapter 4
for information on advanced function settings and explanations not given below.
Purpose
Description
Operation procedures
Reference
page
Swiching the
output
1
Swiching the output. (L-on/D-on)
1. Press the [MODE] button.
2. Switch with the
(
) button.
Adjusting the
sensitivity and
integrating the
display to "
100.0
"
and "
.0
"
2
Set the current received light intensity
to "
100.0
". (Preset)
Press the [PRESET] button while the PST
indicator is OFF.
3
When preset is valid, register the
received light intensity "
.0
".
(Work-preset)
*
After step 7, press the [PRESET] button +
button in the state to be set as "
.0
".
4
Set the received light intensity slightly
higher than when the setting was
made, to "
100.0
". (Maximum sensitivity
preset)
*
While the PST indicator is OFF, press and hold
the [PRESET] button. Reflective model: When
no workpiece is present. Thrubeam/Retro-
reflective model: When a workpiece is present.
5
Automatically register "
100.0
" and "
.0
"
when workpiece passes by. (Full Auto
preset)
*
Press and hold the [PRESET] button while the
PST indicator is OFF.
6
Cancel the various preset functions.
Press and hold the [PRESET] button.
Adjusting the
sensitivity
7
Set the setting value at the midpoint
between the received light intensity
values when a workpiece is present
and absent. (2-point calibration)
1. Press the [SET] button once when a work-
piece is present.
2. Press the [SET] button once when no work-
piece is present.
8
Set the setting value slightly higher
than the received light intensity value
at which the setting was made. (Maxi-
mum sensitivity calibration)
Reflective model: Press and hold the [SET] but-
ton when no workpiece is present. Thrubeam/
Retro-reflective model: Press and hold the
[SET] button when a workpiece is present.
9
Set the setting value automatically
when a workpiece is passing through.
(Full auto calibration)
Press and hold the [SET] button while the
workpiece passes through.
10
Set the setting value to the base point
where the workpiece is positioned.
(Positioning calibration)
1. Press the [SET] button once when no work-
piece is present.
2. Press and hold the [SET] button at the posi-
tioning point.
11
Finely adjust the setting value directly.
Press the
(
) button.
Shifting the
received light
intensity to "
0
"
12
Set the current display to "
0
". (Zero
shift)
Press the [PRESET] button +
button when
the PST indicator is OFF.
13
Cancel the zero shift function.
Press and hold the [PRESET] button.
Need to prevent
the received light
intensity from
becoming satu-
rated.
14
Automatically adjusts to appropriate
light emission and light receiving sen-
sitivity.
Briefly press [MODE] + [SET] buttons with the
amount of received light in maximum-saturated
condition.
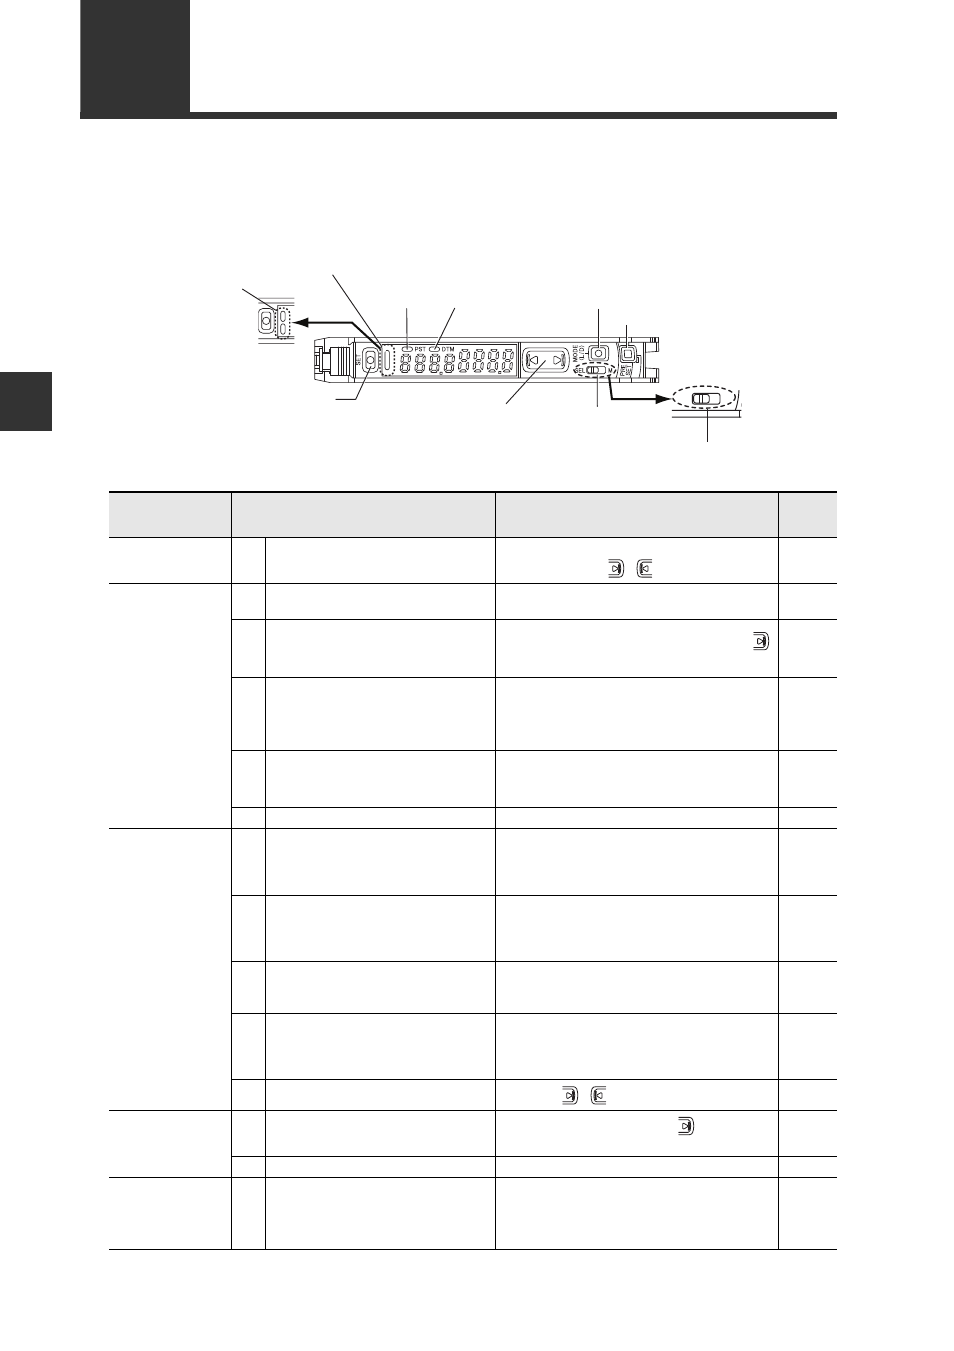
1
2
Manual button
[MODE]
button
Power select switch
(1-output type))
[PRESET]
button
[SET] button
Operation indicator
(1-output/Zero line type)
DTM
indicator
PST
indicator
Operation
indicator
(2-output type)
Channel select
switch (2-output type)