Seam-loc 24, Ssr s – Metal Sales Seam-Loc 24 Installation User Manual
Page 56
© Metal Sales Manufacturing Corporation/ Subject to change without notice/ Effective Date 12/03
800.406.7387 (Corporate Office) • www.metalsales.us.com
55
SEAM-LOC 24
®
INSTALLATION NOTES
SSR S
CULPTURED
R
AKE
(
ON
MODULE
) O
VER
R
IGID
I
NSULATION
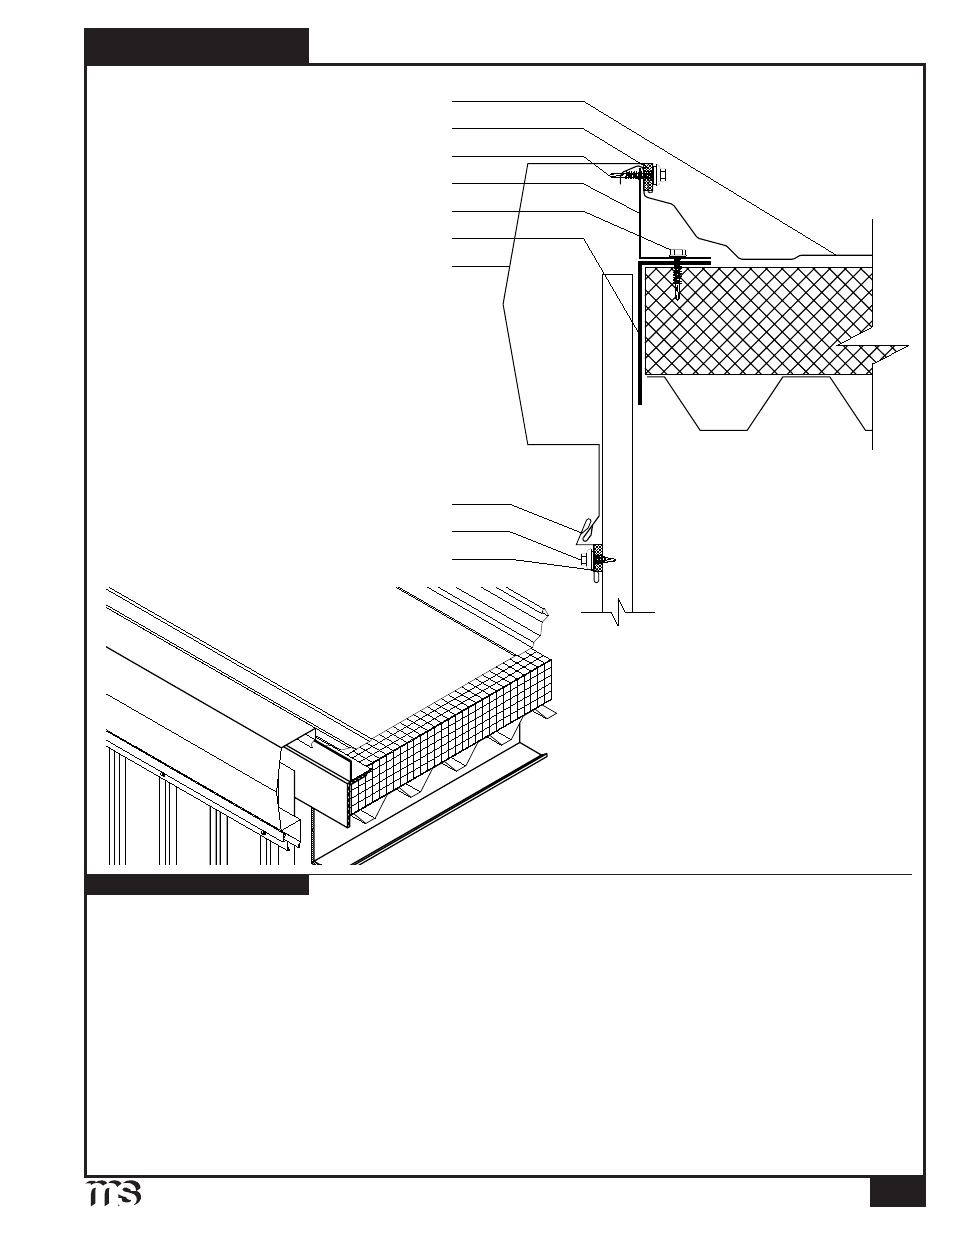
SSR Rake Slide
Double Bead Tape Sealant
Seam-Loc 24 Panel
Floating Rake Angle
SSR Sculptured Rake
#12-14 x 1
1
/
4
" Self Driller XL (1'-0" o.c.)
#12-14 x 1
1
/
4
" Shoulder Self Driller XL (1'-0" o.c.)
#
1
/
4
-14 x
7
/
8
" Stitch Screw XL (1'-0" o.c.)
Double Bead Tape Sealant
Rake Angle
Seam-Loc 24 floating rake angle and Seam-Loc 24 panels must be installed prior to SSR Sculptured Rake installation
(See pages 24-36).
1. With Seam-Loc 24 panel properly nested over top of Seam-Loc 24 Floating Rake Angle, apply a row of Double Bead Tape
Sealant across upper side of panel rib.
2. Install SSR Rake Cleat over Double Bead Tape Sealant. Fasten through SSR Rake Cleat, Tape Sealant, panel, and into
Floating Rake Angle with #12-14 x 1
1
/
4
" Self Driller XL screws, 1'-0"o.c.
3. Apply a row of Double Bead Tape Sealant across top leg of SSR Rake Cleat.
4. Install SSR Sculptured Rake flashing so that top of flashing is flush with top of SSR Rake Cleat and panel rib. Fasten
through SSR Sculptured Rake, Tape Sealant, and into SSR Rake Cleat with #
1
/
4
-14 x
7
/
8
" Stitch XL, 1'-0"o.c.
5. Position and apply a row of Double Bead Tape Sealant across wall panel just below lower leg of SSR Rake Flashing.
6. Install SSR Rake Slide over lower leg of SSR Rake flashing and Double Bead Tape Sealant. Fasten with #1⁄4-14 x
7
/
8
"
Stitch XL, 1'-0"o.c.
7. If two or more flashings are required, lap the flashing over the previously installed flashing by a minimum of 2" placing a
bead of Tube Sealant between the flashings and securing with Pop Rivets, 2
1
/
2
" o.c.