Seam-loc 24 – Metal Sales Seam-Loc 24 Installation User Manual
Page 48
© Metal Sales Manufacturing Corporation/ Subject to change without notice/ Effective Date 12/03
800.406.7387 (Corporate Office) • www.metalsales.us.com
47
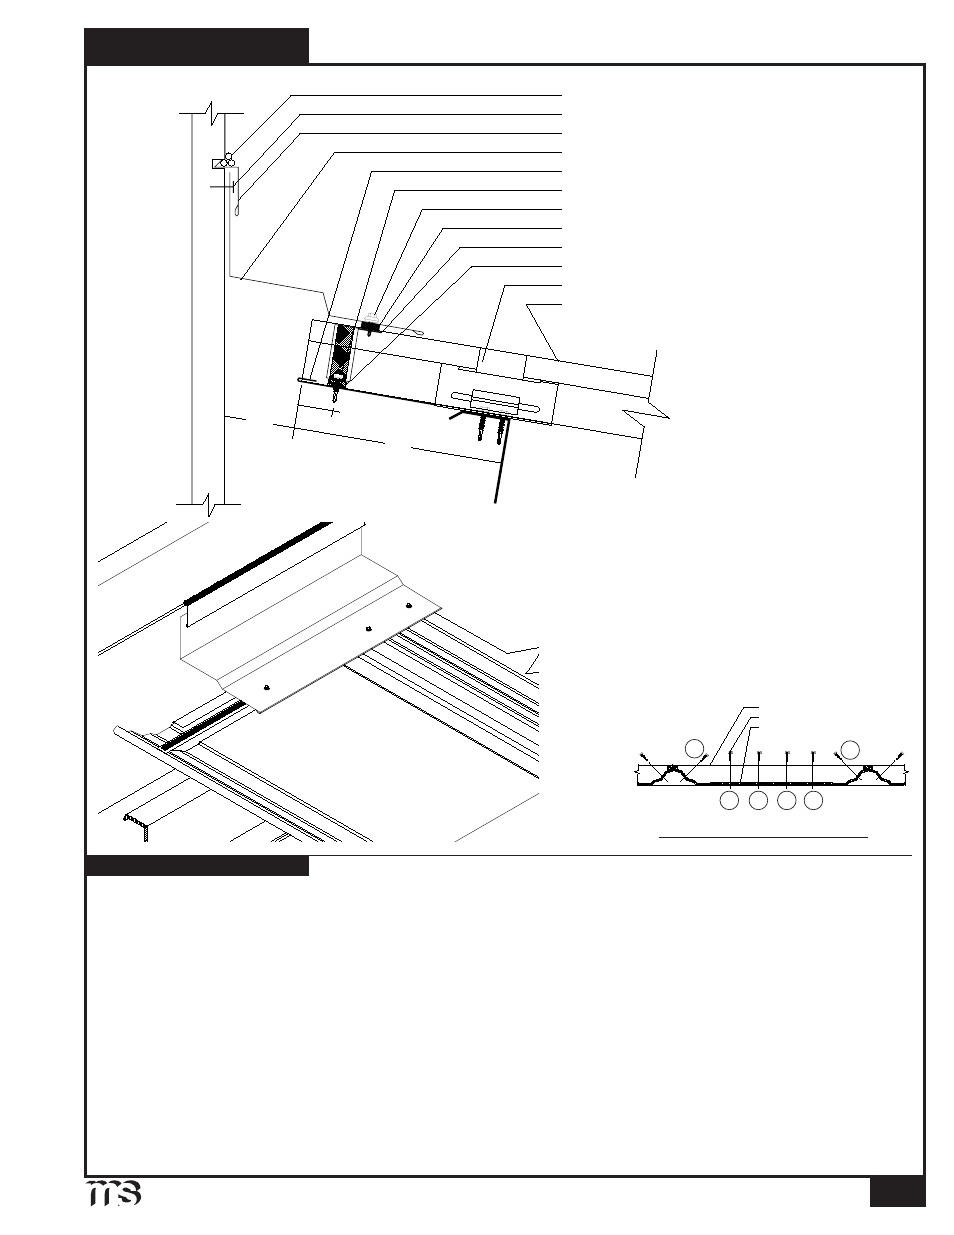
SEAM-LOC 24
®
Tube Sealant
Fastener (by others)
Reglet Flashing
SSR High Side Pitch Break
Compression Plate
#12-14 x 1" SD N/W (see below)
#
1
/
4
-14 x
7
/
8
" Stitch XL (3 per panel)
Double Bead Tape Sealant
Seam-Loc 24 Metal Outside Closure
Double Bead Tape Sealant
Clip with (2) #
1
/
4
-14 x 1
1
/
2
" SD N/W
Seam-Loc 24 Panel
9"
1
1
/
2
"
3"
E
NDWALL
WITH
R
EGLET
F
LASHING
O
VER
O
PEN
F
RAMING
1. Once panels have been installed, slide Compression Plate under upper edge of panels. Position Compression Plate to allow
for proper installation of endwall assembly. Use C-clamps to hold Compression Plate in place.
2. Apply a row of Double Bead Tape Sealant across panel, up and over all ribs approximately 1
1
/
2
" from panel end.
3. Install Seam-Loc 24 Outside Closures over Tape Sealant. Before continuing make sure Outside Closure placement will
accommodate SSR High Side Pitch Break.
4. Once closure is set in Tape Sealant, fasten through Outside Closure, Tape Sealant, Seam-Loc 24 panel, and into Compression
Plate with (6) 12-14 x 1" SD N/W per panel. C-clamps may be removed once closures have been fastened.
5. Once all Outside Closures have been installed, place a row of Double Bead Tape Sealant across top of Outside Closures. Tube
Sealant must be used to fill any and all gaps left around Outside Closures.
6. Install SSR High Side Pitch Break and secure to top leg of Outside Closures with #
1
/
4
-14 x
7
/
8
" Stitch XL at the spacing shown
above and to parapet wall with appropriate fastener, 1'-0" o.c.
7. Install Counter Flashing, Reglet, or wall panel and fasten to parapet wall with appropriate fastener, 1'-0" o.c. If Counter
Flashing or Reglet is used, seal to parapet wall with Tube Sealant.
8. If two or more flashings are required, lap the flashing over the previously installed flashing by a minimum of 2" placing a
bead of Tube Sealant between the flashings and securing with Pop Rivets, 2
1
/
2
" o.c.
INSTALLATION NOTES
1
/
4
:12 Slope
Minimum
Seam-Loc 24 Fastening Pattern
D. B. T. S.
Metal Outside Closure
#12-14 x 1" SD N/W
2
6
5
4
1
3