Creating ospf areas, Deleting ospf areas, Creating ospf areas -3 deleting ospf areas -3 – Lucent Technologies P550 User Manual
Page 185: Creating ospf area
Configuring the OSPF Routing Protocol (Layer 3)
Cajun P550/P220 Switch Operation Guide
9-3
Creating OSPF Areas
To create OSPF areas:
1. In the OSPF Configuration section of the Web Agent window, click Areas. The
OSPF Areas dialog box opens.
Note: The Area ID 0.0.0.0 is a backbone area and always exists in an OSPF
configuration.
2. Click CREATE. The Add OSPF Area dialog box opens.
3. Use Table 9-2 to configure your new OSPF area:
4. Click CREATE to save your changes, or CANCEL to restore previous settings.
Deleting OSPF Areas
To delete an OSPF area:
1. In the OSFP Configuration section of the Web Agent window, click Areas. The
OSPF Areas dialog box opens.
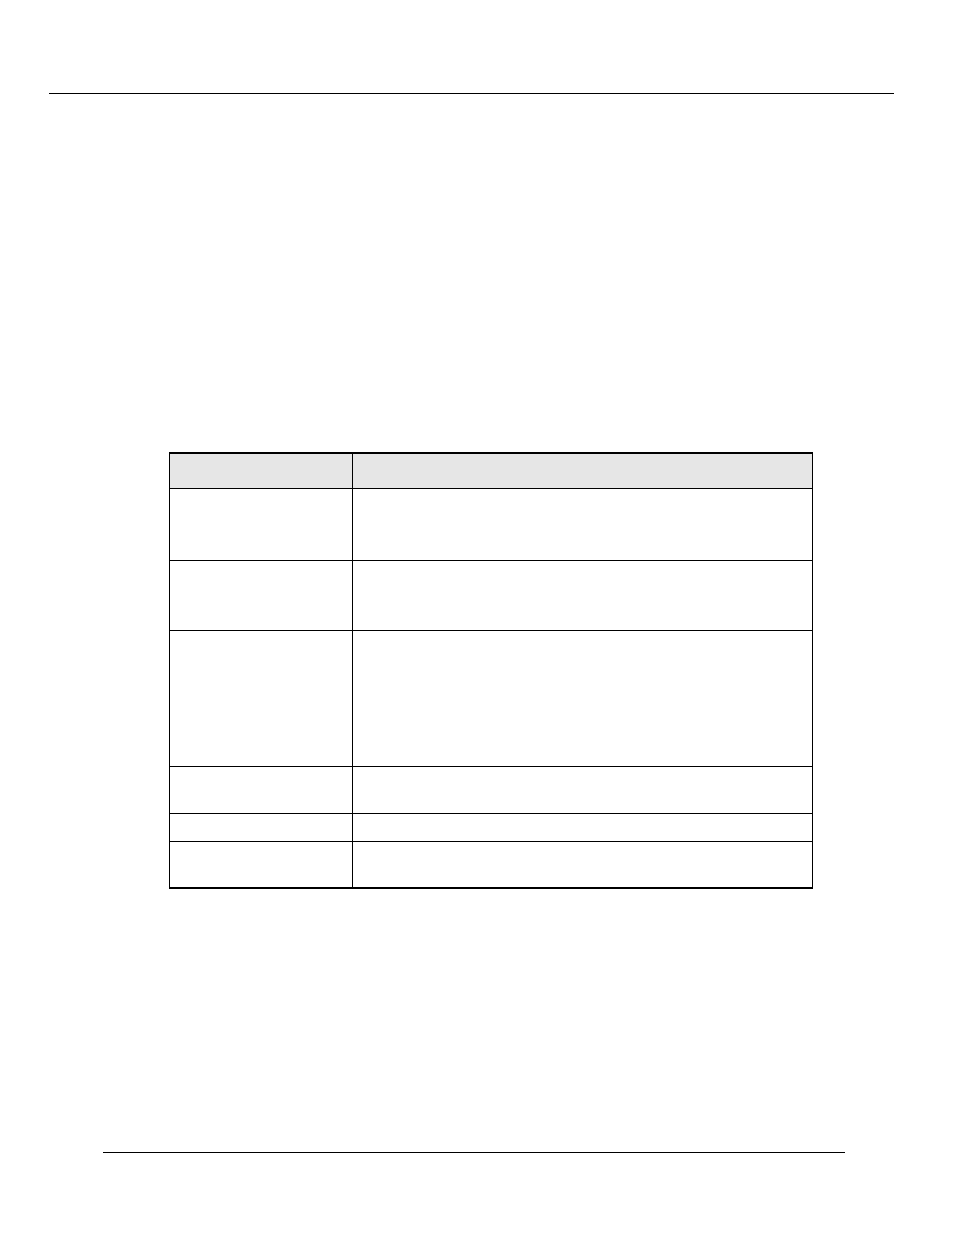
Table 9-2. OSPF Area Parameters
Parameter
Allows you to...
Select
Select the OSPF area to be configured.
Note:
This parameter is displayed in the OSPF Area
dialog box, not in the Add OSPF Area dialog box.
Area ID
Specify the Area ID (32-bit character) for the new area. This
must be a unique ID within AS.
Note: Do not use 0.0.0.0 as an area ID.
Area Type
Select the type of area. Types include:
• Non-Stub - Non-edge device/router.
• Stub - An edge device/router that does not leak external
advertisements.
• Not-so-stubby - This is still a stub area, however, this
device/router can leak some external advertisements.
Translate 7 into 5
Select to enable or disable the translation of the NSSA ASE Type
7 into an AS External LSA Type 5.
Stub Metric
Specify the stub area default summary cost metric. (Default is 1).
Type 3 ASE Filter
Select to enable or disable the Type 3 summary LSA filter for
Stub and NSSA only.