Replacing the bobbin case, Comment retirer la boîte à canette, Comment repiacer la boîte à canette – SINGER 2010 Touch Tronic Instruction Manual User Manual
Page 105: Como reponer la caja de la bobina, Removing the bobbin case, Cómo sacar la caja de la bobina
Attention! The text in this document has been recognized automatically. To view the original document, you can use the "Original mode".
Removing the Bobbin Case
CAUTION: Before removing bobbin case, dis
connect the power-line plug from the socket
outlet.
Remove presser foot, presser foot shank
and needle to aid in visibility.
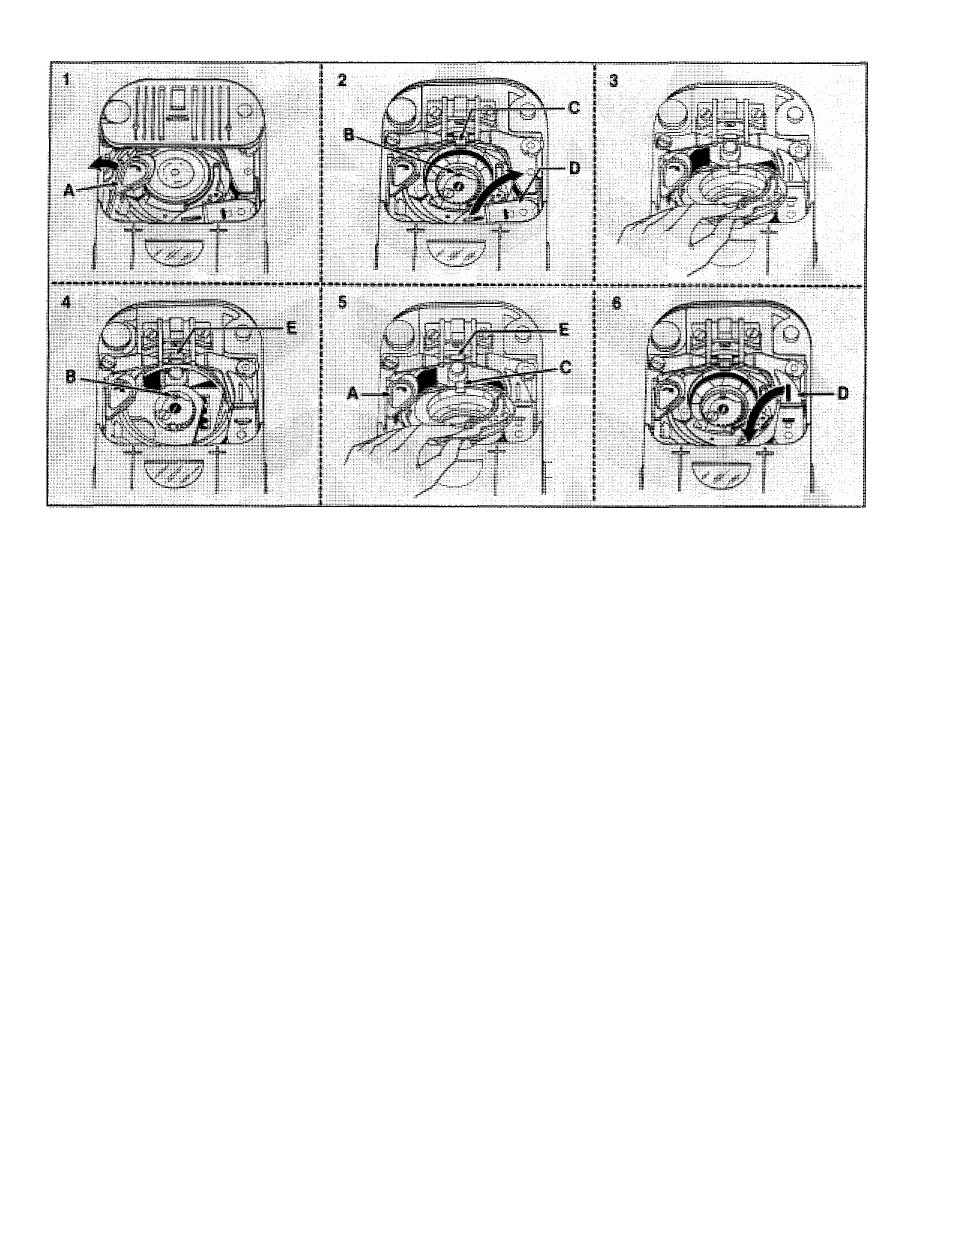
1. Open slide plate. Move the bobbin latch A
all the way to the left. Remove the bobbin
and plate.
2. Turn the hand wheel toward you to posi
tion hole B in the hook area with centre
block C.
® Slide lever D all the way over to the
right.
3. Place the thumb of your left hand under
the metal bracket on the bobbin case and
your index finger over it, as illustrated.
Remove the bobbin case by lifting it up
and guiding it toward you.
Replacing the Bobbin Case
4. Turn the hand wheel toward you to posi
tion hole B in the hook area with the cen
tre section of bracket E.
5. Place the thumb of your left hand under
the metal bracket on the bobbin case and
your index finger over it, as illustrated.
Guide the bobbin case back into place
under bobbin latch A, making sure centre
block C is positioned all the way under
metal bracket E.
6. Slide lever D all the way over to the left
until it clicks into place.
Replace the bobbin and plate. Close slide
plate.
Comment retirer la boîte
à canette
AVERTISSEMENT:
Avant de retirer la boîte
à canette, débranchez ta fiche de la prise de
courant
Retirez le pied presseur, le talon du pied
presseur et l’aiguille, pour plus de visibilité.
1. Ouvrez la glissière. Déplacez le loquet A
de la canette jusqu’à l’extrême gauche.
Retirez la canette et la plaque.
2. Tournez le volant à main vers /’avant afin
de placer le trou B, près du crochet, avec
le bloc de centrage G.
® Glissez le levier D jusqu’à l’extrême
droite.
3. Placez le pouce de la main gauche sous le
support métallique de la boîte à canette et
l’index par-dessus, ainsi qu’illustré. Reti
rez la boîte à canette en la soulevant et
la guidant vers l’avant.
Comment repiacer la boîte
à canette
4. Tournez le volant à main vers /’avant afin
de placer le trou B, près du crochet, avec
la section centrale du support E.
5. Placez le pouce de la main gauche sous
le support métallique de la boîte à canette
et l’index par-dessus, ainsi qu’illustré.
Guidez la boîte à canette à sa position,
en-dessous du loquet de canette A, tout
en vous assurant que le bloc de centrage
C
soit placé totalement sous le support
métallique E.
6. Glissez le levier D jusqu’à l'extrême gau
che, jusqu’à ce qu’un déclic se fasse
entendre, indiquant qu’il est enclenché.
Replacez la canette et la plaque. Refermez
la glissière.
Cómo sacar la caja de la bobina
CUIDADO:
Antes de sacar la caja de la bobina,
desconecte el enchufe macho de la linea eléctrica
del receptáculo.
Saque el prénsatelas, el vástago del prénsa
telas y la aguja para mejorar la visibilidad.
1. Abra la plancha deslizante. Mueva el su
jetador de bobina A completamente hacia
la izquierda. Saque la bobina y la plancha.
2. Gire el volante hacia Usted al orificio B,
cerca del gancho con el bloque centro C.
o Mueva la palanca D completamente
hacia la derecha.
3. Ponga el pulgar de la mano izquierda de
bajo del soporte metálico en la caja de la
bobina y su índice por encima, como se
ilustra. Saque la caja de la bobina levan
tándola y guiándola hacia Usted.
Como reponer la caja
de la bobina
4. Gire el volante hacia Usted al orificio B,
cerca del gancho con la sección del
soporte E.
5. Ponga el pulgar de la mano izquierda de
bajo del soporte metálico en la caja de la
bobina y su índice por encima, como se
ilustra. Guíe la caja en su lugar debajo del
sujetador de bobina A, asegurándose de
que el bloque centro
C
está posicionado
totalmente debajo del soporte metálico
E.
6
.
Mueva la palanca D completamente
hacia la izquierda hasta que encaje.
Reponga la bobina y la plancha. Cierre la
plancha deslizante.
104