SINGER 2010 Touch Tronic Instruction Manual User Manual
Page 102
Attention! The text in this document has been recognized automatically. To view the original document, you can use the "Original mode".
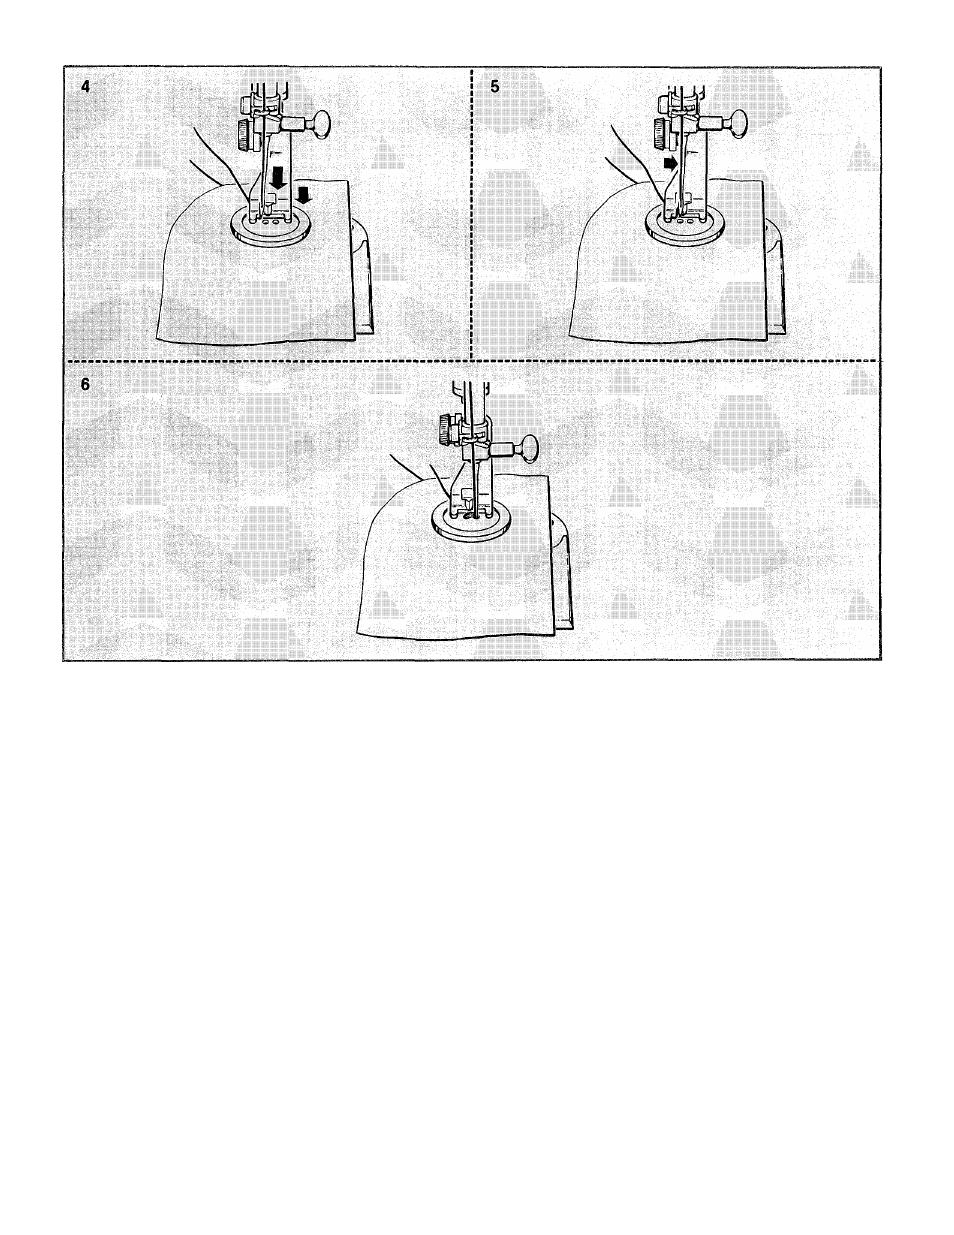
4 Lower button foot.
® Turning hand wheel toward you, lower
needle close to button surface.
Adjust width, if necessary, until needle is
aligned directly above left hole in button.
Turn hand wheel toward you to take one
stitch in left hole, then continue to turn
hand wheel to carefully place needle in
opposite hole.
® Run machine slowly taking approxi
mately six stitches to secure button.
® Remove work from machine leaving
10 cm (4 inches) of thread. Pull thread
ends through to inside of garment, and
knot them close to fabric to form a
secure finish.
If sewing a series of the same buttons is
desired, after following the above pro
cedure, place garment and button under
button foot. Raise needle to position it
over ¡®fS hole of button. Carefully place
needle in left hole of button and run
machine slowly.
4 Abaissez le pied pour bouton.
® Tournez le volant à main vers l'avant
jusqu’à ce que l’aiguille soit à proximité
de la surface du bouton.
5. Réglez la largeur, si nécessaire, jusqu’à
ce que l’aiguille soit alignée directement
au-dessus du trou gauche dans le bouton.
6. Tournez le volant à main vers l’avant pour
faire un point dans le trou gauche et con
tinuez ensuite à tourner le volant afin de
placer l’aiguille avec soin dans le trou
opposé.
® Faites fonctionner la machine lente
ment tout en cousant environ six points
afin d’immobiliser le bouton.
® Retirez le travail de la machine, tout en
laissant environ 10 cm de fil. Faites pas
ser les fils à l’intérieur du vêtement et
nouez prés du tissu afin d’arrêter soli
dement la couture.
Si vous avez une série de boutons identi
ques à coudre, après avoir suivi la mé
thode ci-haut, placez le vêtement et le
bouton sous le pied pour bouton. Relevez
l’aiguille afin qu’elle se trouve au-dessus
du trou gauche du bouton. Placez l’aiguille
avec soin dans le trou gauche du bouton et
faites fonctionner la machine lentement.
4. Baje el sujetabotón.
® Gire e! volante hacia Usted, baje la
aguja muy cerca de la superficie del
botón.
5. Ajuste el ancho, si hace falta, hasta que
la aguja esté alineada directamente en
cima del agujero izquierdo en el botón.
§. Gire el volante hacia Usted para dar un
punto en el agujero izquierdo, después
continúe girando el volante para situar la
aguja cuidadosamente en ei agujero
opuesto.
9 Opere la máquina lentamente y dé
aproximadamente seis puntos para
pegar ei botón.
9 Saque el trabajo de la máquina dejando
10 cms de hilo. Saque los extremos del
hilo por el interior de la prenda y haga
un nudo cerca de la tela para formar
un acabado seguro.
Si Usted desea pegar una serie de boto
nes idénticos, después de seguir el pro
cedimiento anterior, sitúe la prenda y el
botón debajo del sujetabotón. Levante la
aguja para posicionarla encima del agu
jero izquierdo del botón. Introduzca la
aguja cuidadosamente en el agujero iz
quierdo del botón y opere la máquina
lentamente.
101