Painting – Top Flite TOPA0300 User Manual
Page 49
P
a
ints used on the pr
ototype:
W
e
used
K&B Super P
o
xy
pr
imer and color
coat f
or all plastic and Butyr
ate par
ts
.
Surface Preparation
Mask the Rear Windo
w
with vin
yl
electr
ician’
s tape or F
risk
et
®
film (a
v
ailab
le at ar
t
supply stores). Mix
equal par
ts
of K&B pr
imer
,
hardener and thinner
, then stir the mixture w
e
ll.
Spr
a
y
the
Co
wl, Wheel P
ants, T
a
il Cone
, Rear
Windo
w Frame
, F
a
irings
and
Wing Struts
with
a
thin
coat of pr
imer
. Add a second coat of
pr
imer to areas that need it. Allo
w pr
imer to dr
y
o
v
er
night bef
ore sanding. W
et sand the pr
imer
with 320 and 400-g
rit sandpaper using a b
loc
k
where possib
le
. Most of the pr
imer should be
sanded off
.
Appl
y the color
s
W
e
spr
a
y
e
d the par
ts with K&B Super P
o
xy
.
W
e
custom mix
e
d the paint to match the Dar
k
Red MonoK
ote b
y
adding a little Y
ello
w and
Blac
k to their standard Red color
. K
eep a s
w
atch
of MonoK
ote handy to test and compare the
color on a regular basis
. W
e
used a f
e
w drops of
Blac
k and Blue mix
ed with White to match
MonoK
ote Gr
a
y.
NO
TE: All paints dr
y slightl
y darker than
the
y appear while wet. Spra
y
on the color
coat when satisfied with the matc
h
.
K&B paints are not difficult to use if y
ou ha
v
e
spr
a
y
equipment. Use equal par
ts of the mix
e
d
color paint (P
ar
t A) and gloss hardener (P
ar
t B),
stir w
ell, then thin the mixture with K&B thinner
so that it can be spr
a
y
ed. Use about 33 percent
of the total v
o
lume of par
ts A and B combined,
of K&B thinner
.
W
e
painted all Landing Gear assemb
lies
intact. The wheels w
ere mask
ed off with paper
stuff
ed into the Wheel P
ants
. By painting the
Landing Gear in this manner
, all the par
ts
b
lended together m
uch better than if w
e
had
painted them separ
ately
.
DRA
W DOOR AND HA
TCH
OUTLINES
F
or dr
a
wing the door and baggage compar
tment
hatch outlines w
e
used a
Staedtler
®
Lumocolor
313 P
ermanent
fine point pen. These pens are
a
v
ailab
le from engineer
ing/dr
afting supply
stores
. W
e
suggest using this pen because it
w
o
rks w
ell on MonoK
ote and mistak
es can be
remo
v
ed with 70% r
u
b
bing alcohol. Y
our model
ma
y be cleaned with most cleaners without
aff
ecting the lines too badly
. Remember
, y
ou can
easily touch-up outlines b
y
using this method.
APPL
Y THE DECALS
NO
TE: The decal sheet does not give y
o
u
e
ver
ything y
ou need to completel
y trim
y
our model, b
ut it does pr
o
vide all the
intricate detailing and difficult items.
1. Study the plans and the photos on the bo
x to
deter
mine the location of individual decals
.
2. Thoroughly clean y
our air
plane bef
ore
applying decals
.
3
. T
rim the decals as close as pr
actical. Carefully
apply the decals to the model. Y
ou can float the
decals into position b
y
first applying soap
y w
a
ter
(tw
o or three drops of dish detergent to a quar
t of
w
ater) to the model’
s surf
ace
, then smoothing on
the decal. Squeegee out e
xcess w
ater with a
credit card wr
apped with a tissue
. Blot the
surf
ace dr
y and let the decal cure f
or at least 12
hours bef
ore r
unning the engine
.
NO
TE: Cer
tain te
xt decals are pr
o
v
ided and
ma
y be used at y
our discretion.
The
“No Step” decals go on top of the main
wheel pants.
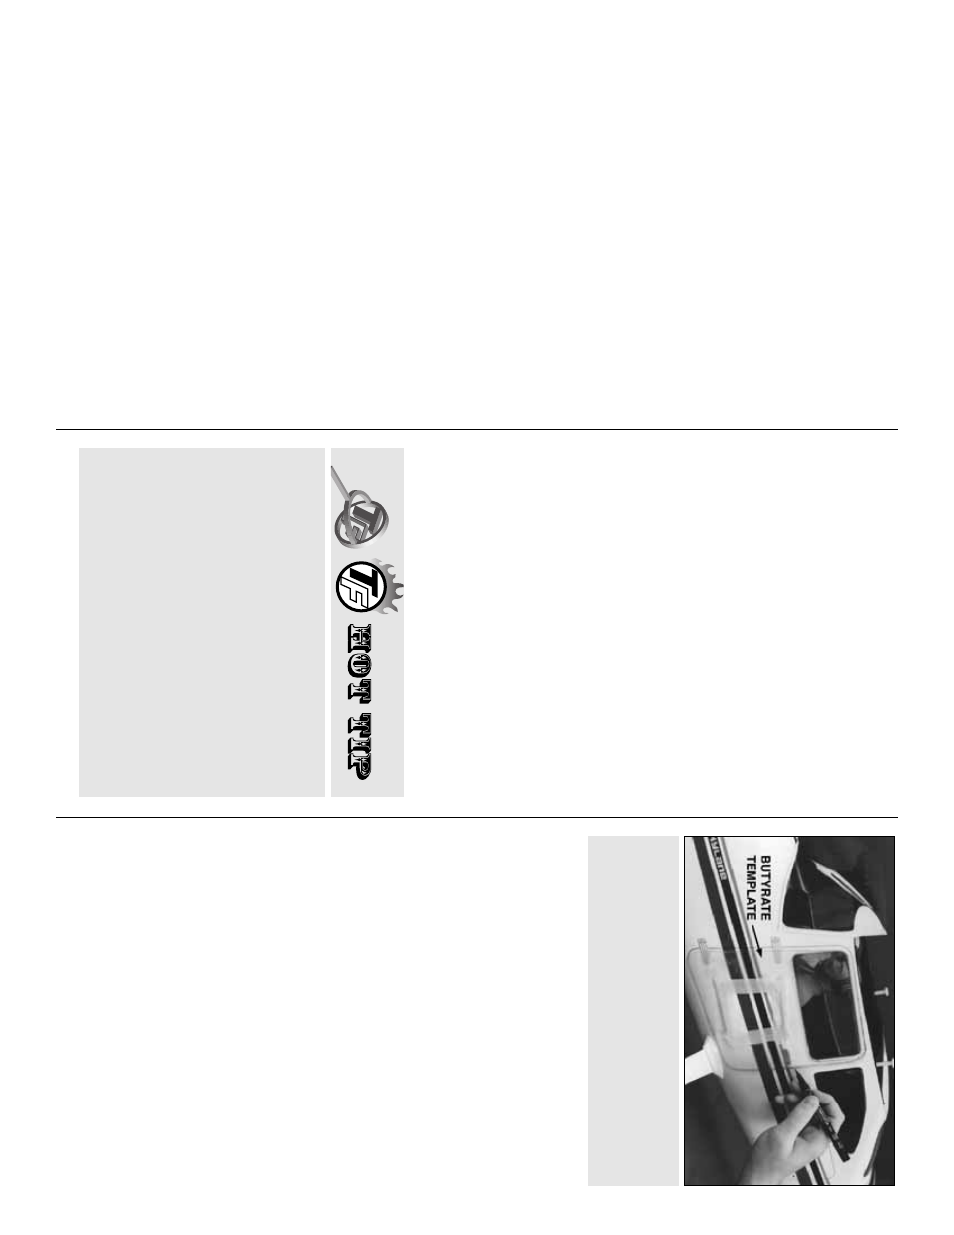
P
osition the template on the fuse using the
windo
w as a ref
erence point, then tr
ace the
door outline with a Staedtler pen. Y
ou will ha
v
e
to measure the location of the luggage hatch.
HO
T TIP
: Place a sheet of clear b
utyr
ate
plastic o
v
er the door and luggage hatch on the
plans
. Score them onto the plastic with a
hob
b
y
knif
e
. Bend the plastic along the score
to break it off cleanly
. Sand the cor
ner r
adii
with 320-g
rit sandpaper to smooth off an
y
b
urrs
. La
y the plastic template bac
k o
v
er the
plans and use a pen to tr
ace the outline of the
windo
w fr
ame f
or ref
erence
. Cut a hole in the
center of the template so that y
ou can tape it in
position without ha
ving an
y tape e
xtending
o
v
er the edges
.
P
ainting
49