Top Flite TOPA0300 User Manual
Page 19
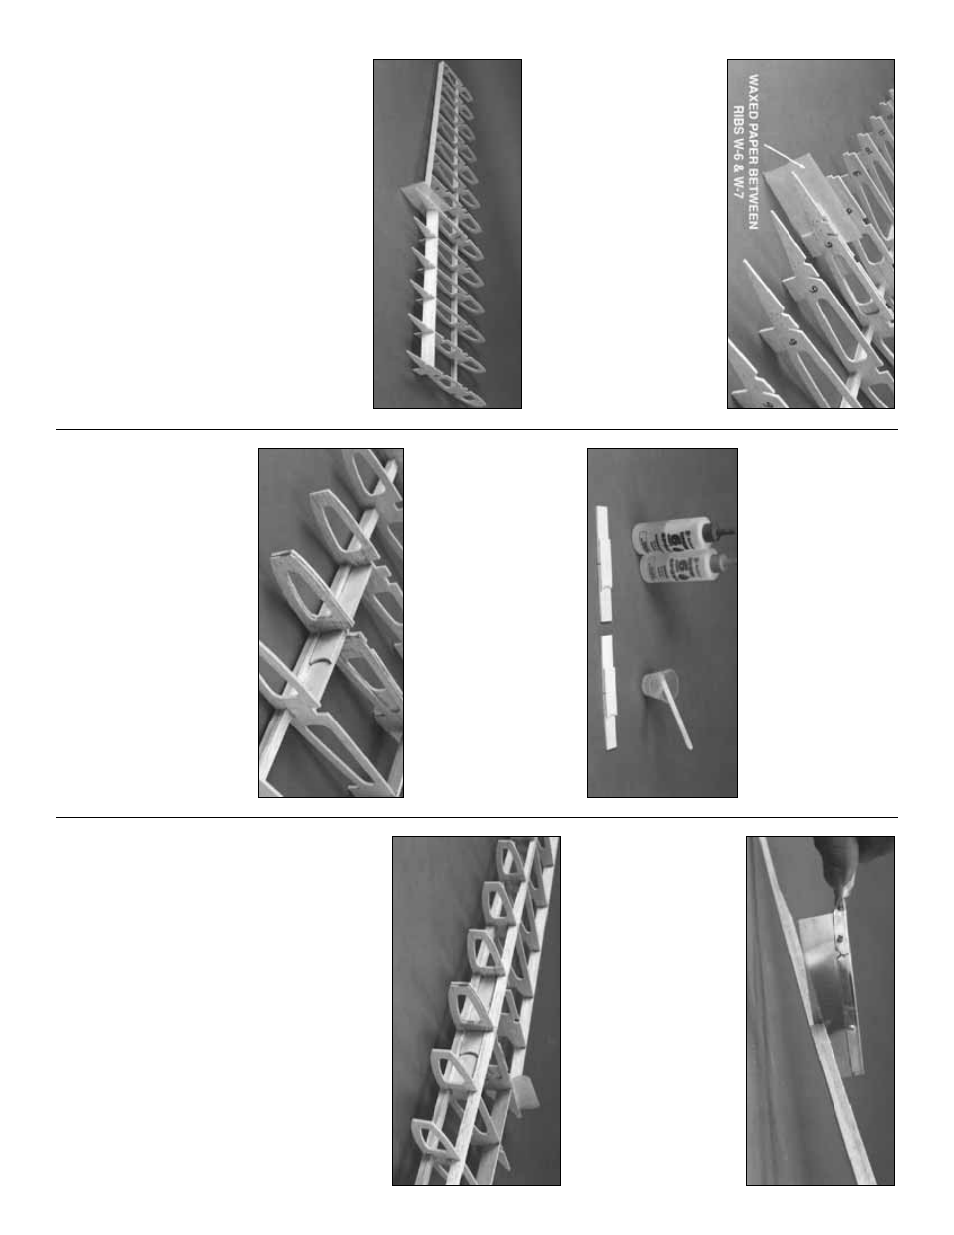
❏❏
6.
NO
TE: Complete this step onl
y if
yo
u
’re ad
ding operational flaps.
Slide tw
o la
y-
ers of w
a
x
ed paper betw
een r
ibs W
-6 and W
-7
from the TE to just f
orw
ard of the Aft Inner Spar
notch. The w
a
x
ed paper will help pre
v
ent the
ribs from stic
king together when y
ou cut the
Flaps free later on.
❏❏
7. Fit the die-cut 1/8” balsa
Aft Inner Spar
and
Aft Outer Spar
into the aft notches of r
ibs
W
-4 through W
-6 and W
-7 through W
-14 respec-
tiv
ely
. The upw
ard f
acing edge of the Aft Inner
Spar protr
udes abo
v
e
the r
ibs
. Mak
e a mental
note of the protr
uding angle
, then, after remo
v-
ing the Aft Inner Spar from the fr
ame
, sand a
be
v
el on this edge so that it will be flush with the
ribs
.
Although y
ou could sand it in place
, y
o
u
w
ould r
un the r
isk of def
or
ming the wing r
ibs
.
❏❏
8. Sight do
wn the TE of the wing from the
root end making sure all r
ibs are aligned. Use
paper to shim under the jig tabs of an
y r
ibs that
are lo
w
.
❏❏
9. Chec
k that the upw
ard-f
acing edges of
the r
ibs and the top surf
ace of the Aft Spars are
e
v
en and that all of the jig tabs are touching the
w
o
rk
surf
ace or shims
. When e
v
er
ything is
aligned, wic
k thin CA into all joints
. Wic
k
thin CA
into
all
seams around the mating surf
aces of
W
-6 and W
-7.
❏❏
10. Place par
t
A
and
B
of the 1/8” die-cut
ply
Outer Dihedral Braces
o
v
er the patter
n
on
the plan and mar
k
the indicated ref
erence line
on both
long edg
es
of each piece
.
NO
TE: Both par
ts are slightl
y narr
o
wer at
one end. Use 6-Min
ute Epo
xy to glue the
par
ts tog
ether as sho
wn in the photo. Be
sure to make one left and one right set.
❏❏
11. Use a r
a
z
or sa
w to cut a 1/4” wide slot
from the upper f
orw
ard Spar notch do
wn to the
lo
w
e
r Spar through r
ibs W
-6 and W
-7. Inser
t the
Outer Dihedr
al Br
ace into the slot y
ou just cut
with the narro
w end to
w
ard the wing tip and the
shor
t por
tion of the assemb
ly f
acing the leading
edge
. The angled edge should be f
acing upw
ard
betw
een r
ibs W
-7 and W
-8.
Don
’t glue it in
place y
e
t, b
ut lea
v
e
it in position.
❏❏
12. Hold the upper Outer Spar in position
on the r
ibs
, with the inboard end flush with W
-4.
Mar
k the Spar at the seam betw
een r
ibs W
-6
and W
-7. Score the inside of the spar tw
o thirds
of the w
a
y through with a r
a
z
or sa
w
.
The
inside
is the side with the tapered 1/8” Outer
Spar Doub
ler
.
❏❏
13. Press the upper
Outer Spar
into the
wing notches and chec
k f
or a flush fit at each r
ib
.
When satisfied, remo
v
e
the Outer Spar
, then use
30-Min
ute Epo
xy to
glue the Outer Dihedral
Brace
in position. Apply a bead of epo
xy to the
upper edge of the Outer Dihedr
al Br
ace
, and,
bef
ore the epo
xy cures
, install the Outer Spar
Assemb
ly and glue it to all the r
ibs with thin CA.
NO
TE: W
ork some epo
xy into the the sa
w-
cut bef
ore la
ying the Spar in place
.
❏❏
14. Cut f
our 3-1/8” long
Ser
v
o
Hatc
h
Rails
from 1/4” x 3/8” x 30” balsa. Glue tw
o of these
pieces into the notches in r
ibs W
-4 and W
-5 and
tw
o betw
een r
ibs W
-7 and W
-8. These will sup-
por
t the flap and aileron ser
v
o
hatches
. Install
19