Build the fin – Top Flite TOPA0300 User Manual
Page 14
❏
18. T
ape the Ele
v
ators to the Stab making
sure that y
ou ha
v
e
the correct clear
ance around
the Balance T
abs
. Hold the bent 1/8”
Ele
v
ator
Joiner Wire
and
Horn
up to the Ele
v
ator and
mar
k the location of the Joiner Wire holes that
will be per
pendicular to the hinge line (see the
plans f
or the joiner location).
NO
TE: The Ele
v
a
tor Horn is off-center
.
When looking at the top surface of the
Stab, the Horn will be to the right of
Stab center
.
❏
19. Dr
ill 9/64” holes in the ele
v
ators f
or the
Joiner wire
. Cut slots inboard of the holes to
allo
w the wire to be inset into the ele
v
a
tors
, flush
with the LE. Sand the
Ele
v
ator LE
to a
“
V
”
shape to allo
w f
or Ele
v
ator tr
a
v
el — ref
er to the
plans f
or the correct angle
.
❏
20. T
est-fit, b
ut do not glue the joiner wire into
the Ele
v
a
tors
. Chec
k to see that the Ele
v
a
tors
align with each other proper
ly and that the
y fit
the Stab without binding. Mak
e adjustments b
y
remo
ving
the Joiner Wire and then bending it,
if required.
❏
1. Co
v
er the Fin/Rudder section of the plans
with w
a
x
ed paper
.
❏
2. Punch out the die-cut 3/32” balsa r
ibs
V-
1
through
V-
6
. Be sure to preser
v
e
their jig tabs
.
NO
TE:
If y
ou plan to install an operational
beacon light on top of the Fin drill a 3/16
”
hole thr
ough the center (fr
ont to bac
k, top
to bottom) of eac
h rib. This hole will pr
o-
vide a passa
g
e
f
or the wiring.
❏
3. Cut a 15” length of the tapered 1/4” balsa
Stabiliz
er/Fin LE
stoc
k to
matc
h the plans
e
xactl
y
, as the length of the LE sets the angle of
the fin.
Notice that the Fin LE fits into a notch on
top of F-8.
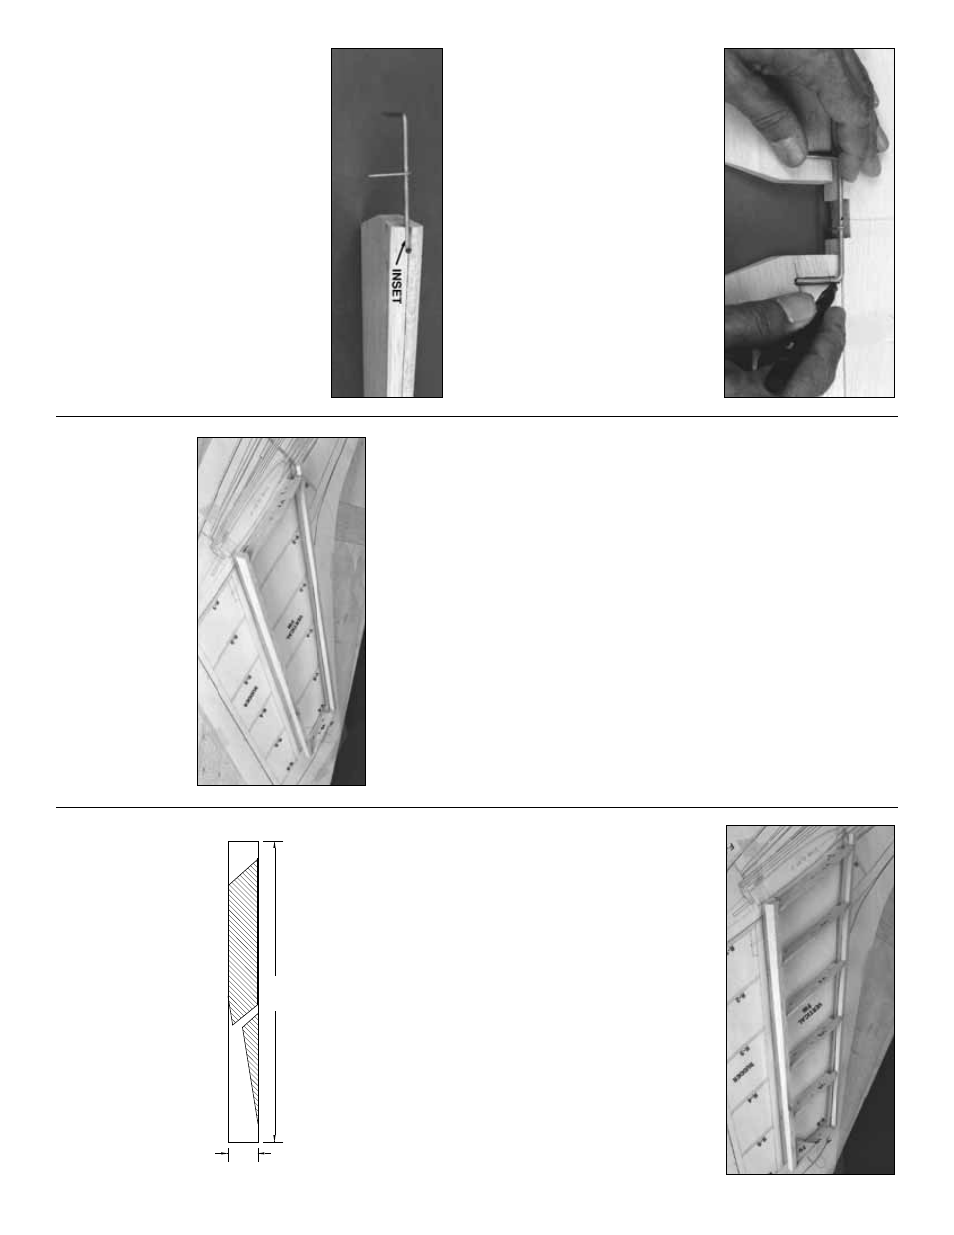
❏
4. Punch out the die-cut 1/4” balsa
Fin TE
and lightly sand the edges to touch them up
.
Sand (or cut) the tips to match the s
w
eep angle
as sho
wn on the plans
.
❏
5. Sand an angle on the ends of each r
ib to
match the s
w
eep angle of the LE and TE. Pin
ribs
V
-1
and
V
-6
to the b
uilding board o
v
er their
proper locations
. Center the LE on the front of
the r
ibs and glue it in place
. Center the Fin TE
on the aft edge of the r
ibs and glue it in place
.
❏
6. Put r
ibs
V-
2
through
V
-5
into their places
and glue them to the LE and TE.
Remember
, all
jig tabs should contact the w
ork surface
.
❏
7. Glue the die-cut 3/32” balsa
Fin Gusset
into the cor
ner of V
-6 and the T
railing Edge
.
❏
8. Apply e
xtr
a CA+ glue to an
y joints that do
not appear to be w
ell glued.
❏
9. Blend the LE to match the r
ibs on the
upw
ard f
acing (left) fin side
. Sand the TE, if nec-
essar
y,
to b
lend smoothly with the r
ibs
.
❏
10. Mak
e
a skin f
or each side of the fin using
1/16” x 3” x 30” balsa sheet. Lea
v
e
e
xcess balsa
on one edge of the skin so it
o
verhangs past
V
-1 about 5/8
”
; this will allo
w fitting to the stab
later
. With the str
ucture flat on the tab
le
, glue on
the left (upw
ard-f
acing) skin.
30"
3"
FIN SKIN
Build the fin
14