Build the flaps, Fit the flaps – Top Flite TOPA0300 User Manual
Page 27
❏❏
9. T
rim off the e
xcess balsa from the
Inner Aft Spar
, then use a 3/4” do
w
e
l wr
apped
with 220-g
rit sandpaper to sand a r
adius on
the protr
uding por
tions of the r
ibs
. Cut a 1/4” x
1/2” slot in the Inner Aft Spar to allo
w the Flap
Hor
n and Cle
vis to clear
.
❏❏
10.
R
e
in
fo
rc
e
t
h
e
u
n
d
e
rs
id
e
o
f t
h
e
w
in
g
sheeting (where it o
v
erhangs the aft inner spar
at the Flaps) b
y
gluing lefto
v
er 1/16” x 1/4”
balsa str
ips betw
een the r
ibs on the underside
of the top sheeting. Sand a be
v
el along this
edge to allo
w the flap to clear when it’
s in the
up
position.
Fit the flaps
❏❏
1. Use a T
-bar to tr
ue-up the aft edge of
the wing sheeting in the flap section.
❏❏
7. Shape the Flap LE to match the cross
section on the plans
. A r
a
z
or plane
, whittling
knif
e
, and coarse sandpaper help the job go
quic
kly
. The die-cut 1/8” ply
Flap Hing
e Drill
Guide
ma
y be used to test the cur
v
a
ture of the
LE (
See step # 2 of “Fit The Flaps”
).
❏
8. Repeat steps 1 - 7 f
or the other Flap
.
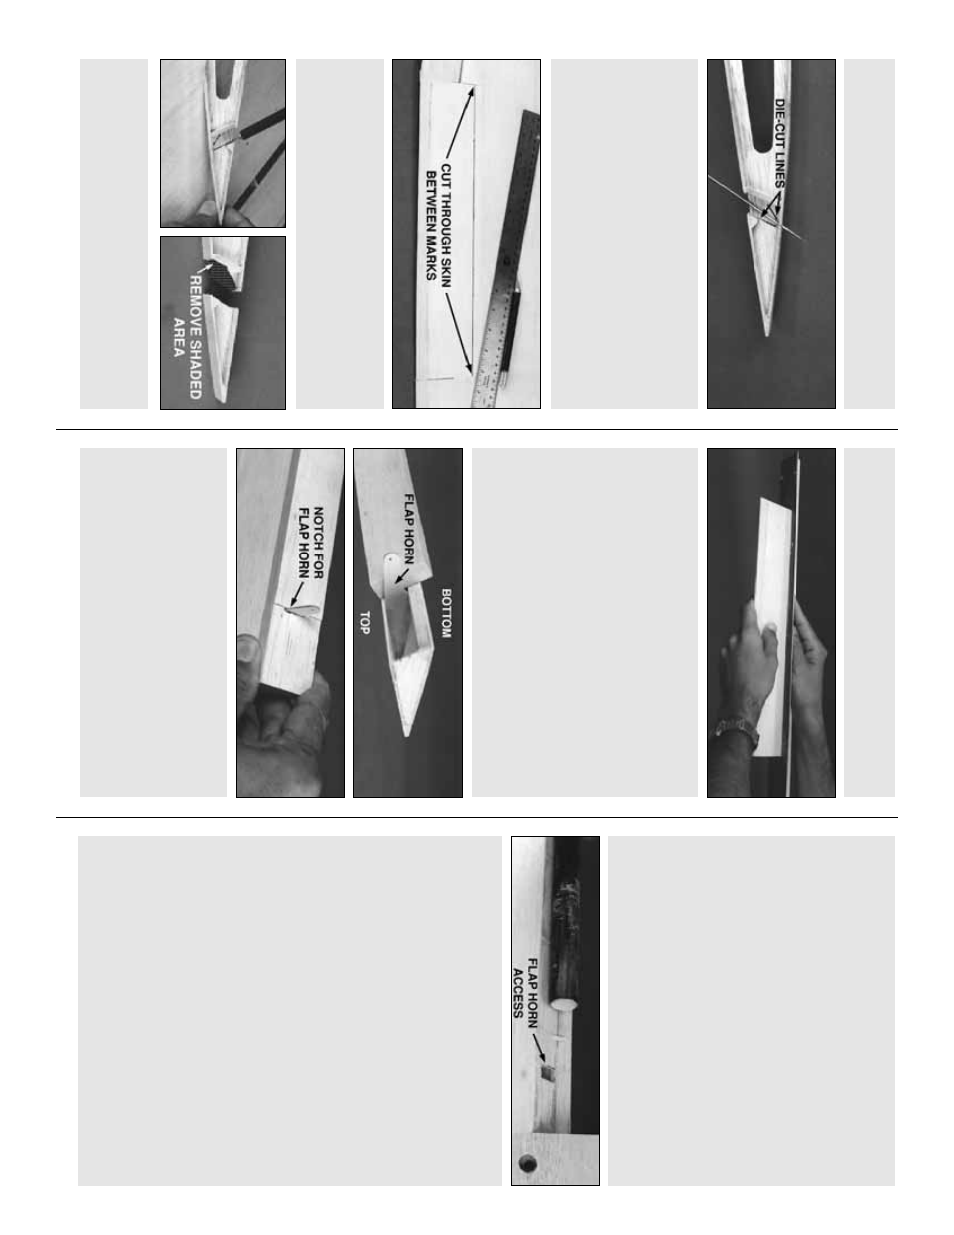
❏❏
6. Cut a 1/2” x 1-1/4” x 14-1/2” balsa
Flap
LE
to fit on both sides of the Flap Hor
n. Cut a
1/16” deep notch in
one
of the Flap LE
sections to allo
w passage of the Flap Hor
n.
Glue the Flap LE in position
e
xactl
y
as sho
wn
in the photo
, with the top of the Flap flush with
the top of the Flap LE.
❏❏
4. Sand the LE of the Flap Ribs flush
(and at the same angle) with the Flap Spar
.
Use a long T
-bar or sanding b
loc
k to maintain
a str
aight LE.
❏❏
5. Ref
er to the plans f
or the location of
the 1/16” die-cut birch ply
Flap Horn
.
NO
TE
:
There is a diff
erent Flap Hor
n
location f
or each
flap
, so doub
le chec
k y
our w
o
rk
o
v
er the plans
.
Glue the Flap Hor
n in position with
thic
k CA.
together
, cut the inboard and outboard ends of
the Flaps free with a hob
b
y
knif
e or r
a
z
or sa
w
.
❏❏
3. Use a
ne
w #11 b
lade
to carefully cut
through each r
ib at the
aft die-cut
line
. In the
e
v
ent that some CA has glued the w
a
x paper
❏❏
2. T
u
rn
the wing o
v
er
, then use a
str
aightedge and hob
b
y
knif
e to cut through
the top sheeting, across the tw
o ref
erence
mar
ks
, along the length of the flap
.
❏❏
1. When y
ou look inside the slot that y
o
u
cut in the sheeting along the Flap LE, y
ou will
see tw
o par
tially die-cut lines on each r
ib
.
Inser
t a pointed piece of wire betw
een the
lines
, through the top wing sheeting at each
end of the flap
.
W
e
are using a wing section
moc
kup f
or the purpose of e
xplanation.
B
UILD THE FLAPS
27