Top Flite TOPA0300 User Manual
Page 13
b
loc
k (the one that will contact the ele
v
ator’
s LE)
to match the angle of the LE. Glue the T
orque
Rod b
loc
k in position when y
ou are satisfied with
the fit.
❏❏
8. Carefully sand the top of the T
orque Rod
b
loc
k flush with the taper of the r
ibs
.
❏❏
9. Mar
k and sand the
inside
TE of an ele-
v
ator skin as y
ou did in step 4. Apply a bead of
thic
k CA to LE, TE, and all r
ibs
, then glue the top
skin into position. Hold the assemb
ly flat until the
CA cures
.
❏❏
10. T
rue up all edges with a T
-bar or
sanding b
loc
k.
❏❏
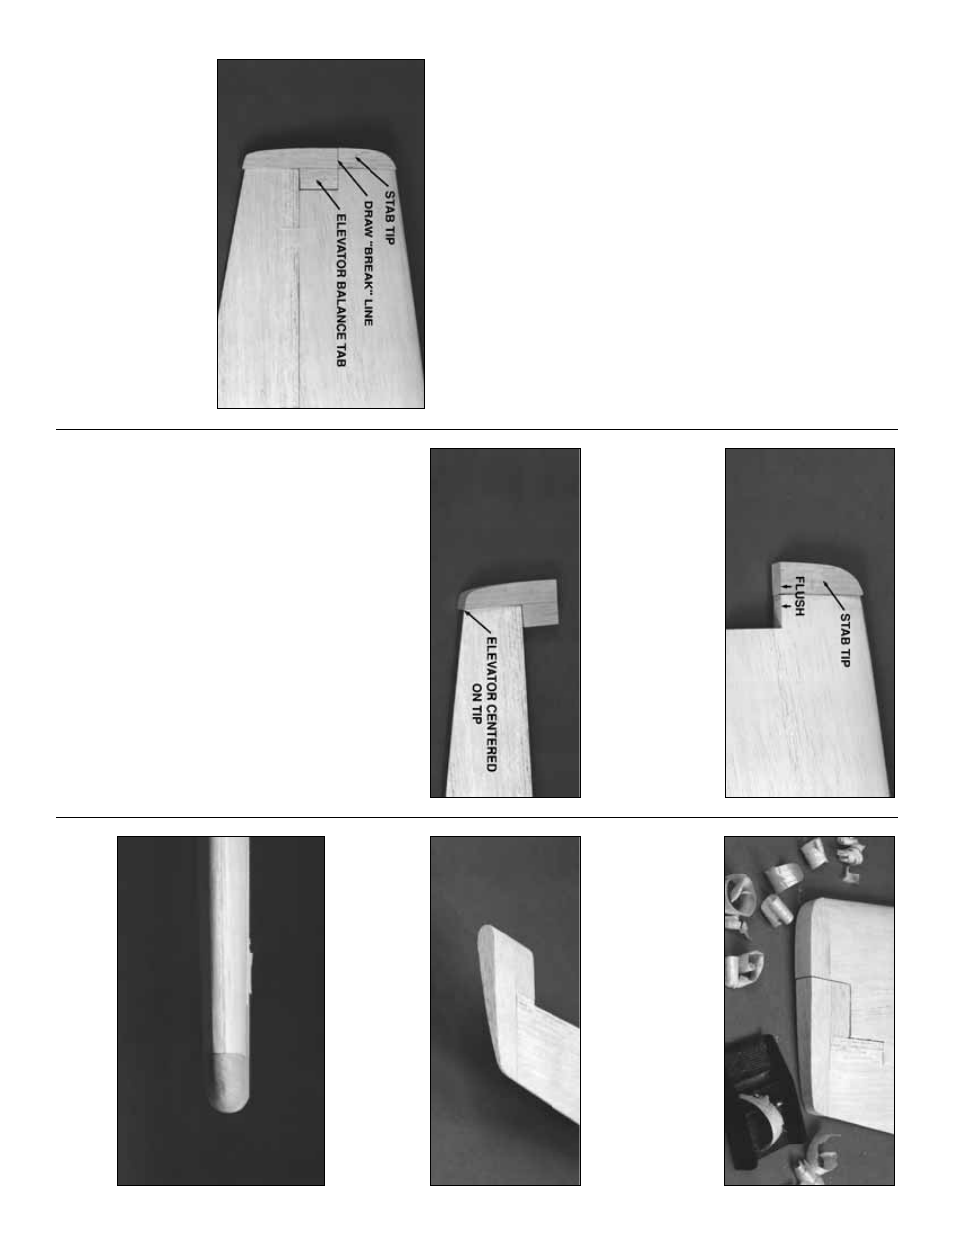
11. T
est fit the Stab
, Ele
v
ator
, 5/8” x 7/8” x
6-1/2” shaped balsa
Stab Tip
, and the 5/8” x
27/32” x 1-9/16” balsa
Ele
v
ator Balance T
a
b
together
. Mak
e an
y adjustments with light sand-
ing. Mar
k the
“break”
betw
een the Stab and the
Ele
v
ator on the Stab Tip
. Cut the Stab Tip apar
t
along this line
.
❏❏
12. Glue the f
orw
ard balsa
Stab Tips
in position.
❏❏
13. Glue the Ele
v
ator Balance T
ab flush
with the Ele
v
a
tor Tip
. Center
the Stab Tip on the
outboard end of the Ele
v
ator
, bef
ore using thic
k
CA to glue in place
. Mak
e sure that both the
Ele
v
ator LE and TE are centered bef
ore the
CA cures
.
❏❏
14. T
ape the ele
v
ator assemb
ly to the Stab
.
Mak
e
sure that the Stab Tip and Ele
v
ator
Balance T
ab are flush along the outside edge
.
There should be a 1/32”-1/16” gap betw
een the
Ele
v
ator Balance T
ab and the Stab
. If not, use
y
our T
-bar sander to correct the prob
lem b
y
alter
nately sanding the inside edges of the
Ele
v
ator Balance T
ab and the Stab
.
❏❏
15. When satisfied with the fit, use a r
a
z
o
r
plane and sanding b
loc
k to shape the Stab Tip
to b
lend with the Ele
v
ator and Stab
.
❏❏
16. Sand a r
adius around the Balance T
a
b
as sho
wn in the photo
.
❏❏
17. Sand a r
adius around the outboard
edges of the Stab and Ele
v
a
tor Tip
.
13