Top Flite TOPQ8414 User Manual
Top Flite Air equipment
P
A
R
TS LIST
These are the par
ts included in this kit.
ITEMS REQ
UIRED
These are the mater
ials required to assemb
le and install the
coc
kpit kit as sho
wn in these instr
uctions:
❏
Instr
ument panel
❏
Thin CA
❏
Hob
b
y
knif
e with #11 b
lade
❏
Medium CA
❏
1/16" [1.6mm] Dr
ill
❏
1/8" [3.2mm] Dr
ill
❏
Sandpaper assor
tment
❏
Small paint br
ushes
❏
(20) #2 x 3/8" [9.5mm] Scre
ws
❏
P
aint
❏
1/4" x 1/4" x 27" [6 x 6 x 700mm]
Bass
w
ood or hard balsa stic
k
❏
1/4" x 1/2" x 16" [6 x 13 x 410mm] Balsa stic
k
❏
Hob
bico cur
ved-tip
, plastic-cutting scissors (HCAR0667)
MAKE THE
SEA
TS
❏
1.
Cut out one of the
seat bases
and one of the
bottom
cushions
.
T
rue the edges b
y
sanding with medium-g
rit
sandpaper and a bar sander
.
Note:
The molded-in cutlines
ha
v
e
been dr
a
wn with an ink pen f
or illustr
ation in the photo
.
❏
2.
Use thin or medium CA to glue the bottom cushion to
the seat base
.
❏
Elastic band
(f
or seat belts)
❏
Decal
❏
(2) 1/8" x 1-1/4"
[3 x 32mm] do
w
e
l
❏
Right and left
coc
kpit sides
❏
Instr
ument panel
❏
Floor
❏
V
alence panel
❏
Cabin bac
k
❏
(4) Seat base
❏
(4) Bottom cushion
❏
(4) Seat bac
k
❏
(4) Bac
k cushion
❏
(2) Steer
ing
Y
o
k
e
s
❏
(3) Small pin
❏
(3) Large pin
SCALE
COCKPIT
KIT – ASSEMBL
Y
INSTR
UCTIONS
Cop
yr
ight © 2004
Pr
inted in USA – AR
O6CIP01 f
or
T
OPQ8414
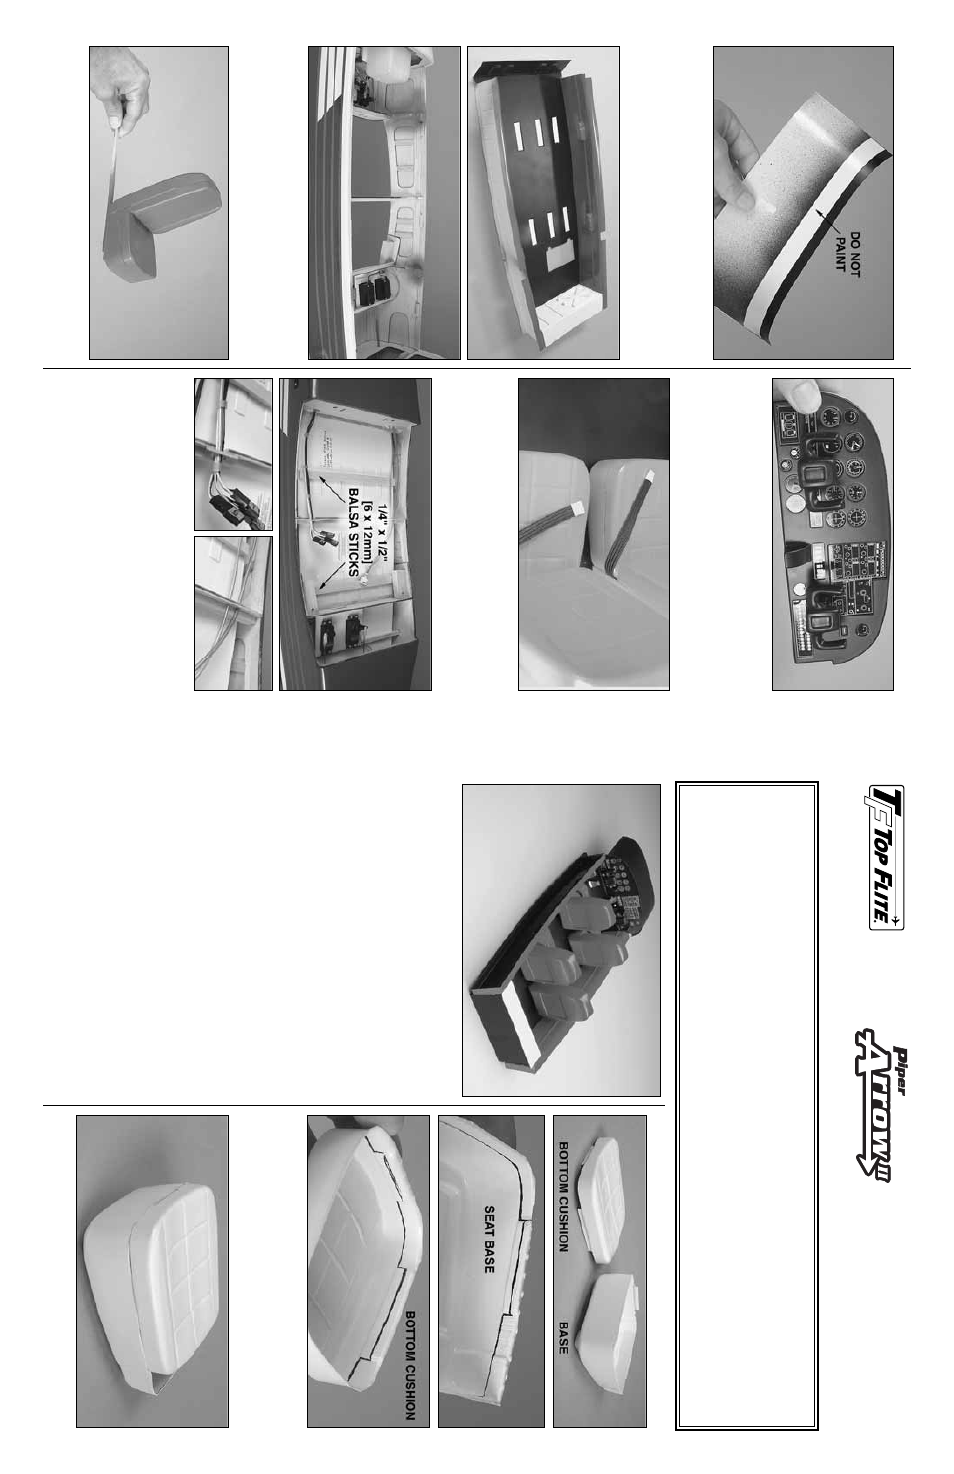
P
AINT
THE COCKPIT KIT
❏
1.
Use a str
ip of masking tape to co
v
er the inside of the
v
alence panel 3/8" [9.5mm] from the aft edge so it will not
get painted—this will allo
w f
or secure gluing to the
instr
ument panel.
P
aint the outside and inside of the v
alence
panel.
Flat b
lac
k is suggested.
❏
2.
Use masking tape to co
ver the indentations in the coc
kpit
floor where the seats will be glued do
wn, then paint the coc
kpit
floor and sides
.
A
lso paint the f
o
rmers in the fuselage that will
not be totally concealed b
y
the coc
kpit sides
.
❏
3.
P
aint the seats
.
Use a drop of medium CA to
tempor
ar
ily tac
k glue a balsa stic
k to each seat bottom.
Hold
the stic
k and rotate the seat while painting.
FINAL ASSEMBL
Y
❏
1.
Cut out and paint the
contr
ol y
okes
.
D
rill 1/8" [3.2mm]
holes through the instr
ument panel f
or the do
w
els
, then glue
in the do
w
els and glue on the y
o
k
e
s
.
P
aint the do
w
els b
lac
k.
❏
2.
Securely glue the instr
ument panel and the dash board
into the cabin top
.
❏
3.
Use the included elastic mater
ial to mak
e the seatbelts
.
Wr
ap a piece of chrome MonoK
ote
®
tr
im sheet or f
oil around
the ends to sim
ulate b
u
c
kles
.
❏
4.
Install the coc
kpit kit in the fuselage using the #2 scre
ws
.
❏
5.
Glue tw
o 1/4" x 1/2" [6 x 12mm] balsa stic
ks to the
underside of the coc
kpit floor where sho
wn.
This will giv
e the
floor a little more r
igidity and hold it steady to reduce
vibr
ation.
Guide the ser
v
o
wires and air lines past f
o
rmer 3
so the
y can be connected to the wires and lines coming
from the wing.
❏
6.
The large and small pins ma
y be used as y
ou pref
er to
sim
ulate an
y control knobs or stic
ks seen in photos y
o
u
ha
v
e
of the full siz
e coc
kpit.
Thank y
ou f
or purchasing the coc
kpit kit f
or the
T
op Flite
®
Piper Arro
w II.
Ev
en though the coc
kpit kit is some
what
concealed under the completed and painted cabin top
, y
ou will still be sur
pr
ised and pleased b
y
ho
w m
uch more realism
and
“lif
e”
the completed coc
kpit kit will br
ing to y
our Arro
w
.
The same as the air
plane kit, the le
v
el of detail that can be
achie
v
ed is up to y
ou.
Simply painting and installing the coc
kpit kit will achie
v
e
a good scale eff
ect.
Or
, y
ou could go
“all
out”
and add as man
y details and f
eatures as y
ou can see in a real Piper Arro
w coc
kpit.
Caution:
Do not paint the coc
kpit kit par
ts with
T
op Flite LustreK
ote
®
.The coc
kpit is v
acuum-f
or
med from styrene plastic
which will be def
or
med b
y
LustreK
ote
.
W
e f
ound that
T
estors enamel paint w
o
rks w
e
ll f
or this type of plastic.
T
estors is
not fuelproof
, b
ut this should not be a prob
lem as the components of the coc
kpit should not come into contact with fuel.