Top Flite TOPA0300 User Manual
Page 11
❏❏
15. Mak
e
tw
o
6
”x 30”
stab skin planks
from f
our 1/16” x 3” x 30” balsa sheets
. F
rom
these planks
, cut f
our stab skins
. See the sk
etch
for the proper la
y
out on the w
ood. Ref
er to the
plans f
or the e
xact shapes and siz
es
, b
u
t
remember to mak
e the skins slightly o
v
ersiz
e
.
❏❏
16. Pin the stab str
ucture to y
our b
uilding
surf
ace using pins only at the tips and diagonally
under the LE & TE.
Make sure that the jig tabs
are flat on the b
u
ilding surface
.
Don’t hide the
pins under the skin.
❏❏
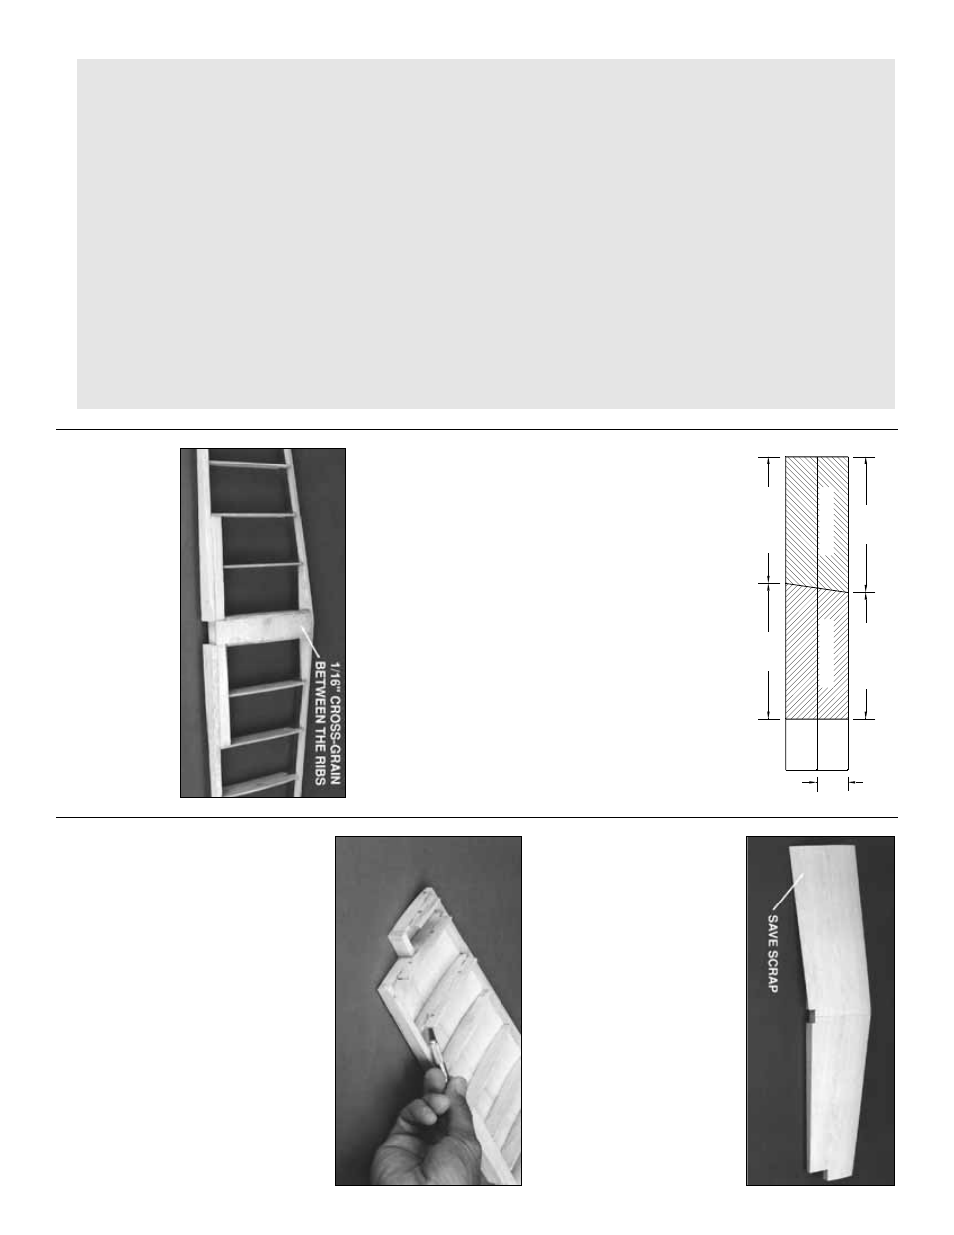
17. Use the off-cut 1/16” mater
ial from the
skin planks to mak
e a 1” wide cross-g
rain str
ip to
fit betw
een the S-1’
s from the LE to the TE. Glue
the str
ip in place betw
een the r
ibs
, flush with the
top edge
.
❏❏
18. T
est-fit the skins o
v
er the stab fr
ame
.
Mak
e sure the skins meet flush at the center
.
Adjust them with a sanding b
loc
k if necessar
y.
Apply an e
v
en bead of medium or thic
k CA to
the upw
ard-f
acing edges on one side of the
fr
ame
. Place a skin in its proper position and
press it fir
mly do
wn until the glue has set.
Repeat this step f
or the other top skin. T
rim off
the e
xcess balsa, b
ut sa
v
e
an
y big scr
aps f
o
r
use when making the ele
v
ators
.
❏❏
19. Remo
ve
the stab from the b
uilding board.
T
rim off the jig tabs with a shar
p knif
e
. T
rim and
b
lend the LE and TE to the r
ibs as y
ou did bef
ore
.
Chec
k all glue joints
, adding glue as necessar
y.
❏❏
20. Cut another 1” wide cross-g
rain str
ip
from 1/16” x 6” off-cut balsa sheeting and glue it
betw
een the tw
o S-1 r
ibs flush with their
bottom
edg
es
.
❏❏
21. It’
s
impor
tant
to get a good glue bond
betw
een the stab fr
ame and the bottom stab
skins
. Apply a
hea
vy
bead of medium or thic
k
STAB SKIN
12-1/8"
13"
13"
12-1/8"
3"
STAB SKIN
for misalignment. On a large surf
ace such as
the wing, 3/8” e
xtr
a is suggested.
D
. T
o
make skins, the f
ollo
wing steps
are sug
g
ested:
1. T
rue up the edges of the sheets with a
metal str
aightedge and a shar
p knif
e
or a
“T
-Bar” sanding b
loc
k.
2. T
est-fit the sheets together to mak
e
sure
the
y
match w
e
ll.
3. METHOD “A”: Edge glue the sheets
together with thin CA, o
v
er a flat surf
ace co
v-
ered with w
a
x
ed paper
. A quic
k
wipe of the
joint with a fresh paper to
w
el will remo
v
e
e
xcess glue and mak
e
sanding easier
. Mar
k
the poorest surf
ace to identify it as the “inside”
surf
ace
.
METHOD “B”: Edge glue the sheets
together with Titebond
®
w
ood glue
. (Titebond
is easier to sand and w
on’t lea
v
e
a r
idge at the
seam, as CA is prone to do
.) Smear the glue
lightly along an edge with y
our finger
, then join
the sheets o
v
er a flat (w
ax
ed paper co
v
ered)
b
uilding board. Pin the sheets to the board to
hold them together
. Wipe off an
y e
xcess glue
bef
ore it dr
ies
.
4. Place the skin on a large flat surf
ace
and sand it with a large flat sanding b
loc
k and
fresh, shar
p 220 paper
. Use light pressure and
a br
isk
cir
c
ular
motion.
5. T
rim the per
imeter of the sheet to e
v
en
things out.
11