Prepare the pol yhedral braces – Top Flite TOPA0300 User Manual
Page 20
the r
ails e
v
en if y
ou don’t plan to add flaps
, as
the
y add a little e
xtr
a strength and fill in
the notches
.
❏❏
15. Glue the 1/8” die-cut
Gusset G-3
to the
Aft Outer Spar and W
-7, as sho
wn on the plans
.
❏❏
16. Hold the 36” shaped balsa
LE
up to the
wing and mar
k it at W
-7. Cut three quar
ters of
the w
a
y through the LE (from the flat side) with a
ra
z
or sa
w to allo
w it to fle
x at W
-7.
Center the
LE ver
ticall
y
on the r
ibs
, then
tac
k glue
it in
position at W
-4, W
-7 and W
-14. Sight do
wn the
LE from both ends to chec
k that all of the r
ibs
are centered and that the fr
ame isn’t cur
v
ed or
twisted. Once again, be sure that
all the jig tabs
are firml
y
on the b
u
ilding boar
d
, then per
ma-
nently glue the LE to all of the r
ibs
.
❏❏
17. Cut the tapered 30” balsa
Flap Spar
to
fit from W
-4 to W
-7 then glue it into the “V”
notches just behind the aft Inner Spar
.
❏❏
18. Center a 1/2” x 15” tapered balsa
TE
on
the aft edge of W
-4 and the last W
-6, then glue it
in position to only W
-4 and W
-6. La
y a str
aight-
edge across the aft end of the r
ibs to chec
k that
all r
ibs are aligned and le
v
el and that the TE is
str
aight. When e
v
er
ything looks good, glue all
the remaining r
ibs to the TE, center
ing each r
ib
as y
ou proceed.
❏❏
19. Glue the die-cut 1/8” balsa gussets
G1
and
G2
in position, as sho
wn on the plans
.
❏❏
20. T
rim the e
xcess mater
ial from the
Spars
, LE, TE, etc., and sand all ends flush.
Reinf
or
ce all joints
that still need e
xtr
a glue b
y
adding medium CA.
❏❏
21. Ref
er to the plan f
or the location of the
single and doub
le
1/16” x 2-3/4” x 1-1/2” balsa
Shear W
ebs
. Glue the Shear W
ebs in position
with thic
k CA (Not betw
een W
-4 and W
-5).
❏❏
22. Locate the 1/2” x 1/2” x 6” balsa stic
k.
Cut six 1” lengths to use as
Ailer
on Hing
e
Bloc
ks
. Fit and glue 3 b
loc
ks where sho
wn on
the plans
. Sa
v
e
the other 3 f
or use on the sec-
ond wing panel.
W
ell, that about wr
aps up the fr
aming f
or half of
the wing. T
a
k
e
a shor
t break to admire y
our
handiw
or
k, ha
ve
a cup of coff
ee
, clean the CA off
y
our fingers
, and kiss y
our spouse good night.
When y
ou’
re fully re
viv
ed, clean the sa
wdust off
y
our bench, s
w
ap the plan sheets
, and
g
et b
usy
b
uilding the other half
.
Y
ou can rest later
.
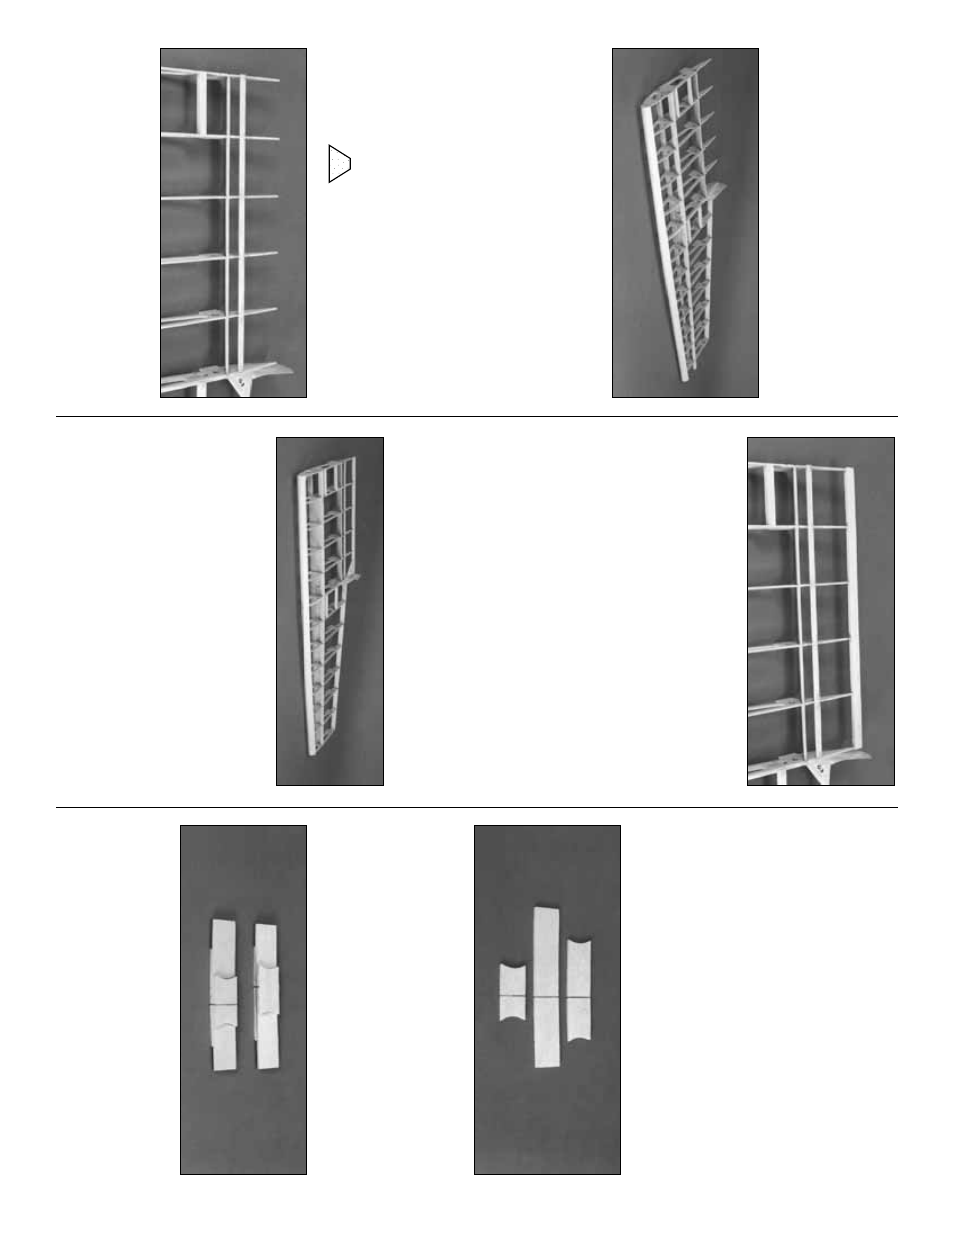
❏❏
1. P
osition the three 1/8” ply par
ts of the
P
o
lyhedral Braces
o
v
er the sk
etch on the
plans
. Look carefully at each piece and y
ou will
notice that the
y f
o
rm
a slight “V” shape
, with one
end longer than the other
. After y
ou align each
piece o
v
er the dr
a
wing, mar
k an inde
x line on
each par
t as sho
wn, then e
x
tend it around to
both edges
.
❏❏
2.
Without
gluing
, stac
k the three pieces
together and compare the assemb
ly with the
photo and the plans
. Repeat this process with
the second set of br
aces
,
b
ut this time flip the
pieces end-f
or-end
when y
ou stac
k them.
Prepare the pol
yhedral braces
FLAP SPAR
20