Complete the fusela g e top – Top Flite TOPA0300 User Manual
Page 39
❏
12. Scre
w a n
y
lon
Cle
vis
onto a
2-56 x 4”
threaded Pushr
od
at least 14 re
v
olutions
. Slide
a Silicone Retainer o
v
er the Pushrod, onto the
aft end of the Cle
vis
. Clip the Cle
vis onto the
Rudder T
orque Rod Hor
n and center the T
orque
Rod (i.e
., neutr
al r
udder). With the ser
v
o
centered, position the 4” pushrod o
v
er the Split
Coupling Slee
v
e
, then mar
k it where it will just
miss touching the other pushrod already in the
Slee
v
e
. Repeat this procedure f
or the Ele
v
ator
.
❏
13. T
rim and
c
lean
(as y
ou did dur
ing Step 11)
the shor
t Pushrods
, then push them into the aft
end of the Coupling Slee
ve
s
. Use
liquid Flux and
Silver Solder
to solder the Pushrods into the
Coupling Slee
v
e
s
. If y
ou ha
v
en’t done this
oper
ation bef
ore
, read
Hot Tip f
o
r Silv
er Solder
ing.
No
w that most of the fiddly w
o
rk
is finished,
clean up y
our bench and let’
s get bac
k to what
man
y people consider “the fun stuff
”–finishing
the airfr
ame
.
❏
14. If y
ou are installing a beacon light on the
Fin, dr
ill a hole through the Stab that matches
the location of the conduit y
ou installed ear
lier
.
❏
15. Mix up some 30-Min
ute Epo
xy and add a
dash of microballoons to “thic
k
en it up” and
create a fillet. Apply the epo
xy mixture to the LE,
TE and bottom of the Fin. Align the Fin, and
press it into position. Use masking tape to hold it
in position while the epo
xy cures
. Once the tape
is in place
, chec
k the Fin to mak
e
sure that it’
s
on the fuse center
line
and
per
pendicular to the
Stab
. Use an
y lefto
v
e
r epo
xy to f
o
rm
a small fillet
around the base of the Fin.
❏
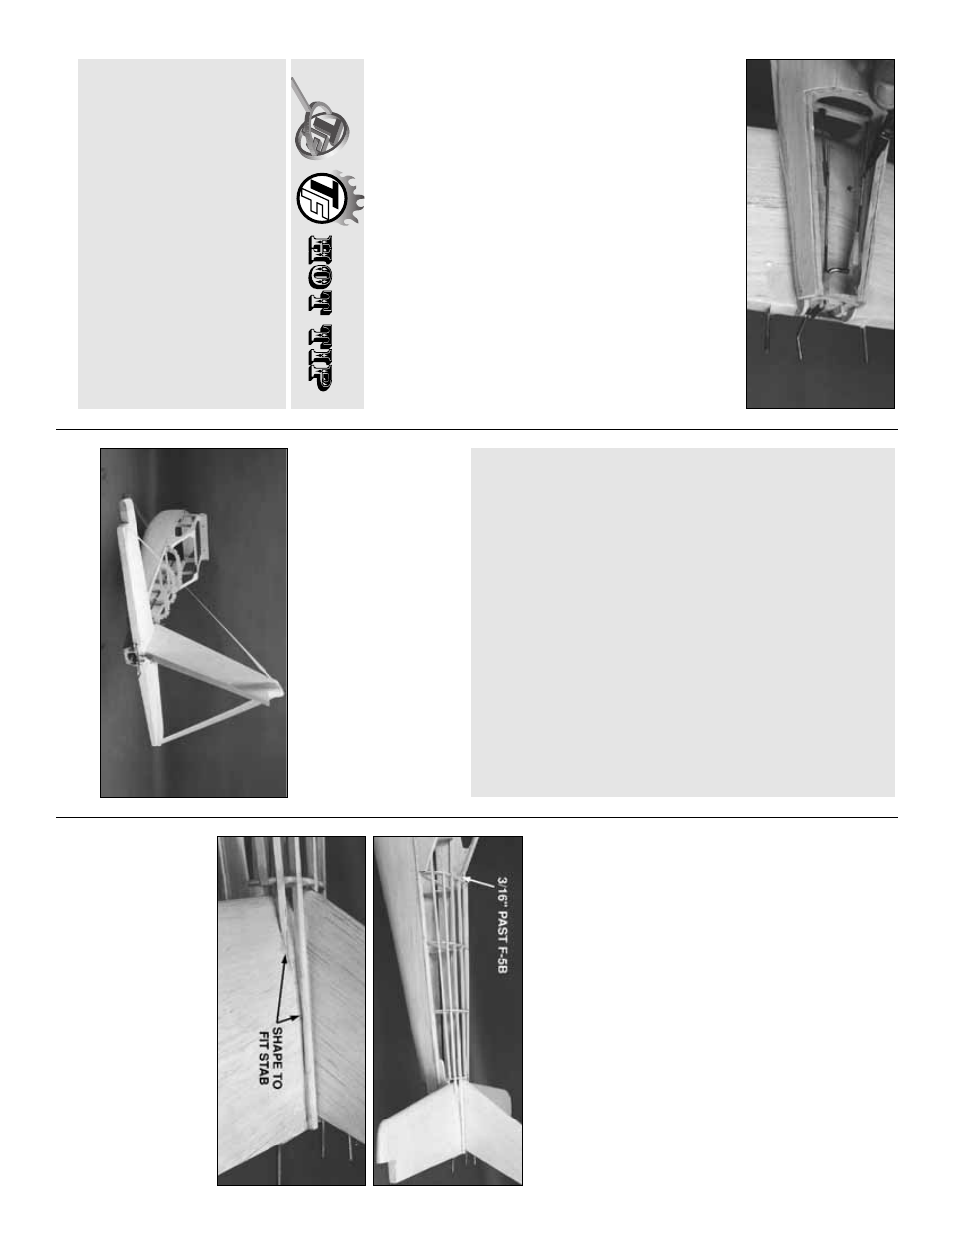
1. Cut 3/16” x 3/16” x 24” balsa Str
ingers to fit
the top aft f
o
rmers from F-5B to the top of the
Stab
. T
aper the Str
ingers to b
lend with the
surf
ace of the Stab
. Lea
v
e
about 3/16” of
eac
h
Str
inger protr
uding
forwar
d
of F-5B to pro
vide a
“ledge” f
or the rear windo
w
. Use thin CA to glue
them in place
.
Complete the fusela
g
e
top
B
. Roughen the area to be soldered with fine
sandpaper
, then clean again.
C
. Assemb
le the items to be soldered.
D
. Apply a small amount of solder
ing flux. Acid
based liquid flux w
o
rks best when one or more
of the items is steel.
E. Heat the metal with a solder
ing gun or iron,
and apply solder to the metal. The metal m
ust
get hot enough to melt the solder and the
solder m
ust flo
w freely into the joint.
F.
Do not mo
v
e
the par
ts until the solder has
cooled.
G. T
est the joint b
y
pulling hard.
H. Clean off the e
xcess flux with alcohol or
solv
ent. Coat the par
ts with a v
e
ry
fine film of oil.
HO
T TIP FOR SIL
VER SOLDERING
Use this process when solder
ing metal to
metal, such as br
ass tube to wire
, or pushrod
ends to wire
.
A. Thoroughly clean the items to be soldered
with alcohol or deg
reasing solv
ent. P
a
y special
attention to the
inside
of the Threaded
Br
ass Couplers
.
39