Top Flite TOPA0300 User Manual
Page 26
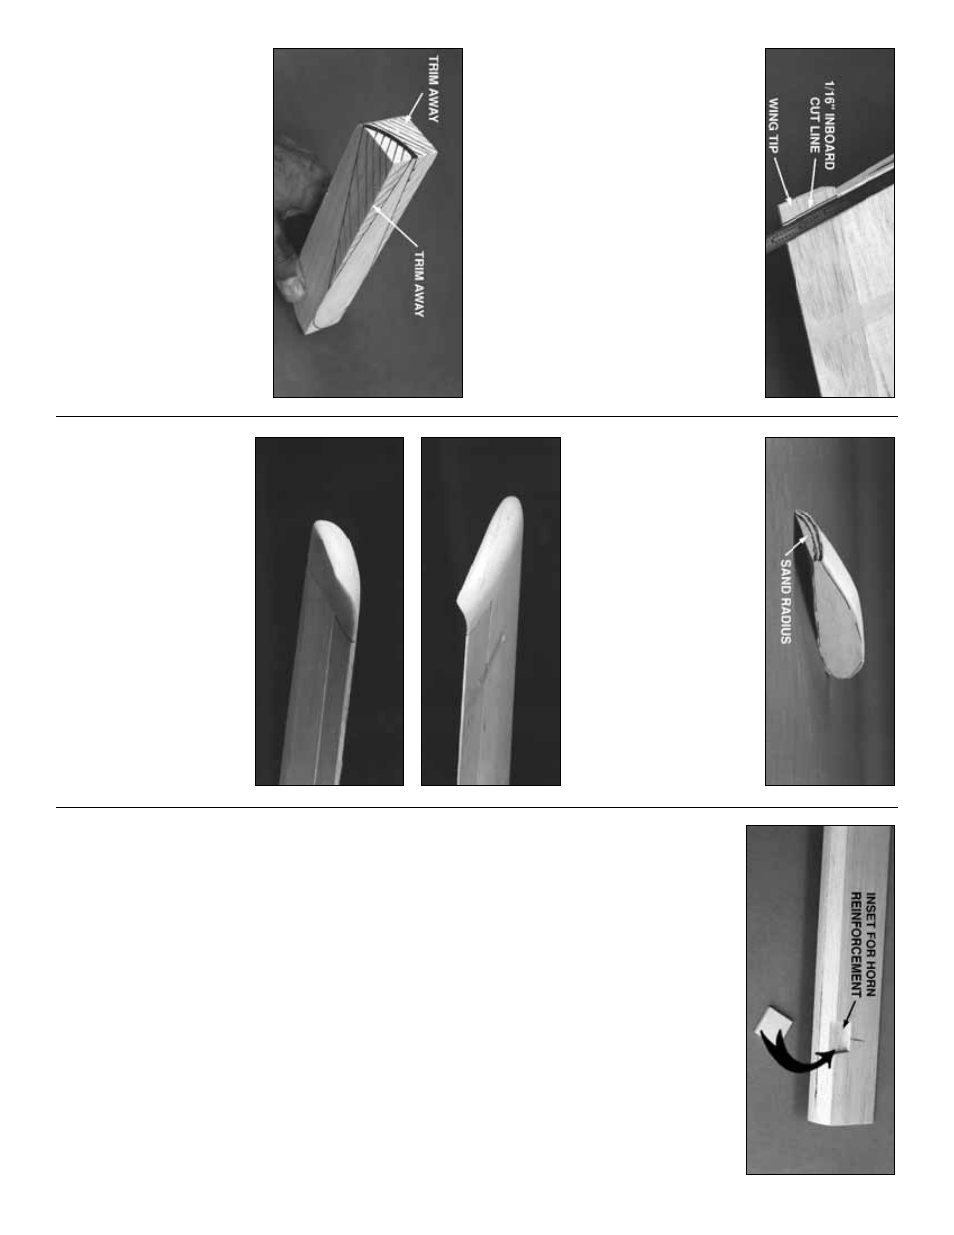
❏❏
6. T
ape the Aileron bac
k into position. Mar
k
the tip end with a str
aightedge placed along W
-
14.
Dra
w a line 1/16” inboar
d of the fir
st line
.
Cut off the Aileron tip on the second (inboard)
line
. By so doing the Aileron will ha
v
e
1/32”
clear
ance on both ends when it’
s installed.
❏❏
7. Dr
a
w
a center
line on the LE of the
Aileron. Sand a
“V”
shaped be
v
el along this
edge
. Ref
er to the wing cross section on the
plans f
or the required angle
.
❏❏
8. T
ape the Aileron
securel
y
in position
with its
TE aligned with the TE
at W
-7
.
❏❏
9. T
ape a shaped balsa Wing Tip in position.
It should be centered on W
-14 and the aft end
should be centered on the TE of the Aileron. T
race
the airf
oil onto the inside edge of the wing tip
.
NO
TE: Horner Tips are an option on
full-scale Cessnas. If y
ou pref
er
, y
ou ma
y
simpl
y car
ve a standar
d tip without the
under
camber
. Dra
w
an ar
c the width of the
Ailer
on’
s TE (as sho
wn on the plans) if y
o
u
want to car
ve Horner Tips. Remo
ve the tip.
❏❏
10. Use a long car
ving b
lade to car
v
e
a
w
a
y
most of the e
xcess w
ood and rough in the shape
of the tip
. T
o
car
v
e
a Hor
ner Tip
, cut a
w
a
y
a
w
edge of balsa as sho
wn in the photo
, then use
a round sanding tool (e
.g., 80-g
rit sandpaper
wr
apped around a shor
t piece of broom handle)
to cur
v
e the underside
.
❏❏
11. When the Wing Tip has been shaped
close to finished siz
e
, glue it to W
-14 with
medium CA.
Don’t glue it to the Aileron
. Finish
sanding the Wing Tip with 220 g
rit sandpaper
,
b
lending it with the wing sheeting and LE. Fine
tune the cur
v
ed undercamber por
tion of the
Wing Tip with a round sanding tool and 220 g
rit.
The thic
kness of the Tip’
s TE should match the
thic
kness of the Aileron TE.
❏❏
12. Ref
er to the plans f
or the aileron hor
n
location. P
osition a die-cut 1/8” x 5/8” x 5/8” ply
Horn Reinf
or
cement
on the bottom of the
aileron at this location and score around its
per
imeter with a hob
b
y
knif
e
. Remo
v
e
balsa
from within the score mar
ks to recess the hor
n
reinf
orcement. Use thic
k CA to glue the hor
n
reinf
orcement in place
.
❏❏
13. Repeat steps 5-12 f
or the other
wing panel.
If y
o
u are b
uilding y
our wing without oper
ational
flaps
, there’
s nothing left to do e
xcept fit the wing
to the cabin dur
ing final assemb
ly
. In
vite y
our
b
uddies bac
k to the shop f
o
r a prog
ress update
.
Also
, y
our floor needs s
w
eeping.
NO
TE: If y
ou are NO
T b
u
ilding operational
Flaps, skip the f
ollo
wing section and
pr
oceed to B
UILD THE FUSELA
GE.
26