A=a a a – Top Flite TOPA0300 User Manual
Page 38
❏
3. When the Stab is aligned with the Fuse
,
dr
a
w
light ref
erence mar
ks on the Stab to help
y
ou accur
ately reposition it after the glue has
been applied.
❏
4. Apply 30-Min
ute Epo
xy to the
Stab Sad
dle
,
then la
y the Stab in place
. Apply a w
eight to hold
the Stab in position until the epo
xy cures
. Doub
le-
chec
k alignment bef
ore the epo
xy kic
ks off
.
❏
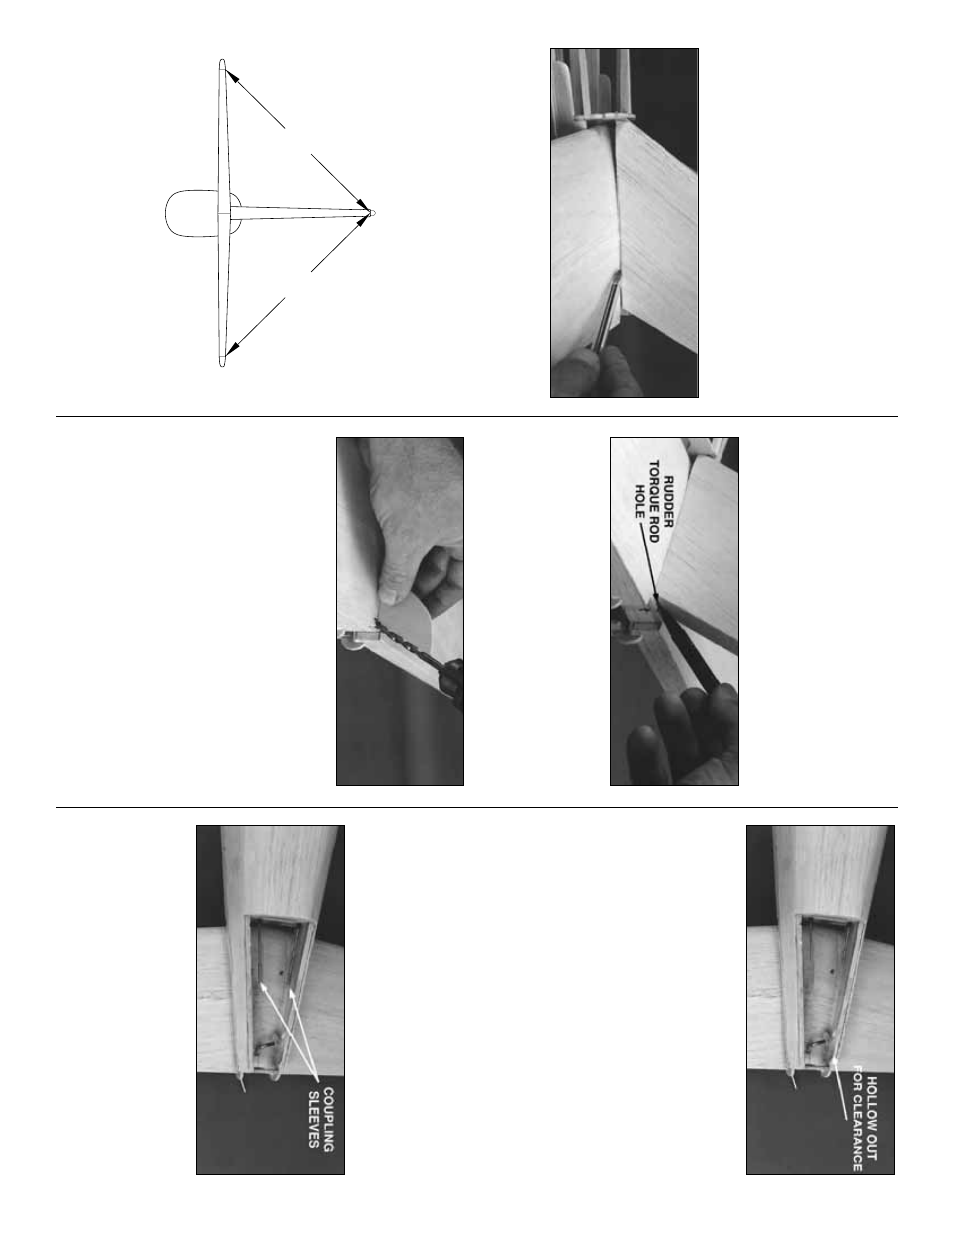
5. Hold the Fin on top of the Stab with the LE
in the notch at the top of F-8B
. Ref
er to the plans
and y
ou will see that the Fin TE is 1/8” f
orw
ard
of the Stab TE notch (see photo at step 7). Mar
k
the bottom edge to sho
w where fin sheeting
needs to be tr
immed to allo
w a
flush fit
with the
Stab
.
❏
6. Put the Fin in position and sight it from 6
to10 f
eet behind the model. If it is not v
e
rt
ical,
mak
e
adjustments to the bottom edge a little at a
time with fine sandpaper
. When y
ou are satisfied
with the fit, pin the Fin in position. Carefully
measure from the Fin tip to the Stab tips to
doub
le chec
k y
our “e
y
eball” method and to be
sure that y
our sanding is accur
ate
.
❏
7. Mar
k the aft center of the Fin’
s TE on the
Stab
. This is where the Rudder T
orque Rod will
e
xit the Stab
. Mar
k the location of the fin pr
ior to
remo
v
al f
or future realignment. Remo
v
e
the Fin
from the Stab
.
❏
8. Align the die-cut 1/8” ply
Fin Drill Guide
with the Fin center mar
k
on the Stab as sho
wn.
Carefully dr
ill a
3/16” hole
through the Stab into
the rear of the fuse while k
eeping the dr
ill bit
aligned with the Fin Dr
ill Guide
.
❏
9. T
rim the threaded por
tion of the 1/8” bent
wire
Rud
der T
o
rque Rod
so that 5/8” of thread
remains
. Scre
w the n
ylon Rudder Hor
n onto the
threaded end until flush with the end of
the threads
.
❏
10. Inser
t the Rudder T
orque Rod through the
hole in the Stab from inside the fuse
. T
ry not to
damage the Stab as the T
orque Rod e
xits the
hole
. If satisfied with the fit and alignment,
remo
v
e
the Rudder T
orque Rod and roughen up
the surf
ace of the plastic bear
ing tube with
100-g
rit sandpaper
.
Coat the T
o
rque Rod wire
with petr
oleum jell
y
at both ends of the plastic
bear
ing tube
. Coat the Plastic Bear
ing T
ube with
6-Min
ute Epo
xy
, then reinser
t it into the hole in
the Stab
. The Plastic Bear
ing T
ube should
protr
ude abo
v
e
the Stab about 1/16”.
NO
TE: Bef
ore installing the Fin, we need to
finish up the pushr
od hookups so that the
Fin w
on’t be in the wa
y when y
ou turn the
fuse upside do
wn.
❏
11. Clean the aft ends of both wire pushrods
with steel w
ool. Clean the ends with alcohol.
Gr
ip a pushrod with a pair of pliers
, then push a
Coupling Slee
ve
onto the wire halfw
a
y
using
another pair of pliers
. Do the same with the
other pushrod.
A=A
A
A
38