Join the wing panels – Top Flite TOPA0300 User Manual
Page 21
Y
ou should no
w ha
v
e
a
right
hand and a
left
hand set of P
olyhedr
al Br
aces
, as sho
wn in the
photo
.
T
racing around the edges of the tw
o
shor
ter par
ts will help alignment when y
ou glue
them together
.
❏❏
3. When satisfied that the br
aces are
accur
ate
, use
6-Min
ute Epo
xy to glue the par
ts
together with the alignment mar
ks perf
ectly
aligned.
❏❏
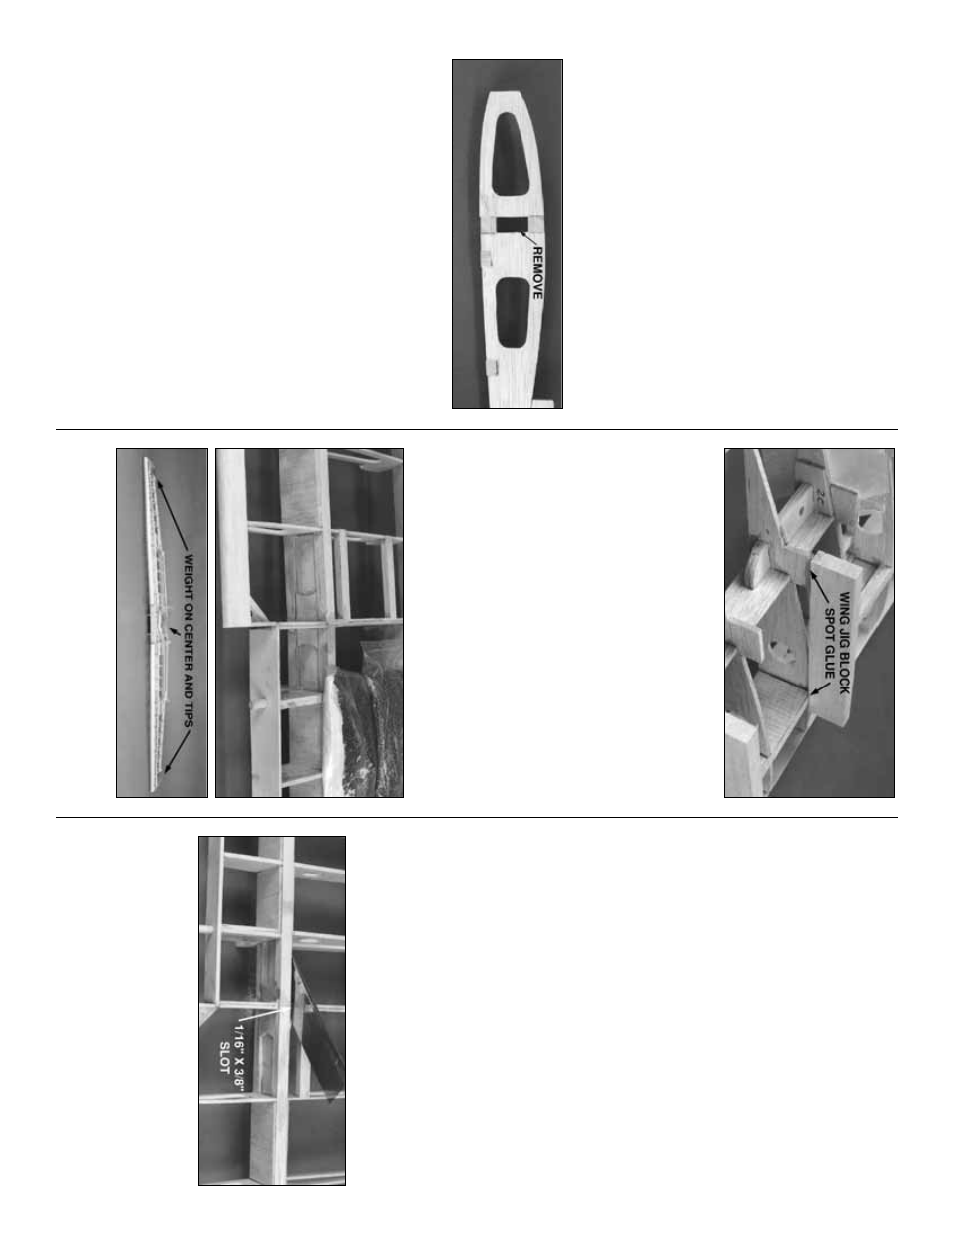
1
. Carefully remo
ve
a 3/8”-wide str
ip of balsa
from
between the spar
s
on both the W
-3 r
ibs of
the Center Section and the W
-4 r
ibs of the outer
panels
. This will allo
w the P
olyhedr
al Br
aces to be
inser
ted and glued betw
een the spars
.
❏❏
2. T
e
st fit (b
ut don’t glue) the P
olyhedr
al
br
aces into the center and outboard wing panels
.
The long
er end
of the joiner is the end that
plugs into the outboar
d panels.
Sand the
ends
, if necessar
y,
f
or a good fit. The wing
panels should mate e
v
enly along the joint
without an
y unnecessar
y twisting or bending to
line things up
. If y
ou ha
v
e
to f
orce the panels to
fit, locate the prob
lem and fix it bef
ore
proceeding. An
y twists will become a per
manent
par
t of the str
ucture after the panels are joined
and will be difficult to correct.
❏❏
3. Use only a spot of CA to glue the tw
o
1/4” x 1-1/16 “ x 5-7/8” balsa
Wing Jig Bloc
ks
to the
W
-2 jig tabs
and the
top
of the spar
.
No
w f
or the hard par
t — cleaning a space on
y
our w
o
rk
bench large enough to spread out and
join the wing.
IMPOR
T
ANT
: Chec
k y
our w
o
rk surface with
a metal straightedg
e to make sure that it’
s
perf
ectl
y
flat bef
ore pr
oceeding. Make a
“dr
y run” of the f
ollo
wing step bef
ore
actuall
y perf
orming it with glue
.
❏❏
4. Place the Center panel on the Jig Bloc
ks
in the middle of y
our w
o
rk
bench. Add some
w
eight to hold it in place (a f
e
w magazines or
small sandbags are handy f
or this). Prepare 1/2
ounce of
30-Min
ute Epo
xy
. Liber
ally apply
epo
xy to the
W
-3 Ribs
, the
P
o
lyhedral
Braces
,and the
spar ends
.
(If y
ou will be
installing Flaps
, don’t put epo
xy on the “Flap”
por
tion of the r
ibs
. Inser
t w
a
xed paper betw
een
W
-3 and W
-4 at the flaps
.)
Plug the P
olyhedr
al
Br
aces
into
the
Outboar
d Wing P
anels
. Plug
the Outboard Wing P
anels
into
the
Center
Section
and align the Ribs
fo
r a flush fit. The
protr
uding Center Section LE and Aft Center
Spar tabs will help with alignment. Once all the
panels are in position, clamp the r
ibs together
and center the P
olyhedr
al Br
aces betw
een the
Spars as sho
wn on the top vie
w of the plans
.
Put weights on the tw
o W
-14 ribs
to hold the
jig tabs and spars on the w
o
rk
surf
ace
.
Bef
ore
the epo
xy
kic
ks off
,
doub
le c
h
ec
k y
our w
o
rk
.
IMPOR
T
ANT
: Make cer
tain that both the upper
and lo
wer Spar
s touc
h their mates on the
adjoining panel
. If
, after all y
our eff
or
ts
, y
ou end
up with a small gap
, pac
k epo
xy into the ca
vity
.
❏❏
5. Use a r
a
z
or sa
w to cut a 1/6” wide x 3/8”
deep slot on
both
sides of the bottom spars at
W
-3.
Remember
, the wing is upside do
wn on the
bench so the bottom spars are presently on
the “top
.”
Join the wing panels
21