Sheet the top of the wing, Prepare the wing panels for the flaps – Top Flite TOPA0300 User Manual
Page 24
pre
vious step
, or glue tw
o large-diameter
pushrod tubes (not supplied) inside the wing,
ahead of the spars
, to ser
v
e
as a conduit f
o
r
the wires
.
❏❏
15. Glue the 1/2” x 1/2” x 1” bass
w
ood
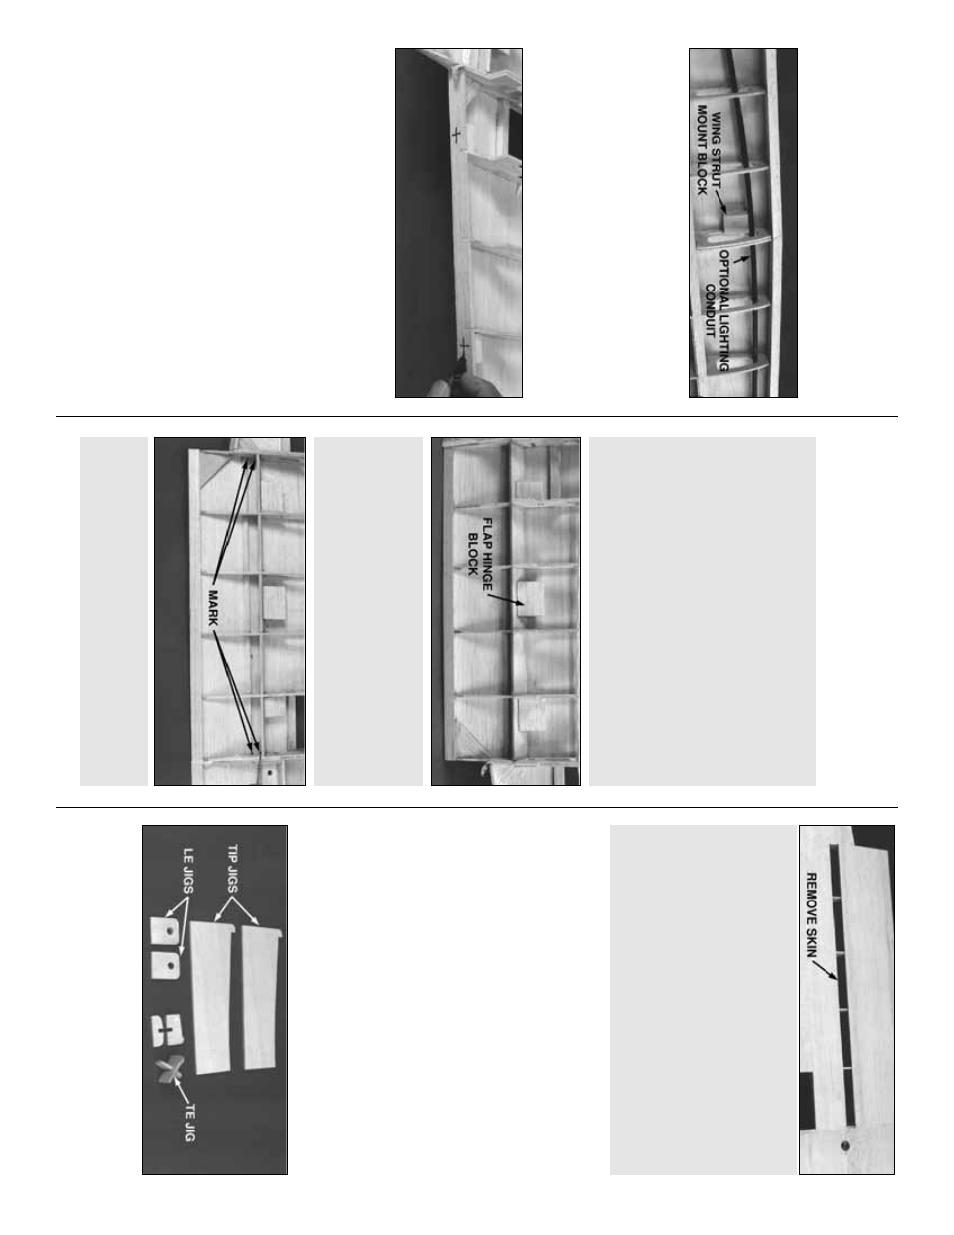
Wing Strut Mount Bloc
k
to the inboard side of
the W
-6 r
ib and to the sheeting at the location
sho
wn on the plans
. W
e
recommend
6-Min
ute Epo
xy f
or this job
. T
o
help locate the
b
loc
ks later
, dr
ill a 1/16” hole through the center
of the b
loc
ks
, out through the bottom sheeting.
❏❏
16. T
rue all edges with a sanding b
loc
k.
Mar
k the location of the Aileron Hinge Bloc
ks on
the outside edge of the aft Outer Spar
.
❏❏
17. Carefully cut off all of the jig tabs on the
top surf
ace of the wing. Lightly sand the tops of
the r
ibs and spars
. Clean up an
y glue b
lobs that
will interf
ere with the top sheeting, then doub
le
chec
k
y
our w
o
rk
.
If y
ou aren’t installing oper
ational flaps (the neat
looking, highly eff
ectiv
e
, sim
ulated F
o
wler Flaps)
skip the ne
xt section
and proceed to “Sheet
The T
op Of The Wing”. Are y
ou sure y
ou
w
on’t reconsider?
NO
TE: This kit inc
ludes a special set of
wing jigs to hold the wing at the pr
oper
washout angle (2 degrees washout at eac
h
tip) while y
ou appl
y the top skins. T
wisted
wings are a major cause of bad flight
c
haracteristics. P
o
lyhedral angles can v
a
ry
slightl
y
, so if y
our tip jigs require
adjustment, just be sure that both tip jigs
are modified the same
, and are theref
ore
identical. Be careful not to c
hang
e the
washout angle (the negative angle of attac
k
of the tip ribs) if y
ou adjust the jigs.
❏❏
1. Locate all of the 1/8” die-cut ply wing jigs
as sho
wn in the photo
. Assemb
le the tw
o par
ts
of both
TE Jigs
as sho
wn.
Sheet the top of the wing
❏❏
3. T
u
rn
the wing o
v
er
, then
carefull
y
cut
a
w
a
y
the balsa sheeting from betw
een the
mar
ks
. Don’t cut through the r
ibs until the top
of the wing has been sheeted and y
ou are
instr
ucted to do so
.
That’
s all y
ou need to do f
o
r no
w regarding the
flaps
. Let’
s
mo
v
e
on and put the skins on the
top of the wing.
❏❏
2. Mar
k the location f
or the
Flap LE
by
inser
ting a shar
pened wire through the
sheeting at the locations sho
wn in the photo
.
❏❏
1. Cut the shaped 5/8” x 9” balsa
Flap
Hing
e Bloc
k
into f
our pieces 1-1/2” long, and
tw
o pieces 1” long. Glue the b
loc
ks to the aft
Inner Spar
, sheeting, and r
ibs as sho
wn on
the plans
.
Do the f
ollo
wing steps if y
ou are b
uilding
operational flaps.
Ev
en though b
uilding oper
ational flaps requires
a little bit of patience and elbo
w g
rease
, y
o
u
will be re
w
arded b
y
more scale appear
ance
and slo
w
er landings than the less ambitious
modeler
. If that isn’t enough, the
y look g
reat
dur
ing slo
w fly-b
ys and shor
ten the tak
eoff roll.
Prepare the wing panels
for the flaps
24