AERCO BMK 6000 Dual Fuel User Manual
Page 65
Benchmark 6000 DF Installation, Operation & Maintenance Manual
CHAPTER 4 – INITIAL START-UP
OMM-0096_0B
AERCO International, Inc. • 100 Oritani Dr. • Blauvelt, NY 10913
Page 65 of 219
GF-141
Ph.: 800-526-0288
03/21/2014
Natural Gas Combustion Calibration – Continued
16.
Once the oxygen level is within the specified range at 100%, record the O
2
, NOx and CO
readings on the Combustion Calibration Data Sheets provided with the unit.
17.
Lower the valve position to 80%
using the ▼arrow key.
NOTE
The remaining combustion calibration steps are performed using the
Combustion Cal Menu included in the C-More Control System. The
combustion calibration control functions will be used to adjust the oxygen
level (%) at valve positions of 80%, 60%, 45%, 30% and 18% as described
in the following steps. These steps assume that the inlet air temperature is
within the range of 50°F to 100°F. If NOx readings exceed the target values
shown, increase the O
2
level up to 1% higher than the listed calibration
range. Record the increased O
2
value on the Combustion Calibration sheet.
18.
Press the MENU key on the front panel of the C-MORE and access the Setup menu. Enter
password 6817 and then press the ENTER key.
19.
Press the MENU key on the front panel of the C-MORE until Combustion Cal Menu
appears on the display.
20.
Press the ▲ arrow key until SET Valve Position appears on the display.
21.
Press the CHANGE key. SET Valve Position will begin to flash.
22.
Press the ▲ arrow key until the SET Valve Position reads 80%. Press the ENTER key.
23.
Next, press the down (▼) arrow key until CAL Voltage 70% is displayed.
24.
Press the CHANGE key and observe that CAL Voltage 70% is flashing.
25.
The oxygen level at the 70% valve position should be as shown below. Also, ensure that
the nitrogen oxide (NOx) and carbon monoxide (CO) readings do not exceed the following
values:
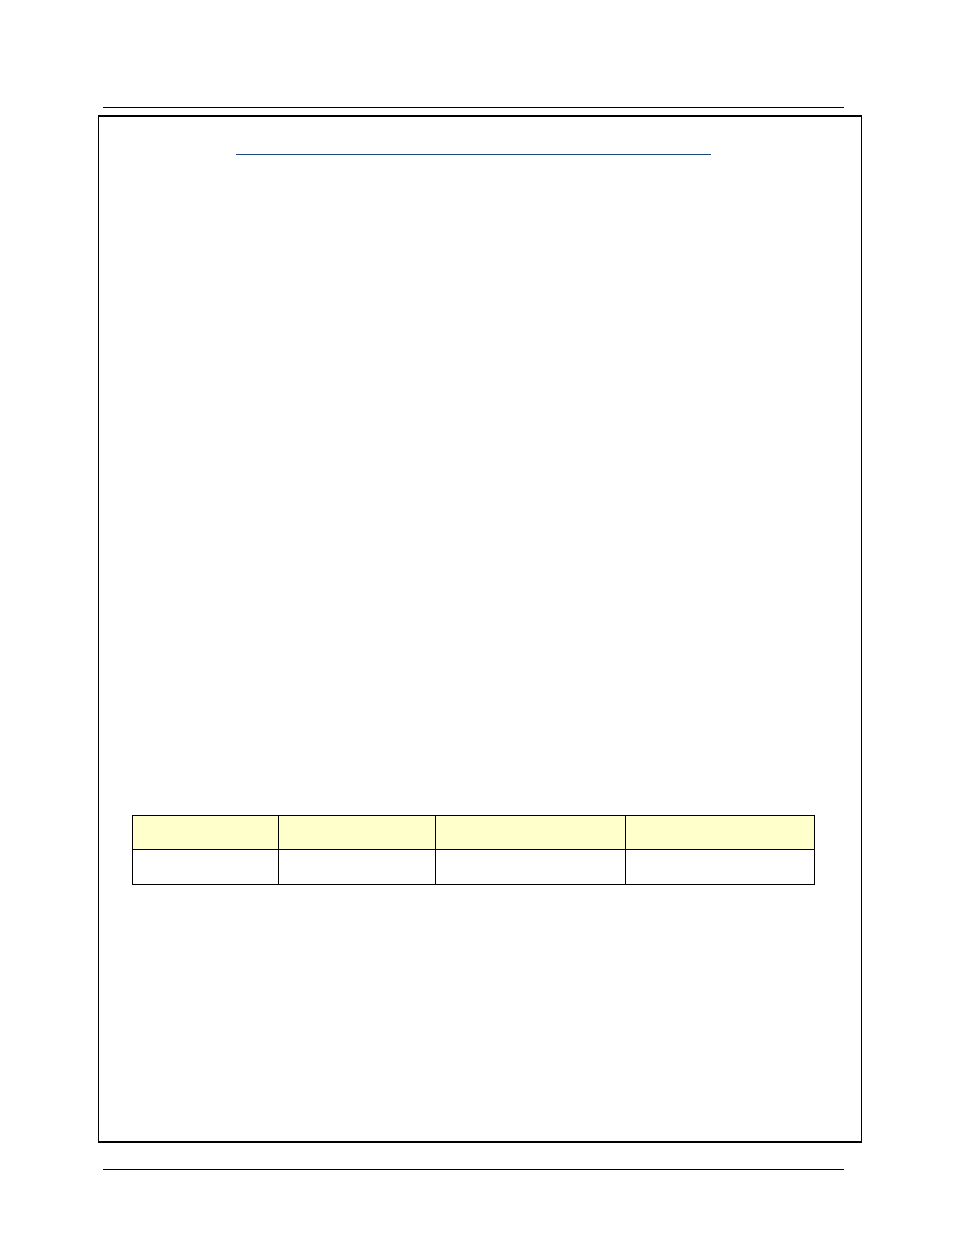
Combustion Calibration Readings
Valve Position
Oxygen (O
2
) %
Nitrogen Oxide (NOx)
Carbon Monoxide (CO)
70%
6.0% - 6.5%
<20 ppm
<100 ppm
26.
If the oxygen level is not within the specified range, adjust the level using the ▲ and ▼
arrow keys. This will adjust the output voltage to the blower motor as indicated on the
display. Pressing the ▲ arrow key increases the oxygen level and pressing the down ▼
arrow key decreases the oxygen level.
27.
Once the oxygen level is within the specified range at 70%, press the ENTER key to store
the selected blower output voltage for the 80% valve position. Record all readings on the
Combustion Calibration Sheets provided.
28.
Repeat steps 20 through 27 for valve positions of 50%, 40%, 30% and 18%* (see *NOTE
below). The oxygen (O
2
), nitrogen oxide (NOx) and carbon monoxide (CO) should remain
within the same limits for all valve positions as shown in the following table.