Benutzen des suchers, Benutzen des lcd-monitors, Einstellen des winkels – Panasonic NVDX100EG User Manual
Page 26: Using the finder, Using the lcd monitor, Adjusting the angle, Using the finder using the lcd monitor
Attention! The text in this document has been recognized automatically. To view the original document, you can use the "Original mode".
DEUTSCH
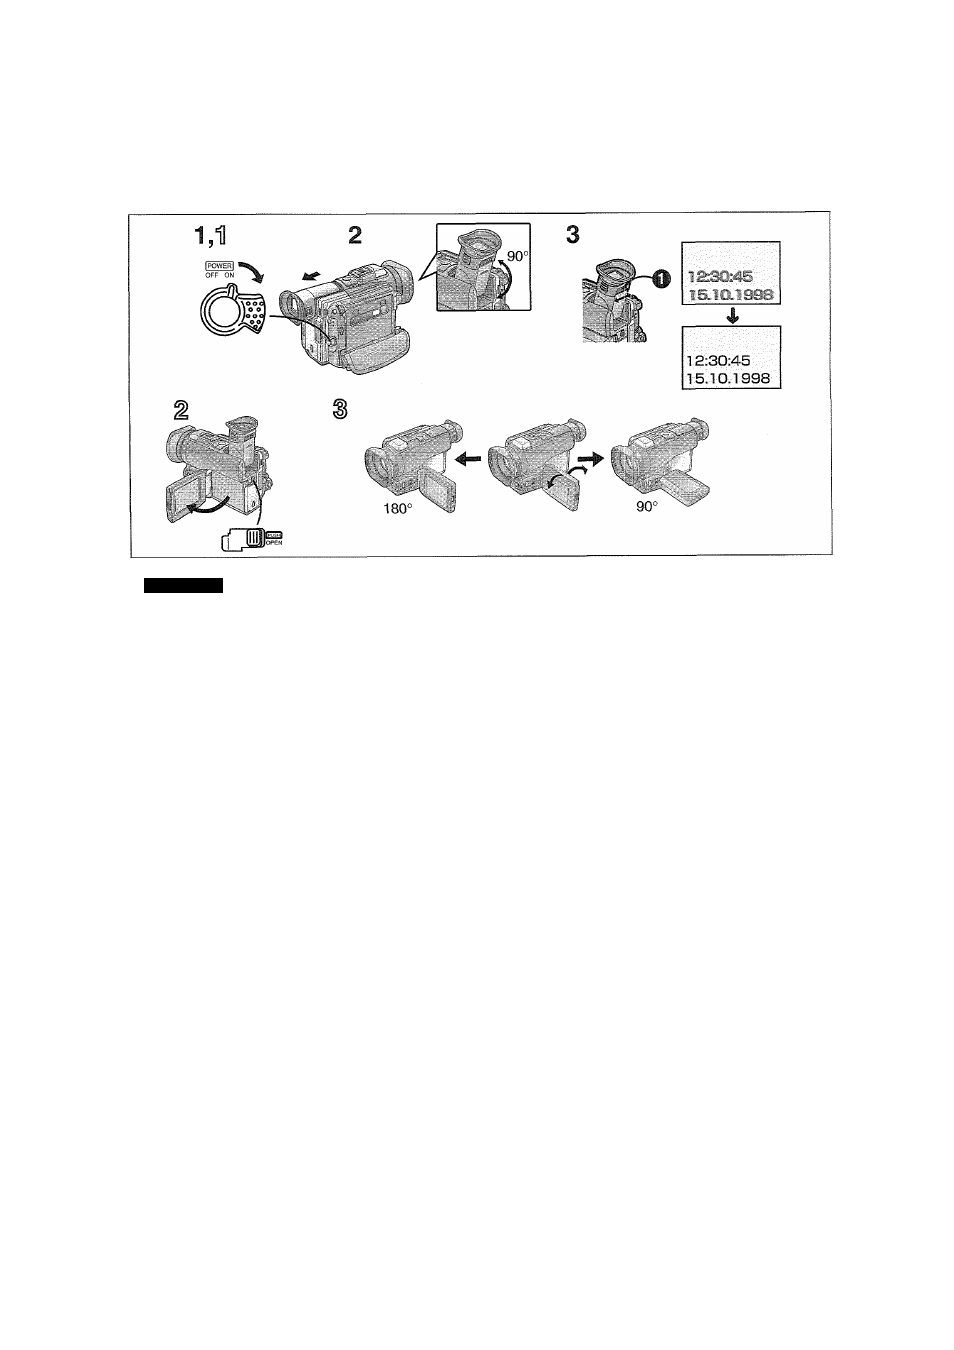
Benutzen des Suchers
Vor dem Benutzen des Suchers diesen präzis so auf die
Sehkraft Ihrer Augen abstimmen, daß die Anzeigen im
Sucher klar und deutlich sichtbar sind.
1
Den Schalter [POWER ON/OFF] auf
[ON] stellen.
2
Den Sucher nach hinten schieben.
Der Winkel des Suchers läßt sich nach oben
verstellen. Jedoch unbedingt zuerst den Sucher bis
zum Anschlag nach hinten schieben, bevor Sie ihn
nach oben schwenken.
3
Den Okularkorrektur-Regler
Q
nach links
oder rechts schieben, bis die Anzeigen im
Sucher klar und deutlich sind.
Sie können zudem die Helligkeit des Sucherbildes im
Menü regeln. (-» 126-130, 138)
Benutzen des LCD-Monitors
Sie können auch aufnehmen, während Sie das Motiv auf
dem geöffneten LCD-Monitor betrachten.
1
]
Den Schalter [POWER ON/OFF] auf
[ON] stellen.
1 Den Hebel [PUSH OPEN] schieben und
den LCD-Monitor in Pfeilrichtung um
ca. 90
°
öffnen.
Der Sucher schaltet automatisch ab.
Einstellen des Winkels
3 Den Winkel des LCD-Monitors dem
gewünschten Aufnahmewinkel
entsprechend einstellen.
^ Der LCD-Monitor läßt sich aus seiner normalen
senkrechten Stellung um maximal 180° nach oben und
vorne 0 und 90° nach unten © drehen. Ein
gewaltsames Drehen über diesen Bereich hinaus könnte
den Camerarecorder ernsthaft beschädigen.
• Sie können die Farbsättigung und Helligkeit des
LCD-Monitors im Menü regeln. {-¥ 126-130, 138)
Schließen des LCD-Monitors
Den LCD-Monitor gegen das Cameragehäuse schwenken,
bis der Hebel [PUSH OPEN] mit einem Klick einrastet.
Using the Finder
Before using the Finder, adjust it to your eyesight so that
the indications in the Finder are clear and easy to read.
1
Set the [POWER ON/OFF] Switch to
[ON].
2
Slide the Finder backward.
The angle of the Finder can be adjusted upward.
However, be sure to slide the Finder backward until it
stops, before turning it upward.
3
Adjust by sliding the Eyepiece
Corrector Knob Q.
You can adjust the brightness of the Finder on the
Menu. 126-130, 138)
Using the LCD Monitor
It is also possible to record while viewing the picture on
the opened LCD Monitor.
H Set the [POWER ON/OFF] Switch to
[ON].
3 Push the [PUSH OPEN] Lever and turn
out the LCD Monitor approximately 90°
in the direction of the arrow.
The Finder turns off.
Adjusting the Angle
3 Adjust the angle of the LCD Monitor
according to the desired recording
angle.
♦ The LCD Monitor rotates upward a maximum of
180° 0 and downward a maximum of 90° 0 from
its normal vertical position. Trying to forcefully
rotate it beyond this range could seriously damage
the Movie Camera.
• You can adjust the colour level and brightness of
the LCD Monitor on the Menu. (Hr 126-130, 138)
Closing the LCD Monitor
Push the LCD Monitor close until the [PUSH OPEN]
Lever locks with a click.
-26-