Orp - outputs menu - alarm relay 5.19 – Aquametrix SHARK-120/240 Controllers User Manual User Manual
Page 73
S
H
A
R
K
MULTI-PARAMETER CONTROLLER & ANALYZER USER’S MANUAL
ORP - Outputs Menu - Alarm Relay 5.19
ORP - Outputs Menu - Alarm Relay 5.19
Page 71
TO OUTPUTS MENU
DOWN
DOWN
DOWN
DOWN
DOWN
DOWN
DOWN
UP
DOWN
DOWN
DOWN
UP
DOWN
UP
DOWN
UP
DOWN
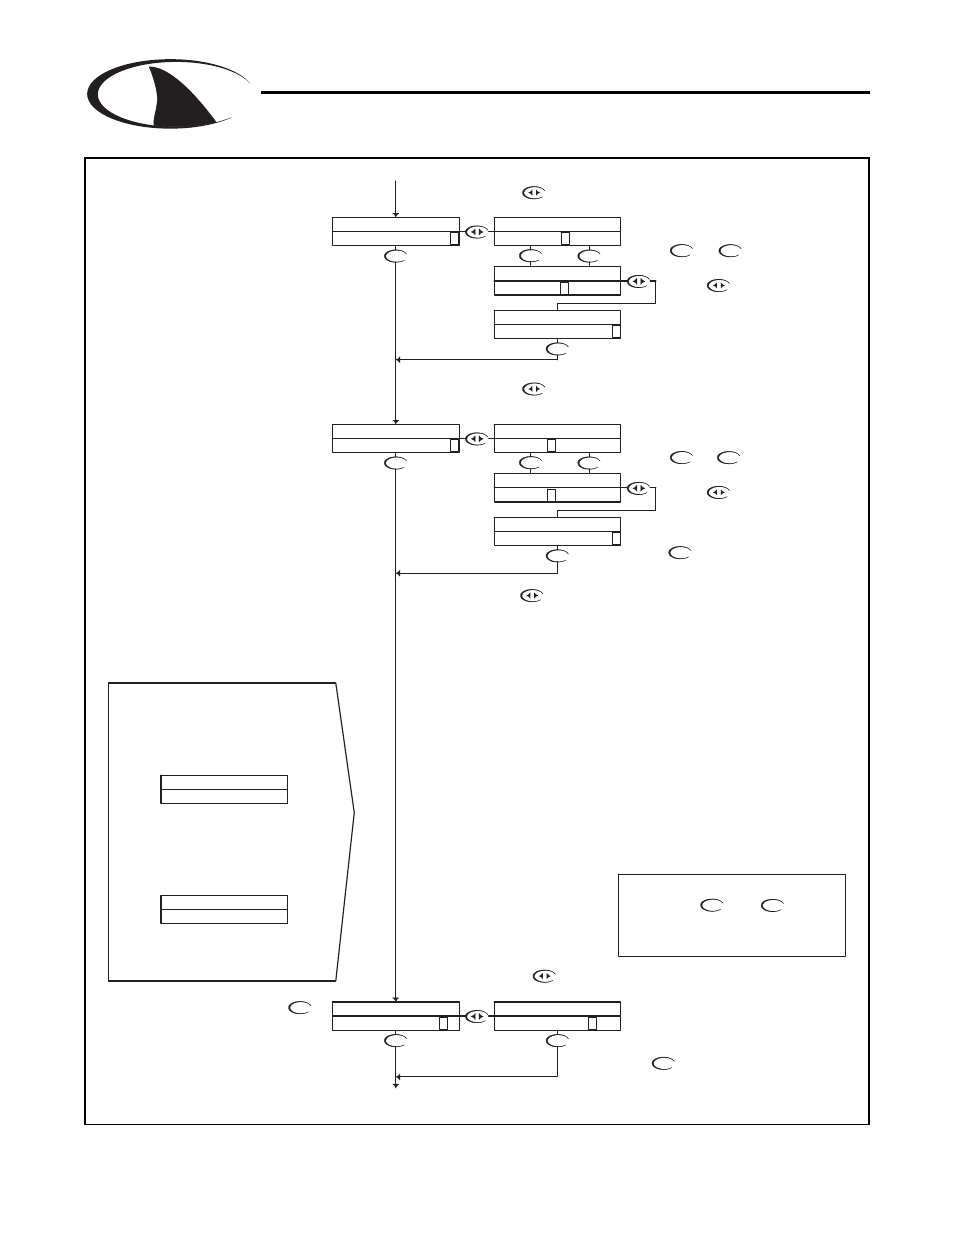
With "N" selected, pressing the
key will NOT store the selection, but
simply return to the OUTPUTS Menu.
This function is useful if you wish to view
the current selection without making any
changes.
Not stored
The FAIL SAFE feature is designed to reverse the
normal action of the relay.
When set to FAIL SAFE OFF, the relay will operate as a
normal relay, which means that when the relay is not
energized the NO contacts are open, and a device
connected via the NO contacts is turned off. When the
relay becomes energized the device turns on.
When the relay is set to FAIL SAFE ON, the normal
action of the relay is reversed. Thus the NO contact acts
as the NC contacts and the NC acts as the NO.
Therefore the device connected to the NC contacts will
be turned on when the relay on set-point is reached.
Actually the relay will be de-energized but because it is
acting in reverse the device will be turned on. When the
relay off set-point is reached the relay will energize and
the device connected to the NC contact will turn off.
The reason that the Fail Safe option would be used is to
have the device turned on in the event of a power
interruption.
The HIGH OFF set- point is the value that the must
reach in order to de-energize the alarm relay after it
has increased over and tripped the HIGH ON set-
point. This value must be lower than the HIGH ON
Set-point.
FROM HIGH ON
Then press the key to store the
selection and return to the OUTPUTS
menu
Stored
Use the and
keys to change the setting
UP
NOTE
PRESS THE AND KEYS
TOGETHER TO GO IMMEDIATELY BACK TO
RUN MODE
DOWN
the Y character.
Or press the key to highlight
If you wish to change the setting,
press the key once which will move the
cursor to the first character of the value to be
changed
Press the key to accept the
setting and move to the next
setting
Press the key once
which will move the cursor
back to the RH side of the
display.
If you wish to change the setting,
press the key once which will move the cursor
to the first character of the value to be changed
If you wish to change the setting,
press the key once which will move the
cursor to the first character of the value to be
changed
Use the and
keys to change the setting
Press the key once
which will move the cursor
back to the RH side of the
display.
If the Low On set-point is set higher than the factory
default Low Off set-point, when the user advances from
the low on set-point to the Low Off set-point the controller
will adjust the Low Off set-point to be equal to the Low
On set-point. If the user then tries to decrease the Low
Off set-point the Controller will display the Low Alarm
setup error screen.
This screen will be displayed for 10 seconds, then return
back to the setup screen that was previously displayed. The
same conditions apply to the High alarm set-points. Except
the High Off set-point must be lower than the High On set-
point. If the user tries to increase the High Off set-point
higher than the High On set-point the High Alarm setup
error screen will be displayed.
If the user sets the low on set-point and the low off set-
point equal to 0, it will disable the Low Alarm relay.
Similarly, setting the High On set-point and the HIGH
OFF set-point to 0 will disable the High Alarm.
ON SPT < OFF SPT
LOW ALARM
ON SPT > OFF SPT
HIGH ALARM
STORE? Y N
STORE? Y N
FAILSAFE OFF >
HIGH OFF 700 >
ALARM RELAY
ALARM RELAY
ALARM RELAY
ALARM RELAY
FAIL SAFE ON >
FAIL SAFE O N >
ALARM RELAY
ALARM RELAY
FAIL SAFE O FF >
HIGH OFF 850 >
HIGH OFF 85 0 >
HIGH OFF 70 0 >
ALARM RELAY
ALARM RELAY
ALARM RELAY
ALARM RELAY