Flow - outputs menu - alarm relay 7.17 – Aquametrix SHARK-120/240 Controllers User Manual User Manual
Page 127
Flow - Outputs Menu - Alarm Relay 7.17
Page 125
S
H
A
R
K
MULTI-PARAMETER CONTROLLER & ANALYZER USER’S MANUAL
Flow - Outputs Menu - Alarm Relay 7.17
DOWN
DOWN
DOWN
DOWN
DOWN
UP
UP
DOWN
DOWN
DOWN
UP
DOWN
DOWN
DOWN
DOWN
DOWN
DOWN
DOWN
DOWN
UP
NOTE
PRESS THE AND KEYS
TOGETHER TO GO IMMEDIATELY BACK TO
RUN MODE
DOWN
Press the key once
which will move the cursor
back to the RH side of the
display.
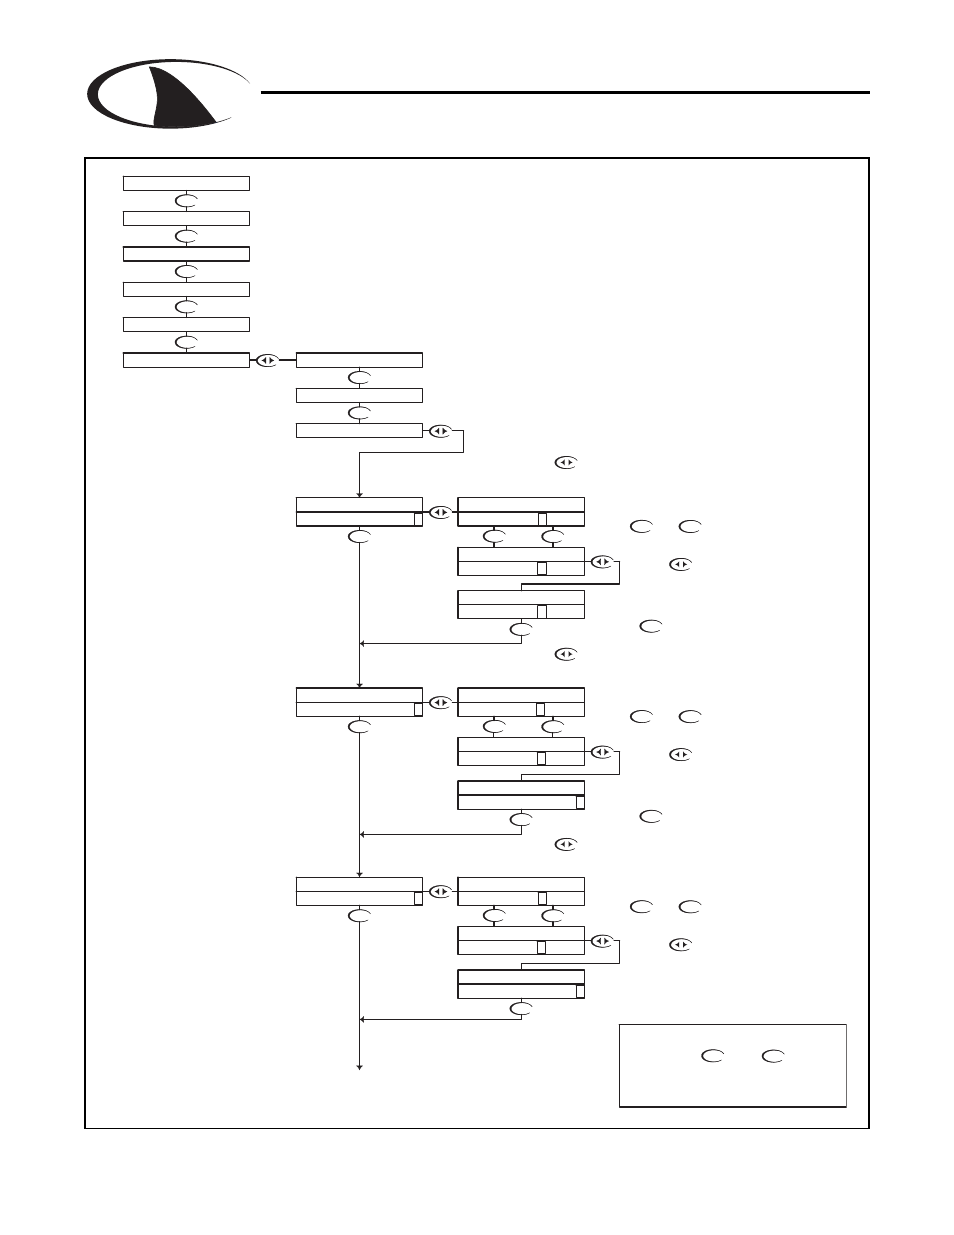
The ALARM RELAY will respond to both a rising and falling
process. The ALARM RELAY will act as a low alarm (falling
process) and a high alarm (rising process). Both relay bands will
have independently adjustable on and off set-points. If a low
alarm set-point is set at a value 20 for example, the off set-point
must be set higher. The controller will not let the user input a
value below 20. The same rule holds true for the high alarm.
The Alarm Relay can be configured for the following operations
-LOW ON Set-point
-LOW OFF Set-point
-HIGH ON Set-point
-HIGH OFF Set-point
-Failsafe
TO HIGH OFF
If you wish to change the setting, press the
key once which will move the cursor to the first
character of the value to be changed
The LOW OFF set point is the value that
the process must reach in order to de-
energize the alarm relay after it has
dropped below and tripped the LOW ON
set-point. This value must be higher than
the LOW ON Set-point.
The HIGH ON set-point is the high process
value that will cause the relay to energize.
This value can be set anywhere 0-100% of
Full Scale.
The LOW ON set point is the low process
value that will cause the relay to energize.
This value can be set anywhere 0-100%
of Full Scale.
If you wish to change the setting, press the
key once which will move the cursor to the first
character of the value to be changed
If you wish to change the setting, press the
key once which will move the cursor to the first
character of the value to be changed
DOWN
Press the key to accept the
setting and move to the next setting
UP
Use the and
keys to change the setting
DOWN
Press the key once
which will move the cursor
back to the RH side of the
display.
DOWN
Press the key to accept the
setting and move to the next setting
UP
Use the and
keys to change the setting
DOWN
Press the key once
which will move the cursor
back to the RH side of the
display.
UP
Use the and
keys to change the setting
DOWN
RUN MODE
HIGH ON
90.00
>
LOW OFF 30.00
>
LOW ON 25.00
>
HIGH ON 75.00
>
ALARM RELAY
ALARM RELAY
ALARM RELAY
HIGH ON 90.0 0
>
HIGH ON 75.0 0
>
LOW OFF 22.00
>
LOW OFF 22.0 0
>
ALARM RELAY
ALARM RELAY
ALARM RELAY
ALARM RELAY
ALARM RELAY
LOW OFF 30.0 0
>
LOW ON 20.0 0
>
LOW ON 20.0 0
>
LOW ON 25.0 0
>
ALARM RELAY
ALARM RELAY
ALARM RELAY
ALARM RELAY
OUTPUTS
UTILITIES
DIAGNOSTICS
CALIBRATION
SETUP
ALARM RELAY
RELAY A
RELAY B
TOTAL 0