Active channel, Figure 3.0-3 menu structure diagram – JVC CB100 User Manual
Page 39
Chapter 3—Operation
HJT Model 100 User's Guide
3-11
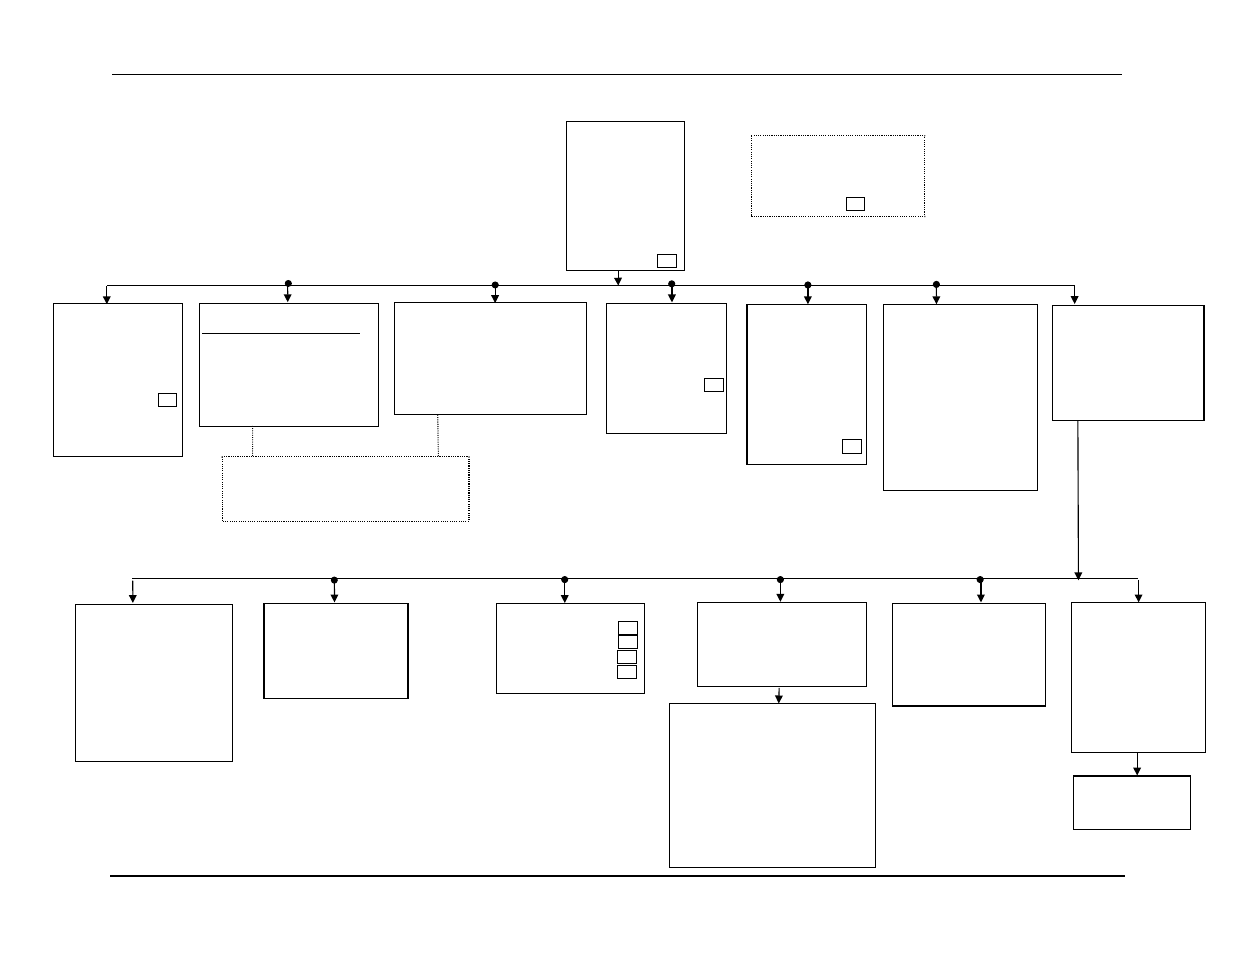
Figure 3.0-3 Menu Structure Diagram
M
AIN
M
ENU
1. P
ICTURE
2. C
HANNEL
3. S
OURCE
4. T
IMING
5. G
EOMETRY
6. C
ONVERGENCE
7. S
YSTEM
8. S
AVE
C
HANGES
9. F
ULL
M
ENUS
M
AIN
M
ENU
(Short Version)
1. P
ICTURE
2. C
HANNEL
3. S
AVE
C
HANGES
4. F
ULL
M
ENUS
1. T
EST
P
ATTERNS
1. Off (External)
2. Registration Crosshatch
3. Contrast/Brightness
4. Variable Flat Field
5. Standard Crosshatch
6. Focus
7. Grayscale/Pluge
8. Linearity/Centering
9. Grayscale (reversed)
2. P
ROJECTION
L
ENS
(Zoom and Focus)
NOTE: If a fixed throw
distance lens is used,
the Zoom does not
function.
2. C
HANNELS
# Name VIC Sources
0
Internal
1
Facto
1.1
VGA
XGA
SXGA
81.1kHz
1. P
ICTURE
1. Brightness
2. Contrast
3. Tint
4. Color
5. Sharpness
6. Black Enhance
7. VIC Setting...
3. S
OURCES
#
Name
H
V
I
0
Internal
33.3kHz 59.3Hz I
1. VGA
31.5kHz 60Hz
2. XGA
48kHz
60Hz
3. SXGA
64kHz
64Hz
4. 81.1kHz 81.1kHz 76Hz
Port A/B Device
Device:
1. None (Default B)
2. ANSI Terminal (Default-A)
3. Video Switcher (one only)
4. Comm Controller (1 port only)
5. Tethered Remote
Speed:
1. 2400
2. 9600 (Default-A & B)
3. 19200
4. C
OMMUNICATIONS
S
ETUP
1. Port A Device
2. Port A Speed
3. Port B Device
4. Port B Speed
5. F
ACTORY
A
DJUSTMENTS
1. ILA
®
Bias
2. ILA
®
Sensitivity
3. CRT Focus
4. H/V Dynamic Focus
6. M
AINT
.
U
TILITIES
1. Status
2. Display System
Error log
3. Reset System Error
log
4. Export Configuration
5. Import Configuration
6. Reset Lamp Timer
5. G
EOMETRY
1. Size
2. Centering
3. Keystone
4. Pincushion
5. Bow
6. Skew/Rotate
7. Linearity
8. Edge Linearity
9 Reg Enable
9. D
IAGNOSTICS
1. Display Error Log
2. Reset Error Log
3. P
REFERENCES
1. Numbered Menus
2. Display Logo
3. Shutters on Hide
4. Focus Enable
7. S
YSTEM
1. Test Patterns
2. Projection Lens
3. Preferences
4. Communications Setup
5. Factory Adjustments
6. Maint. Utilities
4. T
IMING
1. Phase
2. T/L Blanking
3. B/R Blanking
4. Clamp Type
5. VTR Mode
6. C
ONVERGENCE
1. Registration
2. Threshold Uniformity
3. Sensitivity Uniformity
4. Threshold Offset
5. Sensitivity Offset
6. Black Level (G2)
7. Reset
Registration
Threshold
Sensitivity
Pressing M (M
ODE
) on the keyboard when
in the C
HANNELS
or
S
OURCES MENU
displays
a sub-menu to Edit, Copy, Cut or Paste any
channel or source
.
KEY:
Items marked with may be accessed directly with Technician Remote keys.
Checked boxes are shown in the default mode (
"
=ON).
Navigating the Menu:
Press M
ENU
on the Remote (or spacebar on a PC) to display
the M
AIN
M
ENU
. Press the number of the menu item needed
(or use arrow keys to scroll to the item, then press E
NTER
).
From the submenus, press the number of the selection
wanted. To move side to side within any group (such as
from the P
ICTURE MENU
to the C
ONVERGENCE MENU
or from
the P
REFERENCES MENU
to the T
EST
P
ATTERNS MENU
) press
the right or left arrow keys.
"
"
"
"
"
"
"
"