Switch and key operation overview, Switc h and ke y operation o ver vie w, Cursor: appearance and indication – Zoom R16 User Manual
Page 16: Various switches & controls
Switc
h and ke
y operation o
ver
vie
w
15
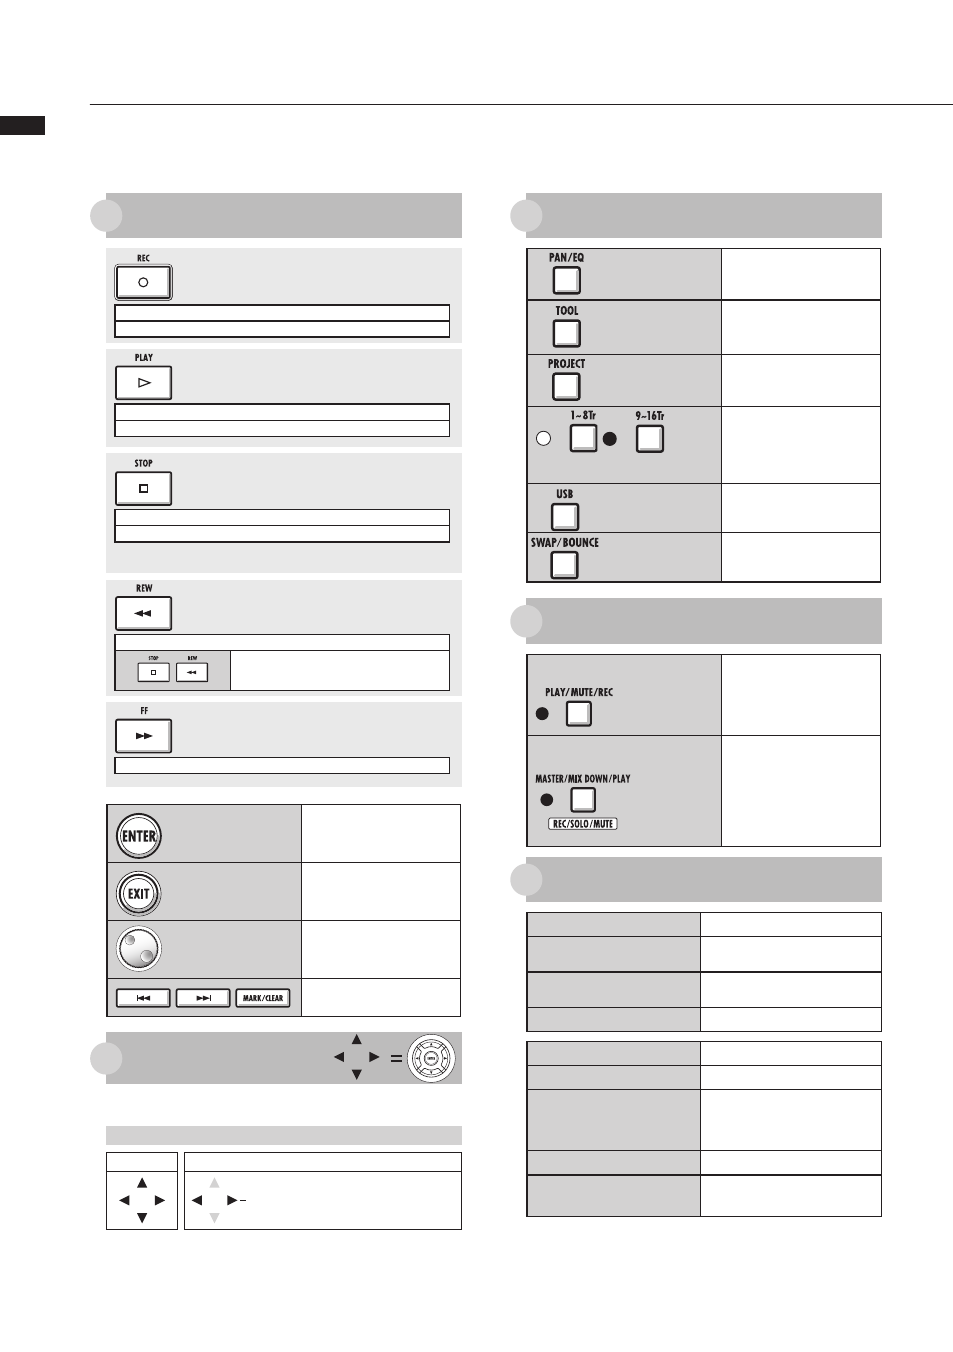
Switch and key operation overview
Here we explain how to use the keys of the R16 and their functions. Please look at the display for keys
that have icons shown on the screen.
[ENTER] key
Confirms selections
[EXIT] key
A quick press returns to the
previous step, and a long press
returns to the top screen.
[DIAL]
Use to change and move among
menus and numbers.
Ref.: Mark-related keys see P.27.
Cursor:
Appearance and indication
Display
Appearance
The display shows cursor directions
Movable in all directions
Display
Black: direction explained
Gray: movable directions
No color: not effective
Manual notation
Movement in
the menu
Use the cursor to move up, down, left and right to choose different function items.
The appearance of the display and its notation in the manual is shown above.
Control section
[PAN/EQ] key
Press to access track
mixer settings
→
P.41
[TOOL] key
Opens TOOL menu
(TUNER, METRONOME,
SYSTEM and SD CARD)
[PROJECT]
key
Opens PROJECT menu
[1-8Tr] & [9-16Tr] keys
Select tracks 1-8 or
9-16 with light showing
selected tracks
[USB] key
Opens USB menu
[SWAP/BOUNCE]
key
Opens SWAP/BOUNCE
menu
This key puts the R16 in recording standby mode.
When in recording standby this key stops recording standby.
Functions only when tracks are in recording standby.
[REC] key
[STOP] key
When recording this key will stop the recording.
This key stops playback.
[REW] key
Rewind.
Press [REC] and [REW] keys at the same time
to return to the top of the song.
[FF] key
Fast forward.
Transport section
Fader section
TRACK 1~8
(9~16) status
keys
Change track ready status
Green: PLAY (playback)
No light: MUTE (mute)
Red: REC (record)
MASTER
status key
Change MASTER track
status
Green: PLAY (playback)
No light: MASTER (not
playback/recording ready)
Red: MIX DOWN
(recording)
Various switches & controls
[POWER] switch
Turns power ON & OFF
[Hi-Z] switch
Turns Hi-Z connection on/off (only for
INPUT 1).
[MIC] switch
Turn built-in microphones on/off
(signals to INPUT 7 & 8).
[METRONOME] switch
Set metronome output.
[GAIN] controls
Adjust input sensitivity
[PEAK] indicators
Light at the moment of maximum input
[BALANCE]
When [METRONOME] is set to
“PHONES ONLY” during recording,
this adjusts the balance of the pre-
MASTER fader and metronome signals
Level meters
Show recording/playback levels
[METRONOME]
indicator
Flashes in time with the count
During audio interface use, control surface functions (shown in boxes below
keys) are provided by the row of keys starting with AUTO PUNCH I/O (F-1 to
F-5), as well as the [1-8Tr] and [9-16Tr] keys (
MIX DOWN/PLAY] (REC/SOLO/MUTE) key.
[PLAY] key
This key starts playback
.
When in recording standby this key starts the recording.