Figure 4-2: align the cooling kit – IEI Integration KINO-DQM871 User Manual
Page 76
KINO-DQM871 Mini-ITX SBC
Page 60
Step 2:
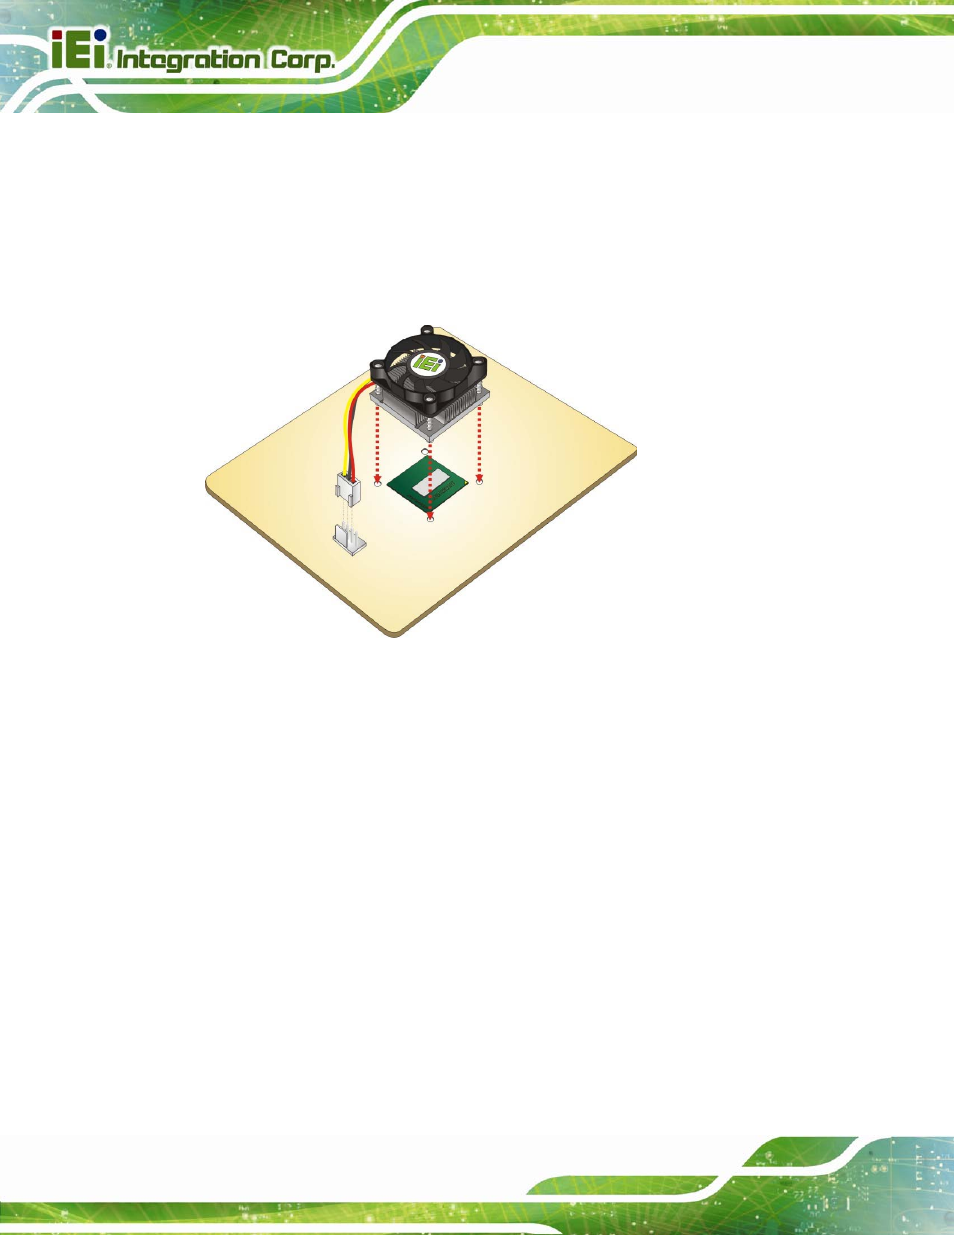
Properly orient the cooling kit. The CPU fan cable must not interfere with the
fan or other moving parts. Make sure the cable can be routed away from the
moving parts.
Step 3:
Properly align the cooling kit. Line up the four screws with the screw holes on
the support bracket below the board (Figure 4-2).
Figure 4-2: Align the Cooling Kit
Step 4:
Place the cooling kit onto the CPU. Push down the fan with some pressure to
secure the cooling kit with the support bracket. See Figure 4-3.
Step 5:
Tighten the screws. Use a screwdriver to tighten the four screws. In a diagonal
pattern, tighten each screw a few turns then move to the next one, until they are
all secured. Do not overtighten the screws. See Figure 4-3.
Step 6:
Connect the fan cable. Connect the cooling kit fan cable to the fan connector
on the board. Carefully route the cable away from heat generating chips and fan
blades.
Step 0:
- SPCIE-5100DX (180 pages)
- SPCIE-C2060 v1.01 (200 pages)
- SPCIE-C2060 v2.12 (212 pages)
- SPCIE-C2160 (204 pages)
- SPCIE-C2260-i2 (217 pages)
- ROCKY-3786 v4.0 (175 pages)
- ROCKY-3786 v4.10 (147 pages)
- PCIE-Q350 v1.00 (272 pages)
- PCIE-Q350 v1.12 (250 pages)
- PCIE-Q350 v1.20 (250 pages)
- PCIE-Q350 v1.30 (213 pages)
- PCIE-Q57A (159 pages)
- PCIE-G41A2 (151 pages)
- PCIE-Q670 v1.03 (206 pages)
- PCIE-Q670 v2.00 (205 pages)
- PCIE-H610 (181 pages)
- PCIE-Q870-i2 (217 pages)
- IOWA-LX-600 (159 pages)
- PCISA-945GSE v1.01 (207 pages)
- PCISA-945GSE v1.10 (190 pages)
- PCISA-9652 v1.00 (232 pages)
- PCISA-9652 v1.01 (232 pages)
- PCISA-PV-D4251_N4551_D5251 (145 pages)
- PICOe-945GSE (197 pages)
- PICOe-GM45A (198 pages)
- PICOe-PV-D4251_N4551_D5251 v1.00 (154 pages)
- PICOe-PV-D4251_N4551_D5251 v1.10 (154 pages)
- PICOe-PV-D4251_N4551_D5251 v1.11 (155 pages)
- PICOe-B650 (156 pages)
- PICOe-HM650 (174 pages)
- HYPER-KBN (139 pages)
- SPXE-14S (3 pages)
- SPXE-9S v1.00 (5 pages)
- SPXE-9S v1.1 (6 pages)
- SPE-9S v1.00 (4 pages)
- SPE-9S v1.1 (5 pages)
- SPE-6S (3 pages)
- SPE-4S (4 pages)
- PE-6SD3 (4 pages)
- PE-6SD2 v4.0 (4 pages)
- PE-6SD2 v2.10 (3 pages)
- PE-6SD (3 pages)
- PE-6S3 v1.0 (2 pages)
- PE-6S3 v4.0 (4 pages)
- PE-6S2 (4 pages)