61 menu descriptions - helicopter – HITEC Eclipse 7 Pro User Manual
Page 63
61
Menu Descriptions - Helicopter
a straight line from 0 to 100% passing through 50% at
hover (center).
2. Be sure you’re in the desired flight condition by moving
the Flt. Mode and Flt. Cond switches to their proper
position. Remember, you can input separate, independent
throttle curve settings for each flight condition!
3. You begin at set point #1, idle.
The numeral 1 will be flashing in the display, and a value
of 0% should be shown.
Press the Data +Increase
or -Decrease key to
change the setting to your desired value.
4. When you’re finished with Point 1, move to the next
point with the Cursor Right key. Flashing Numeral 2 indicates
you are setting the value for Point 2.
Note that the function is inhibited (Inh) to start with.
MX.SS Mix Switch Select
See page 39
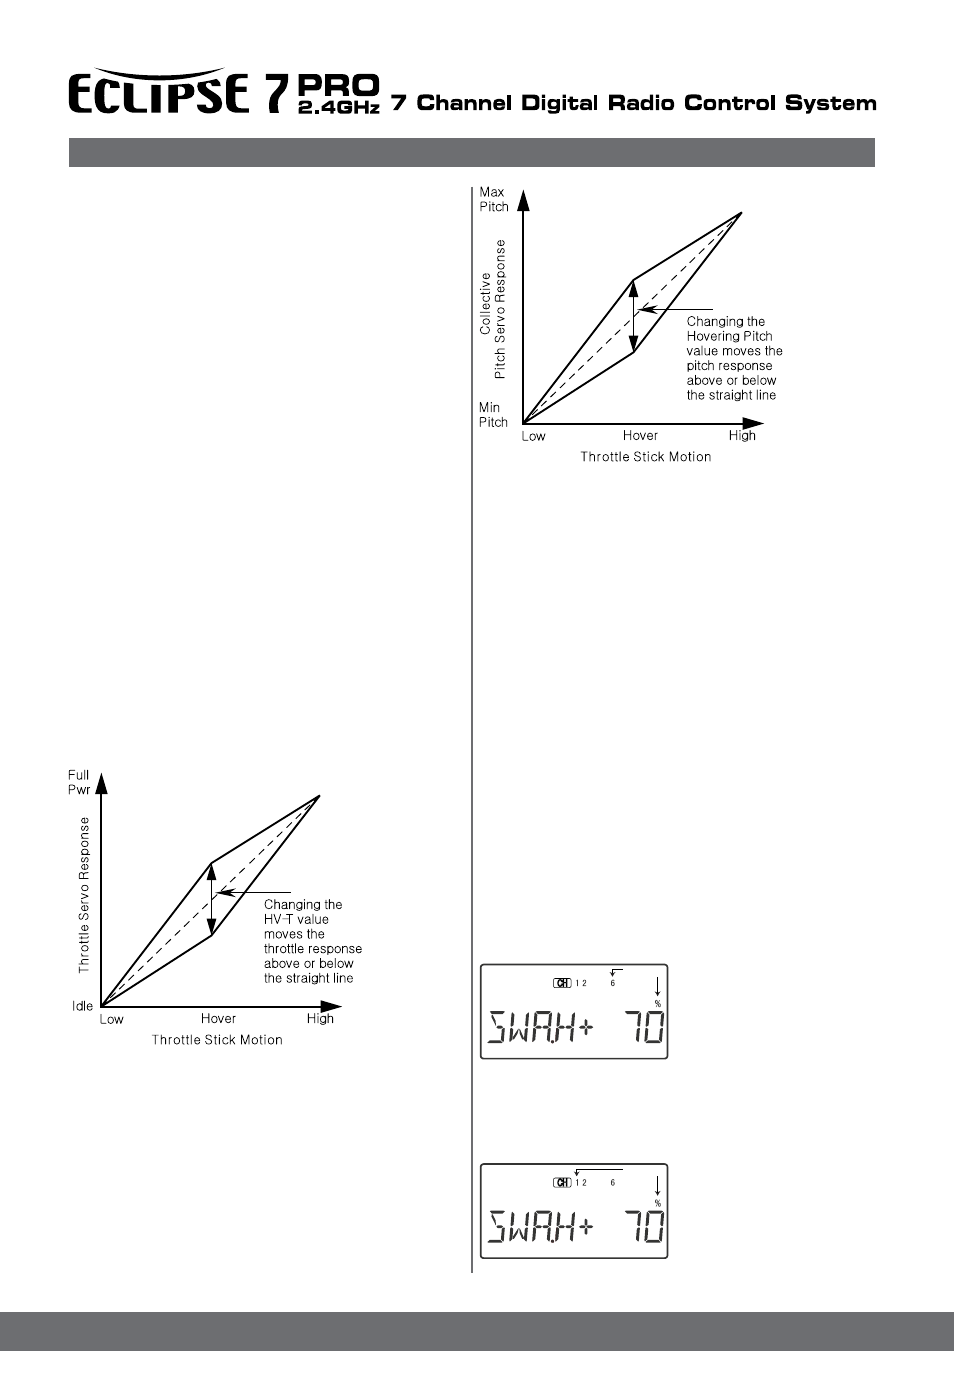
Hovering Pitch Adjustment Knob ( VR 2 )
The Hovering Pitch Knob may be used to trim the collective
pitch servo(s) near hover without affecting throttle. Like
hovering throttle, it’s handy to make up for changes in rotor
speed caused by variations in temperature, humidity, or other
conditions. You can adjust the hovering pitch value simply by
moving the Hovering pitch Knob ( VR 2 ). Like hovering
throttle, this lever only works near hover and tapers off at
either
end of throttle. Center this lever before you set neutrals or
input throttle curves.
Hovering Throttle Adjustment Knob ( VR 1 )
The Hovering Throttle Knob may be used to adjust the throttle
servo’s position around hover without affecting main rotor
pitch.
It’s handy to make up for changes in rotor speed caused by
variations in temperature, humidity, or other conditions. To
change the hovering throttle setting, simply move the Hovering
throttle Knob ( VR 1 ) to get the desired setting. As shown
in the figure, moving the lever has the largest effect in the
hovering region and leaves the endpoints alone. Center this
lever before you set neutrals or input throttle curves.
Setting Up The Swashplate
1. Consult your model’s setup instructions. If three servos are
needed to move the swashplate in a 120°140°or 180° CCPM
set-up, go to the model setup instructions (page 21) and
select the 120°140°or 180° swash type.
2. With all the servos hooked up, and the transmitter and
receiver turned on, move the throttle/collective stick up and
down. The swash should move up and down with no
rotations. Move the aileron stick left and right. The swash
should tilt left and right without pitching or rising. Move the
elevator stick. The swash should tilt fore and aft with no
rotations. If there are rotations when collective is moved, or
the swash moves up and down with aileron or elevator, you
need to adjust the settings in the swash menu.
3. If the servos do not all respond in the same direction for
collective or opposite directions for aileron and elevator, you
will need to reverse one or more of them in the reversing
menu (REV). It may take a little trial and error trying different
combinations of normal and reverse rotation to get the servos
to respond properly. Don’t worry about the direction they
respond, just that they all move the same for collective and
tilt for aileron and elevator.
4. Call up the swash screen by repeatedly pressing one of the
Up Down Edit buttons until the SWAH window appears.
The function is automatically active when you select 120’,
140°or 180°mixing in the model setup menu.
5. If all the servos raise the
swash with increasing collec-
tive, go to the next step. If they
lower the swash, press the
Cursor Right key twice to get to
the collective setting menu
(the numeral 6 will be flashing). Now press the Data
-Decrease key until the sign is reversed in front of the
percentage value. Now the swash should properly respond
to collective. If you’ve done the wrong thing, you can reset
the percentage by pressing the Active/Inhibit (Clear) key.
6. If all the servos tilt the swash
to the right with right aileron
stick, go to the next step. If they
tilt the swash to the left,
press the Cursor Right key
once
Flashing
Flashing